Are you tired of others hotlinking your images? Do you want to prevent hotlinking on your WordPress website?
Stealing content is terrible, but hotlinking it on another website can be even worse. Because not that only they are using your content without your consent, but they are using your server resources to hotlink the content.
If others hotlink your content, it will severely impact your website speed since many of your server resources are going for the stolen content.
In this article, you learn what hotlinking is, why you need to disable hotlinking, and how to prevent hotlinking on your website.
What is Hotlinking?
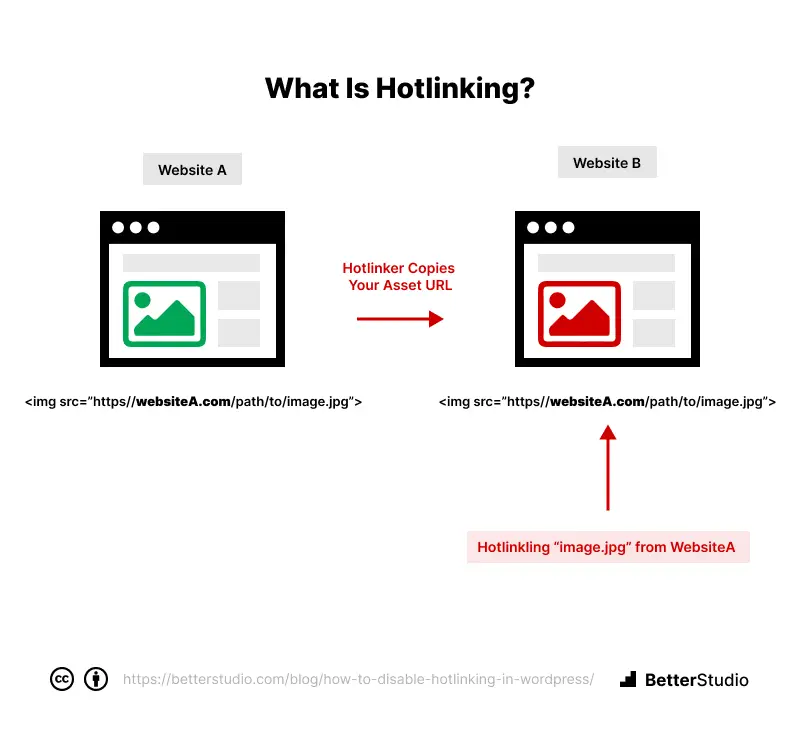
The process of loading photos, videos, or entire pages from another website onto your own is known as hotlinking. The images will show on your website, but their original sources will not be altered.
Hotlinking is stealing your website’s assets and media and using your bandwidth to use it on their website. Though it is very convenient for the hotlinker, it is really theft since it uses the resources of the hotlinked site. Disabling hotlinking is one of the primary methods for preventing content theft.
In other words, someone takes the source code of a piece of your media and links directly to their site, whether it’s another web designer or a blogger posting on another site. Links could lead to images, videos, or other visual media hosted on your site.
Rather than uploading photographs to their own WordPress hosting space or server, they link to yours and show them on their website. They do not host our media on their servers.
If taking your site’s bandwidth wasn’t bad enough, hotlinking often constitutes copyright infringement.
Hotlinkers often use media without your consent or the appropriate licenses. If this occurs, they are also not attributing the content to the original creator or owner.
One shocking statistic about image theft is that about 85% of published images online are stolen! (image theft statistics).
How to Find Out Your Site Images Are Hotlinked
It takes time and effort to discover whether your photograph has been stolen. The time it takes for your website to load a page is one indicator of this. However, there are other causes for a slow website, so how can you be certain that it is due to hotlinking?
You can use different methods to identify and be sure about this problem. For example, you can use Google image search to find out whether websites are hotlinking your images and use a WordPress content protection plugin and use the hotlinking protection feature to disable it.
The easiest way to find out is to use Google Images by following these steps.
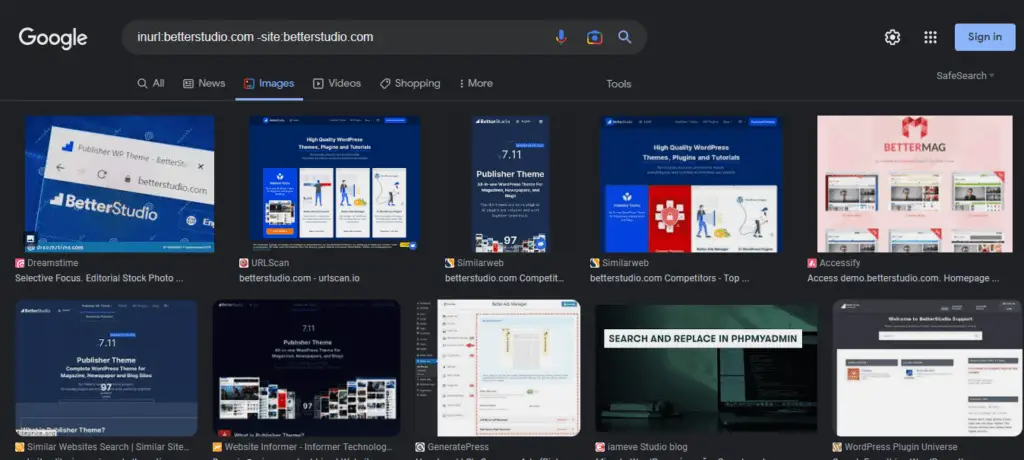
Step 1: Add the following command in the google image:
inurl:yourwebsite.com -site:yourwebsite.comEnter the URL of your website instead of yourwebsite.com.
Step 1: The result will be the images that load from your website host minus the ones that are actually on your website.
Here is a picture of our website, www.betterstudio.com, and our URL list for other websites.
This feature is not 100% accurate, and some images are not hot-linked, but you can check that out by the opening each website.
It can be time-consuming, but I recommend you try it once for your site. You will be surprised at how many images are currently hotlinked from your site! So in the rest of this article, I help you to prevent hotlinking on your website.
How to Protect Your Site Content From Getting Hotlinked
The only way to ensure no one can hotlink your media to their website is to use a Hotlink Protector.
In this article, I will show you different ways to protect your website’s media from getting hotlinked.
Method 1: Disable Images Hotlinking in WordPress
Image hotlinking is a common way to use your photos without your consent. This is a severe issue that you should prevent since, besides using your images, they also use your host resources to load them on their website.
Note that when you purchase a license to use an image on your website, you don’t have the right to share or sell that image, so when someone uses hotlinking to use your picture with your license on their website, you might also get in trouble.
For disabling image hotlinking, I strongly suggest the WPShield Content Protector plugin that offers robust protection against image hotlinking that you can use and ensure your images are safe. Also, this plugin offers 15 different types of protectors to keep your content safe and prevent image theft on WordPress.
To disable the hotlinking of images in WordPress, follow these steps:
Step 1: Download WPShield Content Protector.
Step 1: Install pluign in Plugins -> Add new in WordPress dashboard.
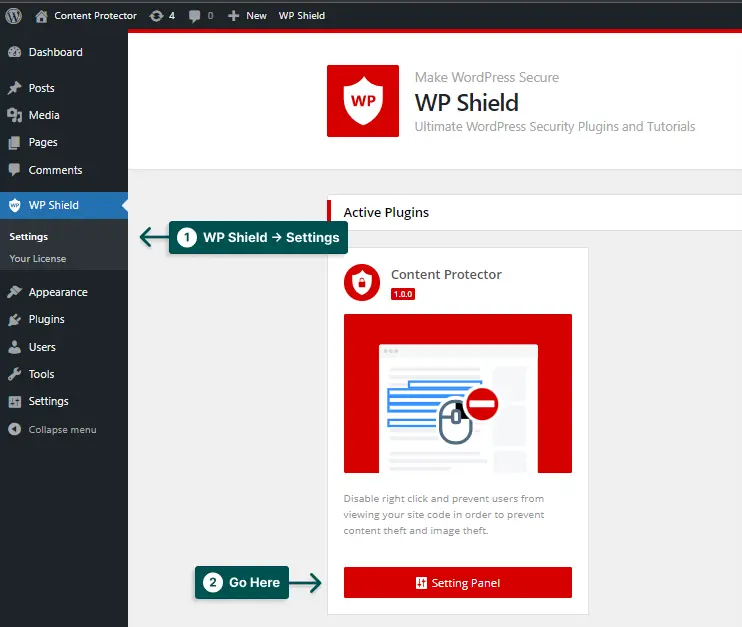
Step 1: Open WP Shield → Settings.
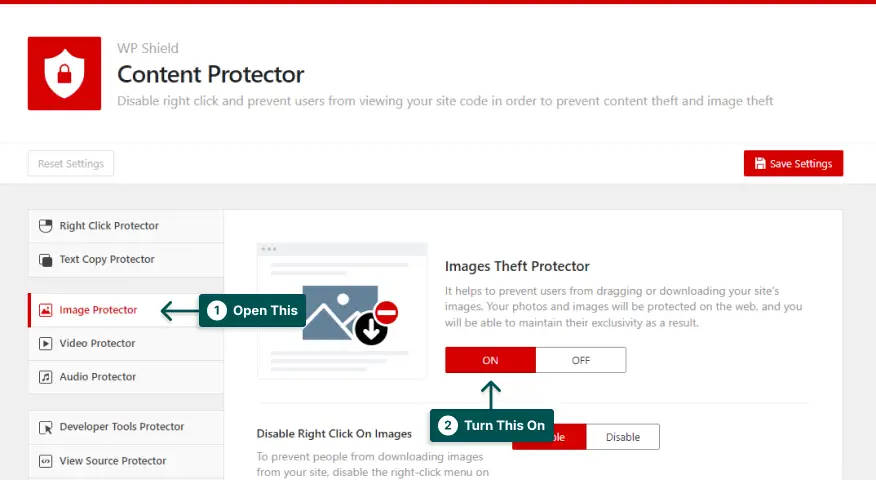
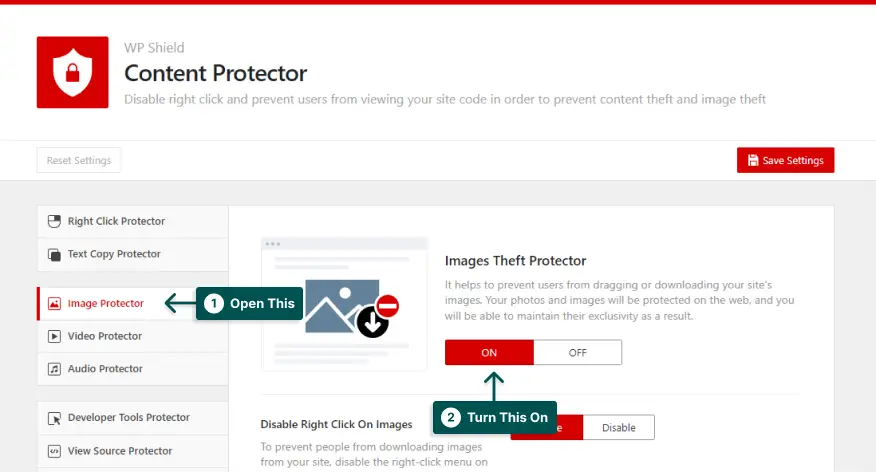
Step 1: Open Image Protector and enable the Images Theft Protector.
Step 1: Turn on Hotlink Protection for Images.
When this protector is enabled, if someone uses your image’s link to load them on their website, it won’t load.
WPShield Content Protector also offers options like disabling right-click or limiting right-click menu and removing links surrounding your images that you might be interested in.
Method 2: Disable iFrame Hotlinking in WordPress.
Some users might use your posts and page URL to embed them into other websites. This option is available on WordPress, so they don’t need coding knowledge.
Hotlinking your pages will take a lot of resources from your website’s host, and you should ensure no one is allowed to do it also, it can create security problems because hotlinkers can use it to fake your site!
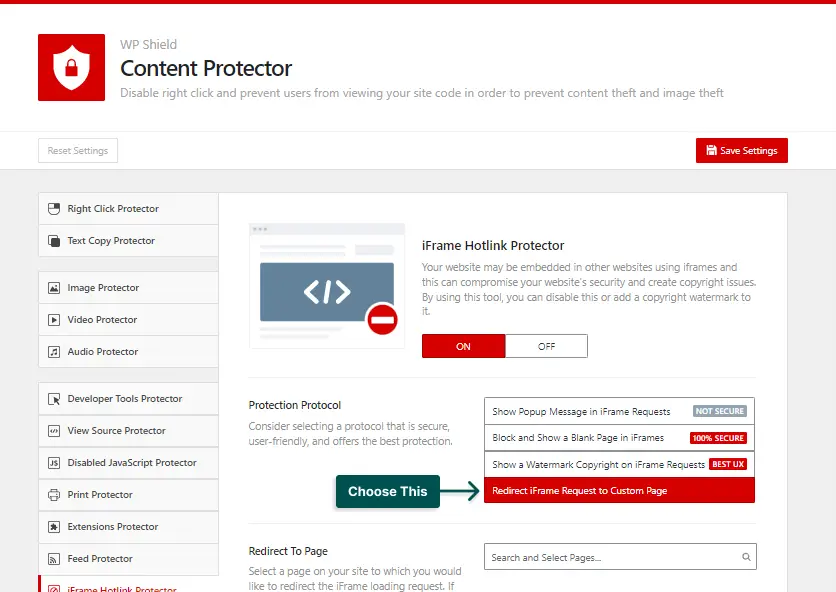
WPShield Content Protector offers four different protocols to prevent iFrame hotlinking. These protocols have different levels of security.
1. Show Popup Message in Hotlinking Requests
The first level of protection is to show a popup message on the requested iFrame, which has a lower security level but better UX for visitors.
To show a popup message on iFrame hotlinking, do the following steps.
Step 1: Download WPShield Content Protector.
Step 1: Go to your WordPress dashboard and install it in Plugins → Add New.
Step 1: Go to WP Shield → Settings.
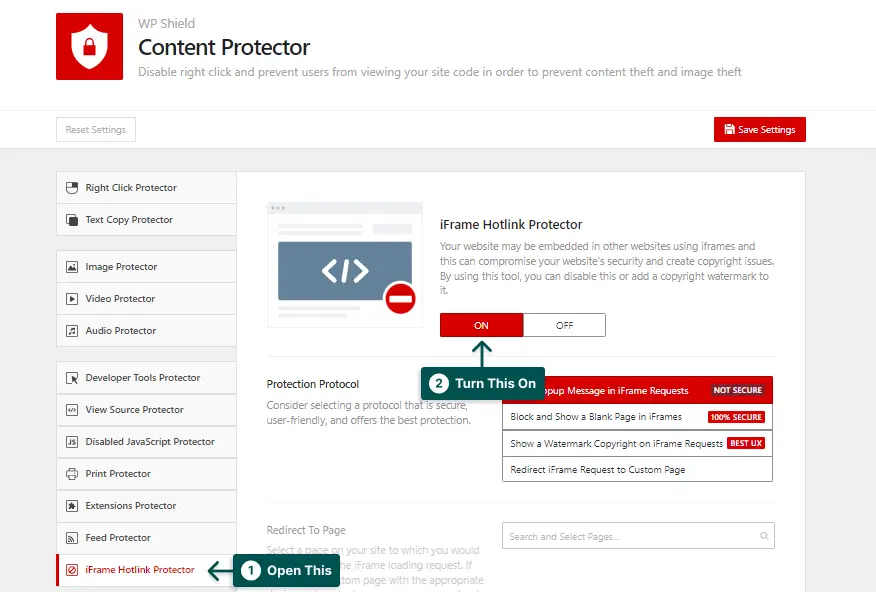
Step 1: Open iFrame Hotlink Protector and enable the iFrame Hotlink Protector.
Step 1: Choose Show Popup Message in iFrame Requests as the Protection Protocol.
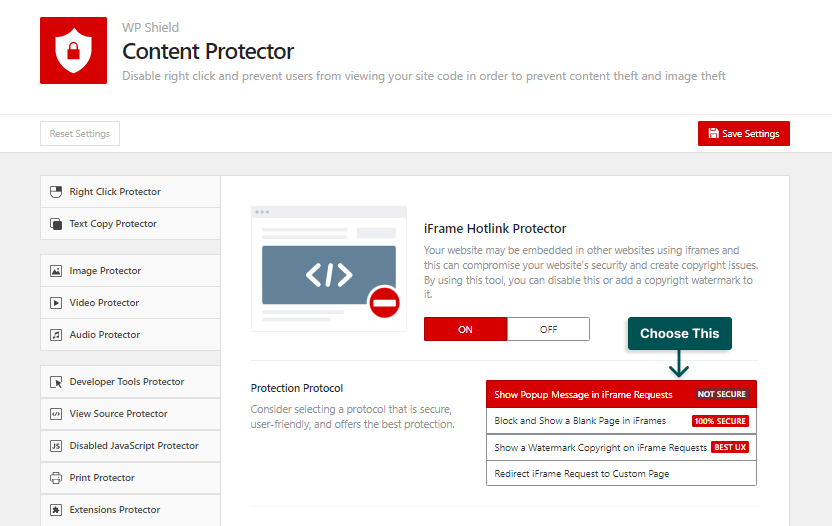

This protection shows a popup message on the iFrame request.
2. Blocking Hotlinking Requests Completely
Another security level is blocking the iFrame hotlinking request, which is secure and removes loads and resource usage completely but could make problems for loading your site in embedded blocks while they are good for your site.
If you want to block the iFrame request, follow these steps.
Step 1: Go to WP Shield → Settings.
Step 1: Open iFrame Hotlink Protector and enable the iFrame Hotlink Protector.
Step 1: Choose Block and Show a Blank Page in iFrames as the Protection Protocol.
This option shows a blank page on the hot-linked iFrame request.
3. Watermarking Hotlinking Requests
If you want better UX on your website besides disabling iFrame hotlinking, you can add a watermark to the hotlinked iFrame.
To add a watermark on the iFrame hotlink, follow these instructions:
Step 1: Go to WP Shield → Settings.
Step 1: Open iFrame Hotlink Protector and enable the iFrame Hotlink Protector.
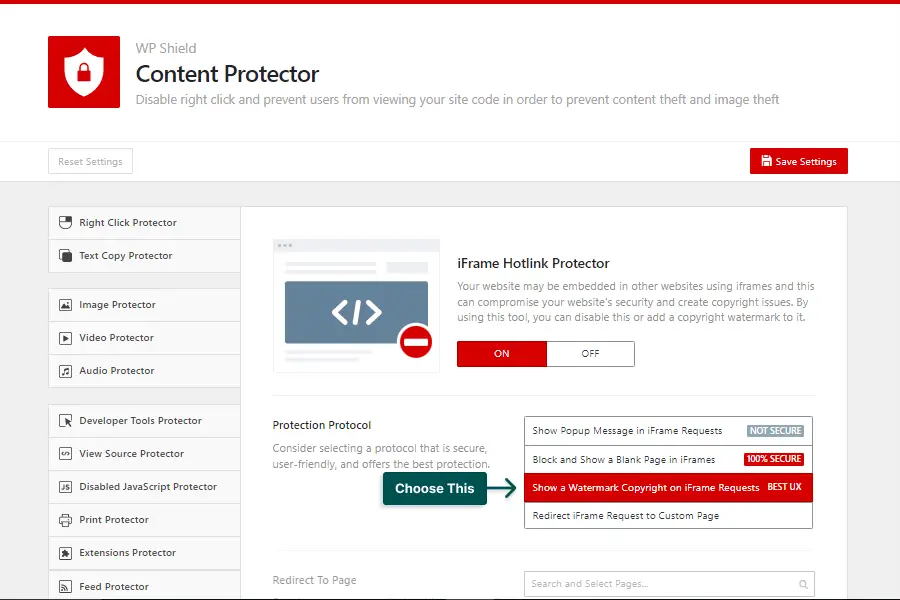
Step 1: Select Show a Watermark Copyright on iFrame Requests as the Protection Protocol.
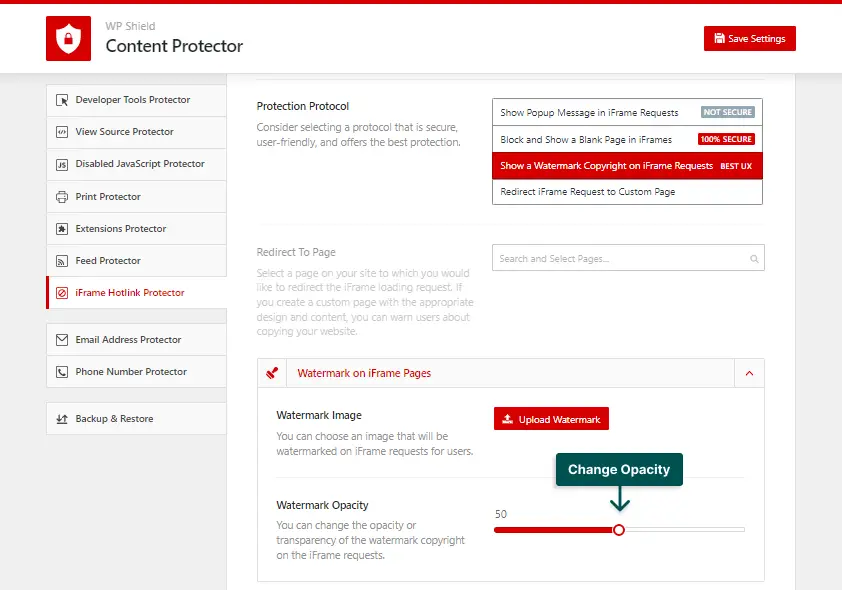
Step 1: Select an image in Watermark Image to show as the watermark.
Step 1: Choose the image opacity in Watermark Opacity.
Important Note: This option displays a custom watermark on iFrame hotlink requests and offers a good UX and also you can use it to promote your brand and aware the visitors on hotlinker website that they are seeing your website inside iframe.
4. Redirecting Hotlinking Requests
Another interesting option of the WPShield Content Protector is redirecting iframe hotlinking requests to another page or URL.
By using this method, you can use WordPress page builders like Elementor or Visual Composer to create a custom page to aware the visitors of the hotlinker website that they are seeing your website inside an iframe.
To redirect the iFrame Hotlink request, follow these steps:
Step 1: Go to WP Shield → Settings.
Step 1: Open iFrame Hotlink Protector and enable the iFrame Hotlink Protector.
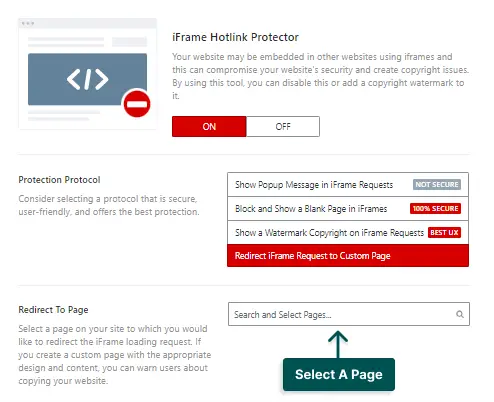
Step 1: Choose Redirect iFrame Request to Custom Page as Protection Protocol.
Step 4: Select the page to which you want iFrame hotlinks to get redirected in the Redirect To Page section.
Using this option, all the requested iFrame hotlinks from your website get redirected to your chosen page.
Method 3: Disable Videos Hotlinking in WordPress
Some might use your video’s link to use them on their website. You probably don’t want this to happen if you don’t have a streaming website like Youtube.
Videos are usually heavier, and if someone hotlinks your videos on their website, it is using your host resources besides your video, so you need to prevent video hotlinking.
WPShield Content Protector plugin offers video protection that disables video hotlinking.
To Prevent video hotlinking, follow these steps:
Step 1: Go to WP Shield → Settings.
Step 1: Open Video Protector and enable the Video Download Protector.
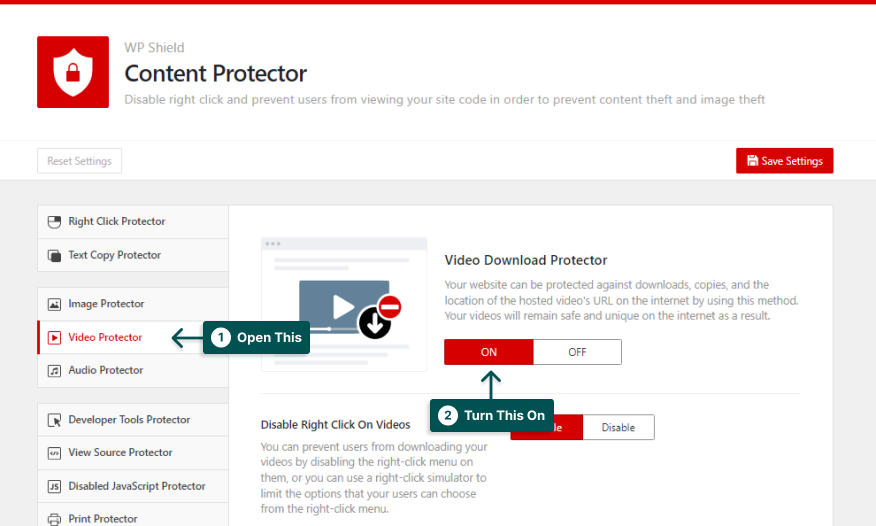

Step 1: Enable Hotlink Protection for Videos.
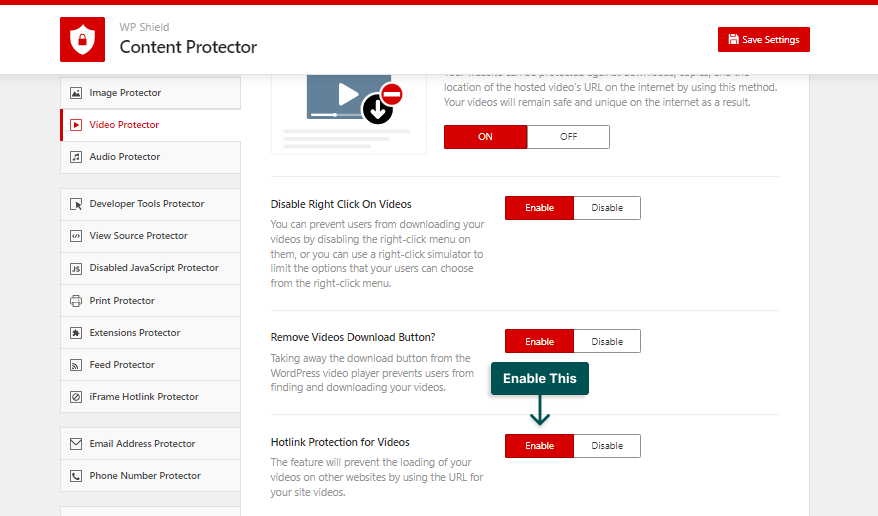

Now, if someone tries to load your videos with its link, it won’t be loaded.
Method 4: Disable Audio and Music Files Hotlinking in WordPress
If you upload songs and audio on your website, it is your big concern to protect them. If you make revenue out of your audio, you need to protect your audio from hotlinking.
If you want to prevent audio hotlinking, follow these steps.
Step 1: Download WPShield Content Protector.
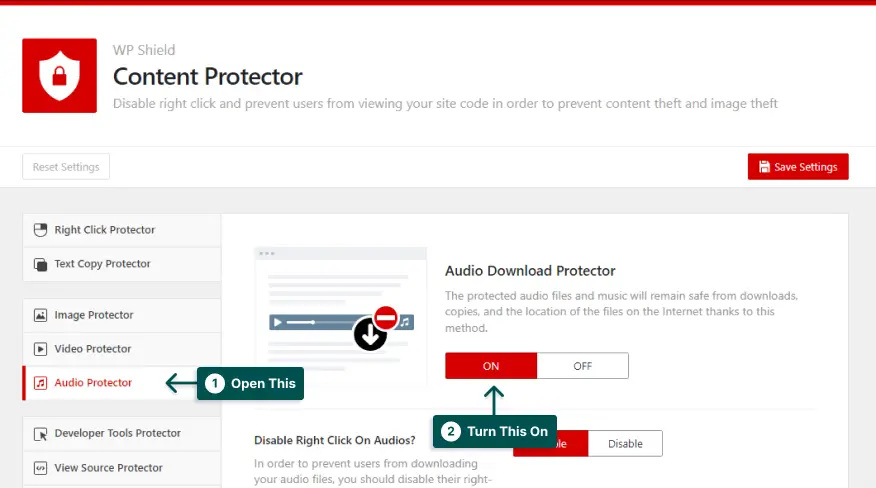
Step 1: Go to WP Shield → Settings.
Step 1: Open Audio Protector and enable Audio Download Protector.
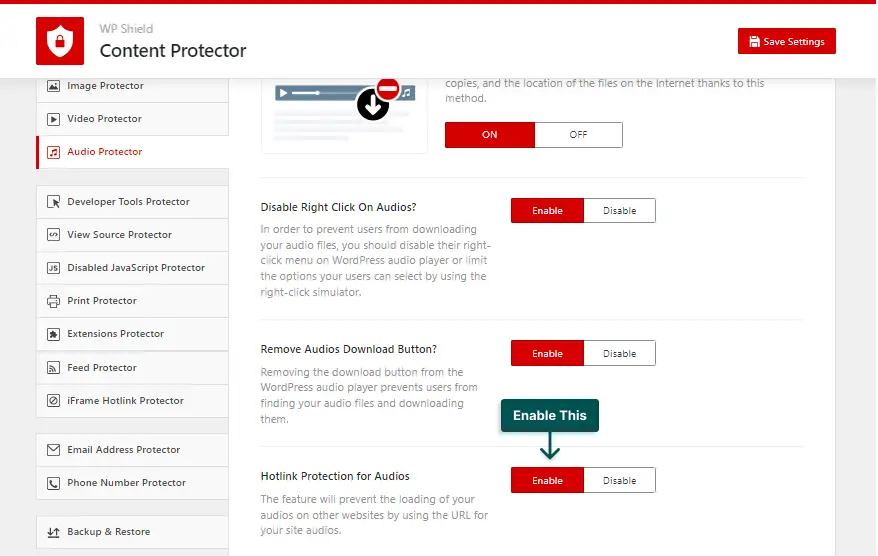
Step 1: Turn on the Hotlink Protection for Audio option.
This option prevents audio hotlinking from your website.
If you publish songs or podcasts, or any audio on your website, you need complete protection on your audio that WPShield Content Protector Audio Protection can offer.
Method 5: Disable Right Click and WordPress Images Link
If you want to ensure your images are fully safe and no one can find a way to use them without your permission, you need more layers of protection.
WPShield Content Protector offers other protection methods like disabling right-clicking and hiding image links.
Right-click is a common way to download photos illegally. It would be best to make sure right-click is disabled on your images.
Note that disabling right-click negatively impacts user experience(UX). To ensure your images are safe and your website’s UX is not affected, WPShield Content Protector can help you limit the right-click menu instead of disabling it.
To disable the right-click, follow these steps:
Step 1: Go to WP Shield → Settings.
Step 1: Open Image Protector and enable Images Theft Protector.
Step 1: Turn on the Disable Right Click On Images option.
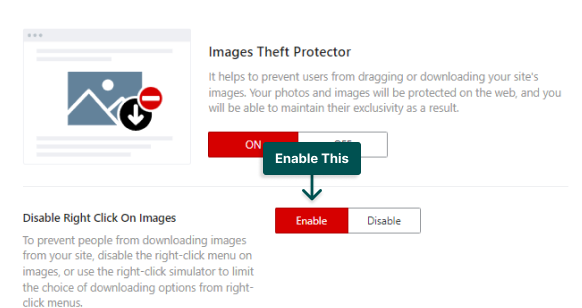

This option disables the right-click on images.
If you are interested in limiting the right-click menu instead, follow these steps.
Step 1: Go to WP Shield → Settings.
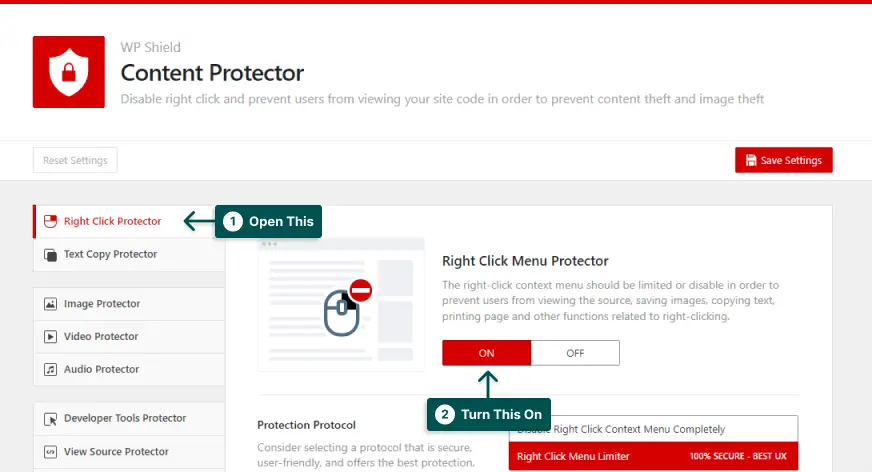
Step 1: Open Right Click Protector and enable Right Click Menu Protector.
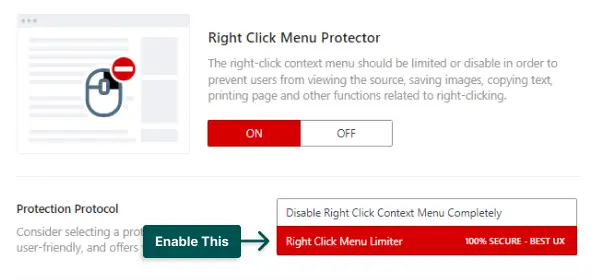
Step 1: Choose Right Click Menu Limiter as the Protection Protocol.
This protocol limits the right-click menu instead of disabling it.
Some WordPress themes might add a link to the full version or the lightbox version of the image. Some protections might not work if you open the image in a new tab since it counts as out of the website, and a plugin can only work inside the website.
WPShield Content Protector can hide all the links around your image.
To remove all the links that might be around your image, follow these steps:
Step 1: Go to WP Shield → Settings.
Step 1: Open Image Protector and enable Images Theft Protector.
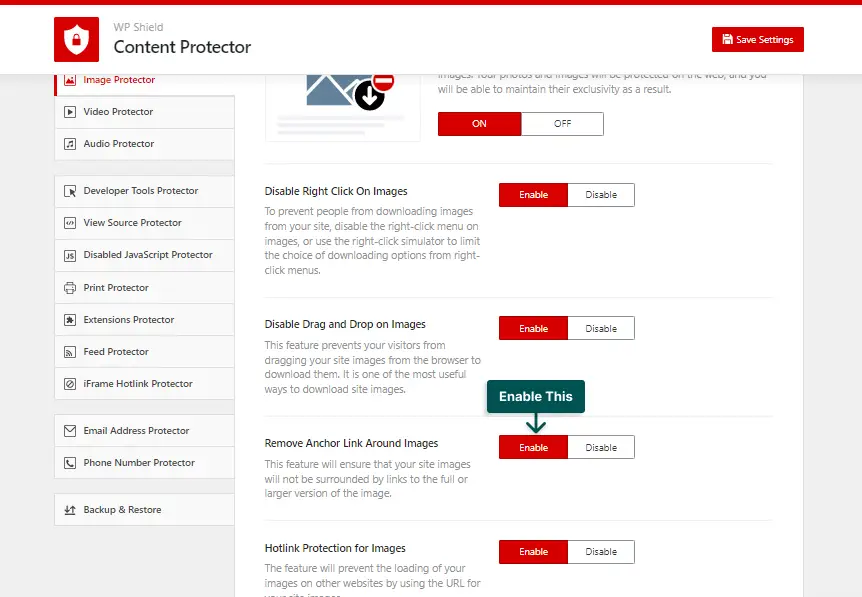
Step 1: Turn on the Remove Anchor Link Around Images option.
This option hides all the possible links around your image.
Method 6: Add Watermark on Your Images.
Consider adding watermarks to your images if you publish original photos on your website.
Even though watermarking your images doesn’t prevent users from hotlinking your images, it might make them reconsider. You get credit even if they do since your watermark is on the image.
You can use WordPress watermarking plugins to add a watermark on your pictures, get a backup of the original images, choose the watermark location, and more.
Why Not Use Codes in .htaccess to Prevent Hotlinking in WordPress?
Some websites suggest you add a code in the .htaccess file to prevent hotlinking. I don’t recommend changing the .htaccess file codes if you are not an expert.
Even though there are many codes available on different websites ready to be pasted on the .htaccess file, most of them might cause real damage to your website.
.htaccess file is essential, allowing you to make changes to your website’s configuration without editing server configuration files. So a simple error or wrong configuration can cause a big issue on your website SEO or server.
Besides making severe issues on your server configuration, some of these codes don’t even disable hotlinking properly.
I suggest you to not prevent hotlinking in the .htaccess file and use a complete content protection plugin like WPShield Content Protector instead to make sure your site content is safe and your ranking on Google is up.
FAQ on Disabling WordPress Hotlinking
Even though hotlinking is considered bad manners in the online community, it is legal to embed images without permission in the EU or the US.
A ‘No hotlinking’ request is to prevent others from directly linking to your website’s assets and stealing them as a result.
With hotlinking protection enabled, nobody can link directly to the assets on your website, like images and videos. This allows you to reserve bandwidth and ensure your website runs smoothly.
Conclusion
In this post, we discussed about hotlinking, what hotlinking is, how to prevent hotlinking, and why you need to prevent hotlinking on your website.
To conclude the post, you can use WPShield Content Protector to prevent hotlinking on your website and ensure your content and assets are safe from thieves.
I appreciate you reading this post till the end; let me know if this post was helpful or if you have any alternative method to disable hotlinking in the comment.
If you want to know more about our new content, follow BetterStudio on Facebook and Twitter.


