There are many protocols on the internet and one of them is HTTP. This protocol is designed to send and received requests. The secured version of HTTP is HTTPS. The S at the end stands for secure.
Other than the speed during searching, users are also looking for more security. Therefore, most WordPress users prefer to use HTTPS over HTTP. That is why WordPress force HTTPS.
In this article, we tend to discuss how to transfer HTTP URLs to HTTPS in WordPress.
There are many ways to increase the security of WordPress. One of these ways is the SSL certificate. We will explain SSL (Secure Sockets Layer) down below.
Why Move URLs from HTTP to HTTPS?
Before anything, we must answer this question. Why should we change HTTP to HTTPS?
HTTPS has been around for many years and most people using the internet are familiar with it. As you know, this protocol encrypts the data send and received to and by the user(s). Thus, websites with HTTPS have way more security over regular websites.
But this isn’t everything! Search engines such as Google pay extra attention to websites with this protocol. In reality, these websites are displayed first then you would see the regular HTTP websites in the search results page. Therefore, it’s very important for a website’s SEO.
So there are two main reasons why it is necessary to use HTTPS:
- It almost guarantees a website’s security.
- Google pays extra attention to websites with HTTPS protocol.
Force HTTPS for WordPress login pages
When we talk about the SSL certificate, it usually means that your website loads on HTTPS protocol. Even when users do not type the HTTPS in the browser, WordPress should load the HTTPS version.
This certificate acts as a security protocol. In simpler words, it secures the connection between the sender and the receiver.
If you are not using an SSL certificate, browsers will automatically send a message to users that website they are about to visit is not fully secured. This message may scare off many users and we don’t want that to happen.
Now that we are familiar with SSL and HTTPS, let us discuss how to enable them on WordPress. In this article, we mention two ways.
Force HTTPS on WordPress Using a Plugin
One of the easiest ways to add this feature to WordPress is by using the right plugins. In the first way, we teach how to add this feature to WordPress by using the WordPress HTTPS(SSL) plugin.
By using this plugin, you can enable HTTPS for any page. This plugin can activate the HTTPS for any web page and admin page.
For example, the blog section of your website may not need HTTPS. On the other hand, having HTTPS is essential for your store page. However, all of these are totally up to you.
To begin, first, you must download, install and activate the plugin. Head over to WordPress dashboard. From Plugins click on Add New and search for the plugin in the search box. Then, install and activate the plugin.
Also, you can download the zip file from the official WordPress website and install it on WordPress. You may use any method you prefer.


Once the installation process is finished, head over to its settings.
First, you need to check the Force SSL Administration. This forces the WordPress dashboard to load with SSL.
Then, enable Force SSL Exclusively. This adds HTTPS to all of your web pages. Finally, make sure you save the changes.
The next step is to enable HTTPS for specific posts on the website. Open the specific posts in the editor.
Scroll down until you see the new section that the plugin has added. By enabling the “Secure post” HTTPS gets added to the post.
NO PICTURE
Secure Child Posts enables HTTPS for all of the child posts. Once the changes are done, make sure you click on save changes.
To check if this feature is enabled on WordPress, enter your URL with HTTP. If HTTPS is correctly activated WordPress will automatically redirect to HTTPS.
Force HTTPS Using wp-config.php
This method is specifically for adding HTTPS to the admin page. In this method, you will be editing the WordPress core files.
Locate the wp-config.php file in the public_html folder on your host. Right-click on it and click on View/Edit.


In the editor, scroll down until you see the “/*That’s all, stop editing! Happy blogging */”. This line represents the end of the file. Copy the codes below and paste them right before the mentioned line.


The first line forces the HTTPS on the admin page. The second line forces the HTTPS on the login page.
Although, you can do these by using the plugin mentioned above. This method is specifically for people who are not afraid to edit the WordPress core files.
Moving Other WordPress Pages to HTTPS
As mentioned above, Google pays extra attention to websites with HTTPS. However, there are no statistics about this. However, if you are looking at ways to transfer other WordPress pages to HTTPS, we will introduce two ways down below:
From the WordPress Dashboard
In the first method, we will be using the WordPress dashboard. From Settings go to The General Settings. Then proceed to add HTTPS to the WordPress URLs.


Once the changes are done, HTTPS will be added to all WordPress URLs. Although, this may cause errors in assets, JavaScript and CSS.
By Editing the .htaccess File
As mentioned above, in the first method, we added HTTPS directly from the WordPress dashboard. However, this method may cause errors in assets, JavaScript and CSS. These errors cause some URLs to sill load with HTTPS instead of HTTPS.
Luckily, these assets can be fixed. To do so, a few lines of code should be added to the .htaccess file. Locate the file in your root directory and add the lines below to it:
# BEGIN WordPress
<IfModule mod_rewrite.c>
RewriteEngine On
RewriteCond %{SERVER_PORT} !^443$
RewriteRule (.*) https://%{HTTP_HOST}%{REQUEST_URI} [R=301,L]
RewriteBase /
RewriteRule ^index\.php$ - [L]
RewriteCond %{REQUEST_FILENAME} !-f
RewriteCond %{REQUEST_FILENAME} !-d
RewriteRule . /index.php [L]
</IfModule>
#END WordPress
This code redirects URLs in 443 port to 301 port.
Fixing CSS and JavaScript Lines
As mentioned above, when you transfer HTTP to HTTPS from the WordPress dashboard, your CSS and JavaScript files may get broken. Whenever these files are called an insecure message will be displayed. But don’t worry, this is easily fixed.
One way is to ask the file owner to add HTTPS to its domain. But if this way isn’t possible, follow the steps below:
- Download the file
- Look for HTTP:// and change it to //
- Upload the file on your website
- Look for files and posts that are using this file
- Change the URL to the new address
Force HTTPS on WordPress Database (To prevent Mixed Content Error)
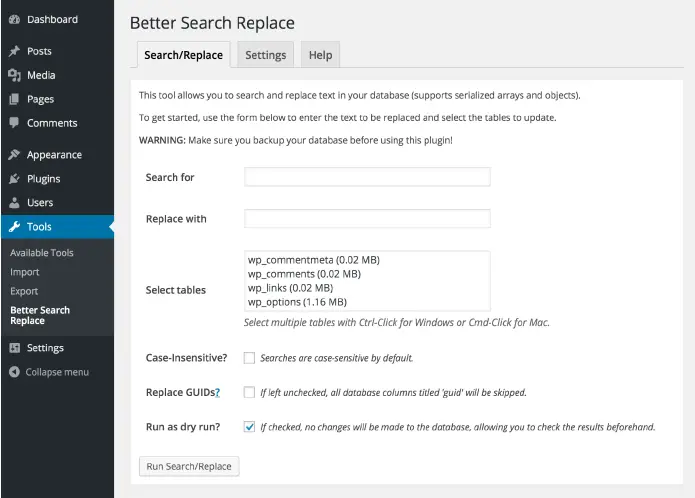
To prevent the Mixed Content error, you can edit the HTTP links in the WordPress database. You can use the Better Search Replace plugin to search and replace the links.
Open the plugin once it’s installed and activated. In the Search for box type in http://yourwebsite.com. Then in the Replace With box, enter the new address with HTTPS https://yourwebsite.com. Finally, to save the changes click on Run Search/Replace. By doing so, all of the old URLs will be replaced with the new URL.


Use SSL Checker for Remaining Mixed Content Errors
Imagine there are two doors for a house. When one door is locked and the other one is unlocked, the house isn’t safe. For security purposes, both doors should be locked at the same time. The same logic works here. When the first links are locked, you must also lock the other links.
To find pages, links and all of the iFrames and different sections of the website, you need to spend a lot of time. Activated templates, plugins, codes, and images that you have added or installed on the website is where you should look. All of these should be loaded with HTTPS.
To find all the insecure files, you need to deactivate the cache plugins in WordPress. Delete your browser’s cache and open the browser in incognito mode. Check every page with developers’ tools or inspector. You should be looking for a Mixed Content error. This error looks like this:


After searching for a Mixed Content error, you must use an SSL Checker tool to review everything. There are many tools, but we recommend JitBit.
Few Last Points
Change the URLs in Google Search Console
Once you have to change the URLs from HTTP to HTTPS, you need to head over to Google’s search console. Here, you must enter the new URL. Once you open Google’s search console, you will see the Change of address, this link may not work. Therefore, you need to look for alternative ways.
Making a new property is the simplest way. Click on Add a new property. Enter the URL with both HTTP and HTTPS. Then verify both of them. We recommend not to remove the old URL and use it as the source. In any case, after this process, Google will index the new URL.
Change the URLs in Google Analytics
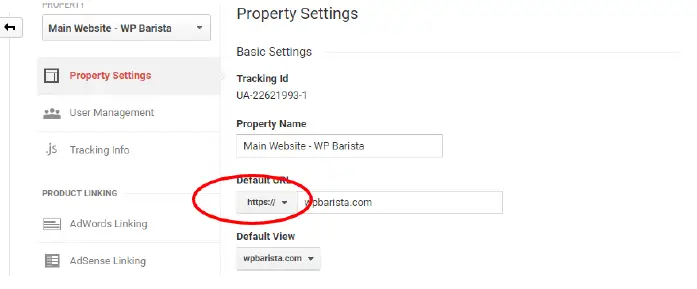
After transferring URLs from HTTP to HTTPS, make sure Google Analytics is tracking the HTTPS. Go to Property – Property Setting. In the Default URL box, select HTTPS.


Recreate WordPress sitemap
When you use SSL in WordPress, it automatically creates a new sitemap. If you are using the Yoast SEO plugin, simply use the link below in Google’s search console: (Change it to your website’s URL)
https://mysite.com/sitemap_index.xml
Conclusion
SSL certificate encrypts the transferring of data between the users and the server. However, SSL and HTTPS are only two ways to increase the website’s security. There are many other ways to increase WordPress security.


