Enabling WordPress maintenance mode is the perfect way to hide the website while construction is going on. When you are updating WordPress, it’s best to hide tests and bugs from visitors.
These changes can be testing a plugin, updating content, changing the theme, or any other changes in the backend. In this article, we tend to teach how to enable WordPress maintenance mode.
The main purpose of this mode is to tell the visitors the website is under construction. This message means, after a short while the website will return to its original state. Although, this return may contain some changes.
Here we demonstrate how to enable maintenance mode on a WordPress site through a step-by-step tutorial. Similarly, we recommend that you review our article on the best WordPress coming soon plugins that are very useful for this purpose.
How to Enable the WordPress Maintenance Mode?
There are many ways to enable WordPress maintenance mode. Below, other than introducing the right plugins, we also teach you how to enable the WordPress maintenance mode with code.
We recommend that you create a WordPress backup before taking any further action to ensure that you can revert your site in the event of an error.
Enable Maintenance Mode Using Code
To enable the WordPress maintenance mode with a code, you need to open the function.php file and add the code below to it:
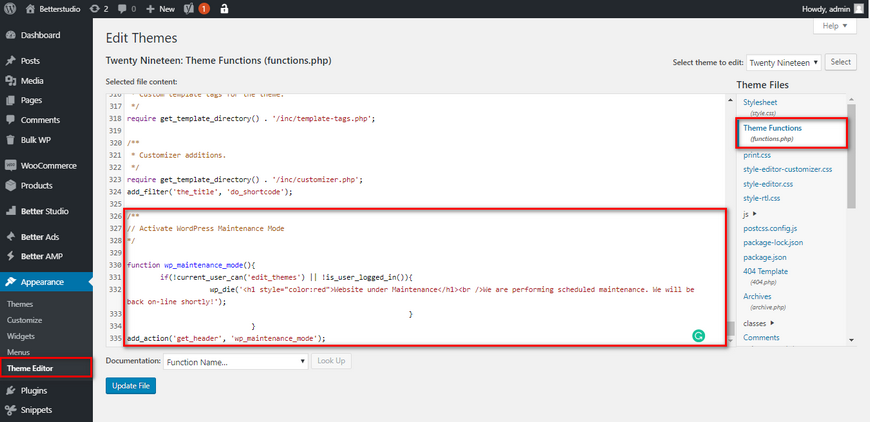

// Activate WordPress Maintenance Mode
function wp_maintenance_mode(){
    if(!current_user_can('edit_themes') || !is_user_logged_in()){
        wp_die('<h1 style="color:red">Website under Maintenance</h1><br />We are performing scheduled maintenance. We will be back on-line shortly!');
    }
}
add_action('get_header', 'wp_maintenance_mode');
Here is the message you would see afterward.


Although, you can edit the message and type in the message you want.
Enable Maintenance Mode with WP Maintenance Mode Plugin
WP Maintenance Mode is one of the most popular plugins the WordPress community uses to enable this mode.
This plugin comes with predesigned and editable themes. You can simply personalize them. You can also find coming soon and landing page themes in this plugin.
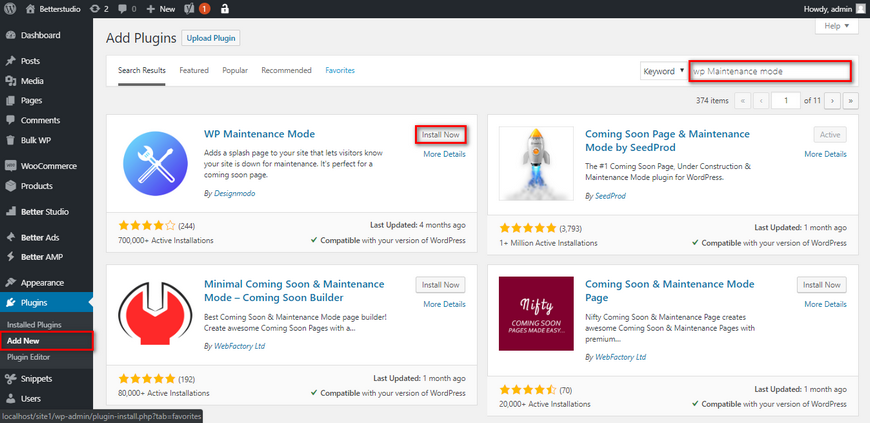

The first step in adding this plugin is to download, install and activate it. To download, simply head over to the Plugins tab in the WordPress dashboard and search for the plugin. Also, you can download the plugin from the official WordPress website.
Once the plugin is activated, from Settings go to WP Maintenance mode. You will have to configure the plugin here.
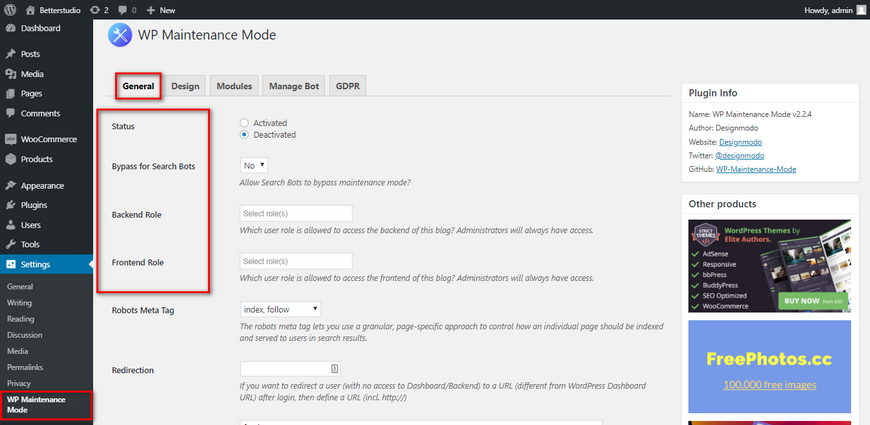

The first tab is the Generals tab.
You can see the general configurations in this tab. The first option you see is Status. Change the value of Status to Activated.
Next, change the Bypass for Search Bots value to Yes.
In this page, you can define which users can access your website while the maintenance mode is activated. By default, only administrators can access the website.
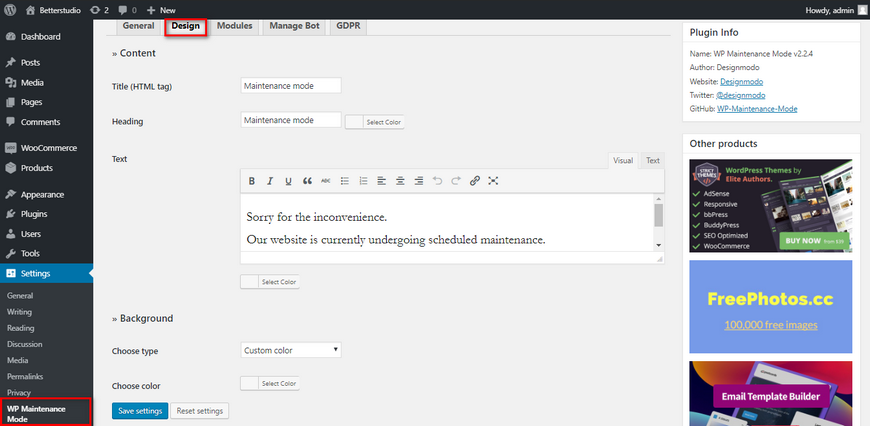

Now it’s time to design the maintenance page. In the Design tab, you can fully personalize the page. You can write the text you wish, change fonts, background and etc.
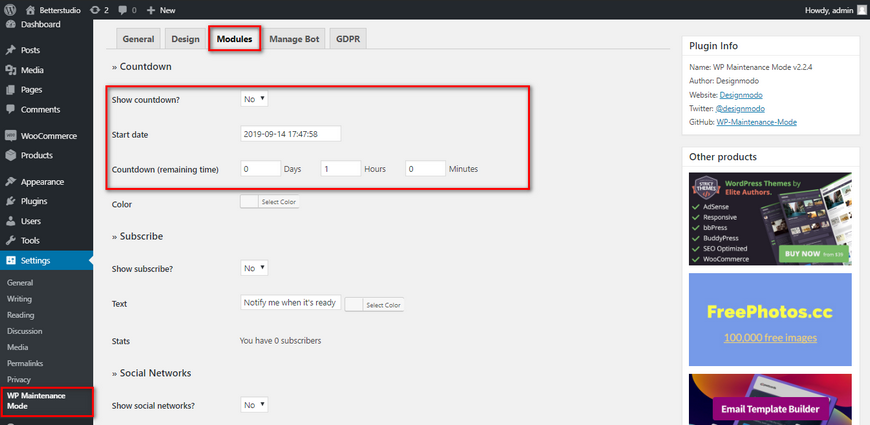

In the Modules tab, you can add more sections to this page. For example, you can define a countdown.
By using the countdown timer module, you notify users how long until your work is over.
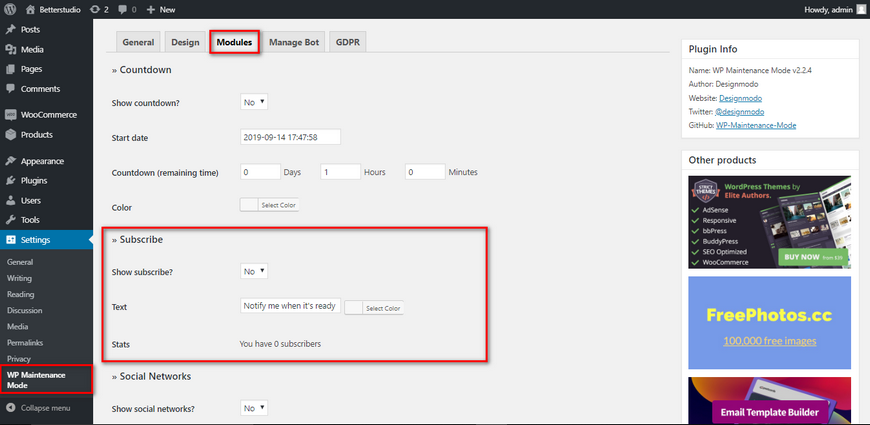

The other feature you can add to this page is to ask your users to subscribe to the newsletter. By signing up on the newsletter, users will be notified when the website goes back to its original state.
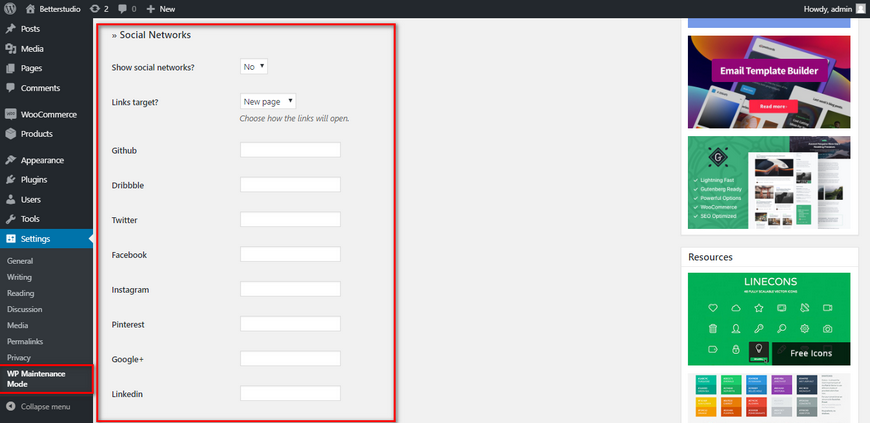

You can also add your social media links to this page. Simply enter the URLs. The icons will be automatically added.
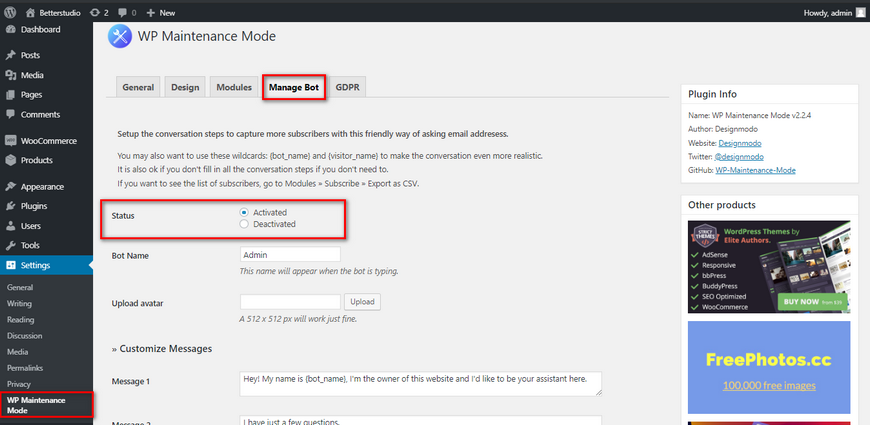

Whilst the maintenance mode is activated, you can enable a bot to start a two-way conversation with the users that visit. To enable this feature, go to the Manage Bot tab.
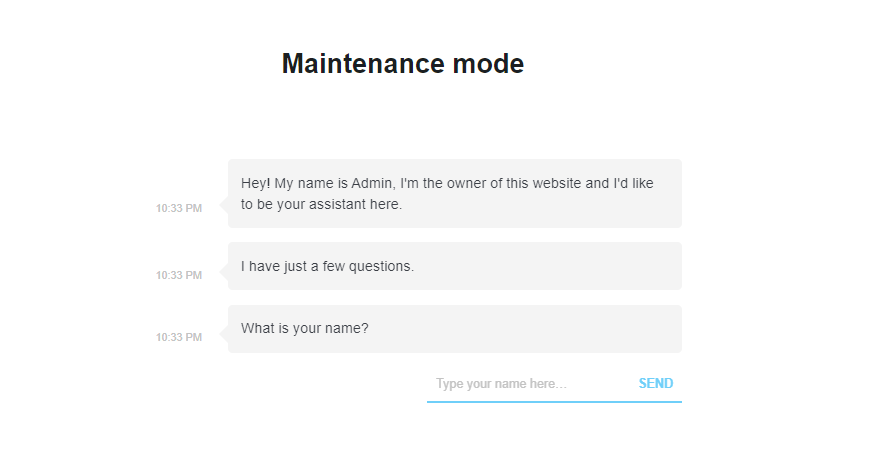
Once you enable this feature, the content you typed in the Generals tab won’t be displayed. Once this feature is activated, you will see the bot like the image below:

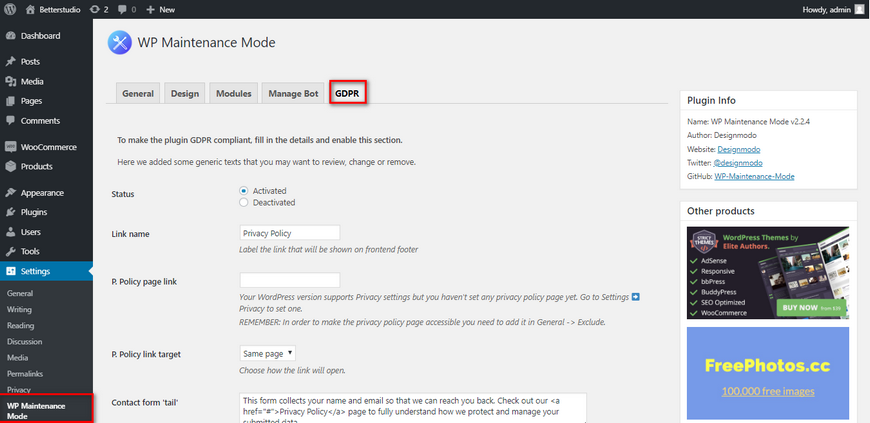
If you are collecting user information while the mode is activated, you need to go to the GDPR tab. In this tab, you define the terms and conditions of gathering users’ information.

This is everything you need to do. To see the changes, open your website in a browser.
Enable Maintenance Mode Using the SeedProd Plugin
SeedProd is another plugin you can use to activate the WordPress maintenance mode. This plugin is offered in both premium and free versions.
With SeedProd, you can design the coming soon and landing page. In the free version, you can change the background, text, adding HTML and CSS codes.
In the premium version, you can also design the coming soon and landing page without having any programming knowledge.
To begin, first, you need to download, install and activate the plugin. Once the plugin is installed, you will receive a message asking you to enter your plugin’s license. Of course, only if you have bought the premium version you can enter the license number.
Once activated, go to the plugin’s settings.
In the settings’ page, in the Coming soon and maintenance mode tab, you need to activate the Status option.
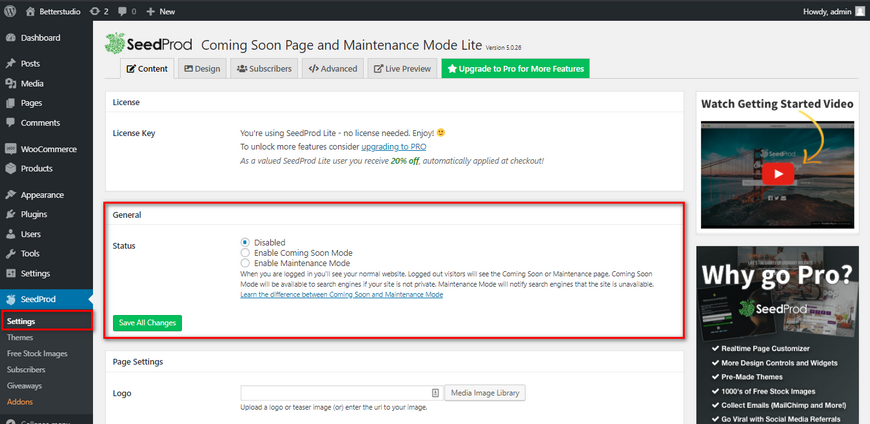

Some users confuse the maintenance and coming soon page. The coming soon page is used when the website hasn’t launched yet. But the maintenance page is used when a website has already been launched and it’s updating.
After choosing the right page for your website, click on Edit Coming Soon/Maintenance Page to design your page. On this page, you can define the personalized design.
This plugin offers more than 50 pre-designed themes. To view and select them, from the left-hand side menu click on Theme > Select a Theme.

Once you choose a design, you will be redirected to the edit page. In the edit, you can customize the theme.

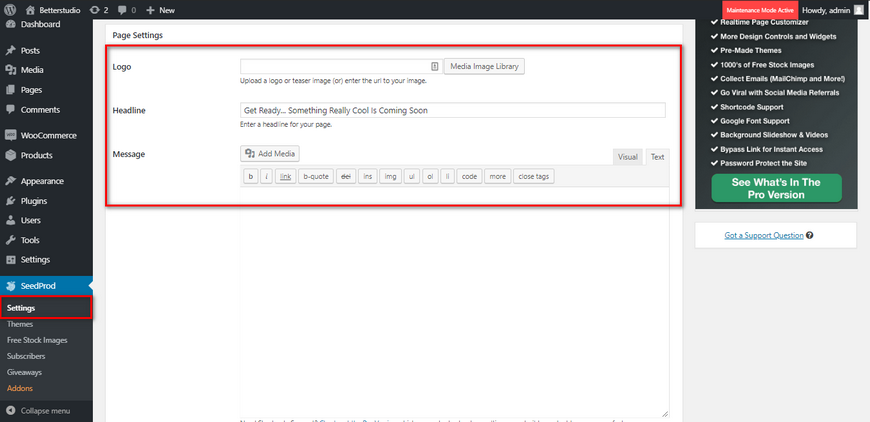
You can write a message in the Content tab. Also, the headline, logo, and description are changeable.
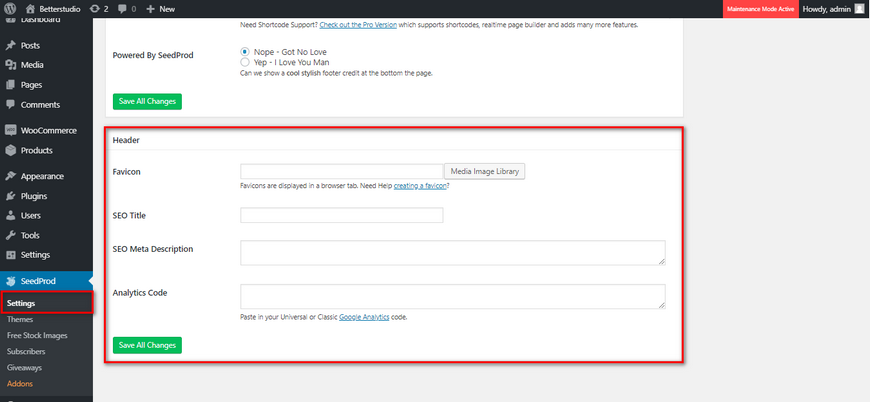
In addition, Favicon, SEO title, SEO description and etc. are addable.

In the Google Analytics Code section, enter your Google Analytics code. Once Analytics is activated, you can track visitors.
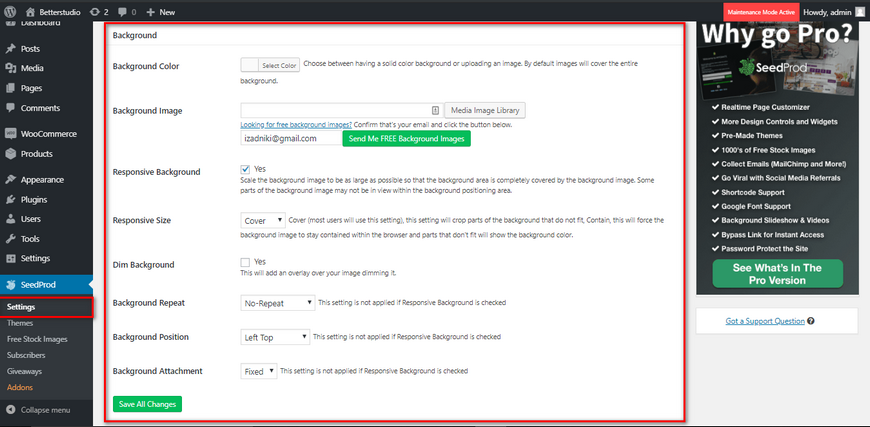
The background is the next option. Design the background however you wish. You can use a video or a slider in the background. Also, colors, sizes and etc. are customizable.
This plugin, allows you to add many different features to the WordPress maintenance page. For example, you can define a Call to Action button to get users’ email addresses and send the newsletter.
For this feature, enable the “Enable form”. Once enabled, you can see a new form added to the page.
This plugin comes with more than 20 email marketing services. In the Save Subscriber’s to section you can define where it saves the information.
One key feature of this plugin is the ability to auto-respond to emails. To enable this feature, go to the Configure optional Autoresponder tab. An editor opens up and you can write the message there.
Add your social media links in the Social Profiles tab.
You can also define a Progress Bar in this plugin. By using SeedProd, your users get notified whenever the website is back to its original state.
In SeedProd, designed pages are completely responsive. To preview the page on different devices, from top left corner, select the available devices.
To publish, simply click on Back to Settings and then click on Save All Changes.
Enable WordPress Maintenance Mode From .htaccess
Adding a few lines of codes to the .htaccess file is another way of activating the WordPress maintenance mode. Locate this file from your root directory and copy and paste the code below to it:
RewriteEngine On
RewriteBase /
RewriteCond %{REMOTE_ADDR} !^123\.456\.789\.123
RewriteCond %{REQUEST_URI} !^/maintenance\.html$
RewriteRule ^(.*)$ https://example.com/maintenance.html [R=307,L]
These commands redirect all of the visitors to a new homepage. This homepage is called maintenance.html
You just need to create this page. Fortunately, there are many ready to use maintenance.html pages on the internet.
What is WordPress Maintenance Mode?
In the WordPress maintenance mode, you can make changes to WordPress without affecting the user experience or SEO.
The main advantage of the WordPress maintenance mode is the fact that you won’t lose your ranking in the search engines.
When a website has the maintenance mode enabled, it automatically tells search engines not to index it while it’s being updated.
Why Use the Maintenance Mode?
Every website requires changes and updates. But what are the main reasons for using the WordPress maintenance mode?
- Every website needs to change its design and user interface after a while.
- Every website is at risk. The WordPress maintenance mode is the best way to fix these bugs and errors.
Generally, you can see live changes on any website. We may need to publish new content on the website without enabling the WordPress maintenance mode.
In most cases, publishing new content is really quick, therefore, there is no need to enable the WordPress maintenance mode.
However, if the changes take more than usual and there are bugs that can be found in it, you have to use the WordPress maintenance mode. Otherwise, users may not be able to access parts of the website.
Another reason to use the WordPress maintenance mode is to keep your users whilst updating the website.
Once you enable the WordPress maintenance mode, it displays a friendly message on the website and notifies them of the situation.
More WordPress Maintenance Mode Plugins
As mentioned at the beginning of this article, there are many plugins to activate the WordPress maintenance mode. You only need to look for the right plugin for your WordPress website.
Some other useful plugins are:
Elementor


Elementor is a page builder plugin with a Drag and Drop feature. With Elementor you can live design a page. Elementor comes with both premium and free versions.
You can use an Elementor WordPress theme to have full compatibility.
Coming Soon & Under Construction Maintenance Page
The Coming Soon & Under Construction Maintenance Page plugin is completely free. Although this plugin is not as popular as other plugins we have talked about in this article, it offers many features to its users.
You can design a page and customize its background, font, colors, texts, and etc. without paying any money.
WordPress Stuck in Maintenance Mode
The maintenance page has an expiration date. This page is not permanent and users will be redirected to the main page after a while.
But sometimes this page won’t expire and it remains permanent. This is the main reason WordPress users face. Let us explain how to fix this issue.
Why WordPress Is Stuck in Maintenance Mode?
This can have many reasons. The most common reasons are:
- You are constantly updating WordPress themes and plugins at the same time.
- The plugin you want to update is not compatible with the current version of WordPress.
- The plugin you use to enable the WordPress maintenance mode has issues.
Fix WordPress Stuck in Maintenance Mode through the Maintenance File
If you are you don’t have a maintenance mode plugin and WordPress is showing “briefly unavailable for scheduled maintenance” message then you need to fix it through the maintenance file.
The reason behind this message is, your website’s directory has failed to completely delete the maintenance file.
If you have access to WordPress files, fixing this issue is very simple.
To fix the briefly unavailable for scheduled maintenance message:
- Connect to your site with an FTP client.
- Enable Make Hidden Files Viewable
- Look for the .maintenance file
- Delete it
Fix Maintenance Mode Plugin Getting Stuck
If you have used a plugin to enable the WordPress maintenance mode, you may have experienced it not disabling once the expiration date is passed.
To disable the maintenance mode, you need to delete the plugin and your website’s cache. To delete the website’s cache, you can follow two main methods:
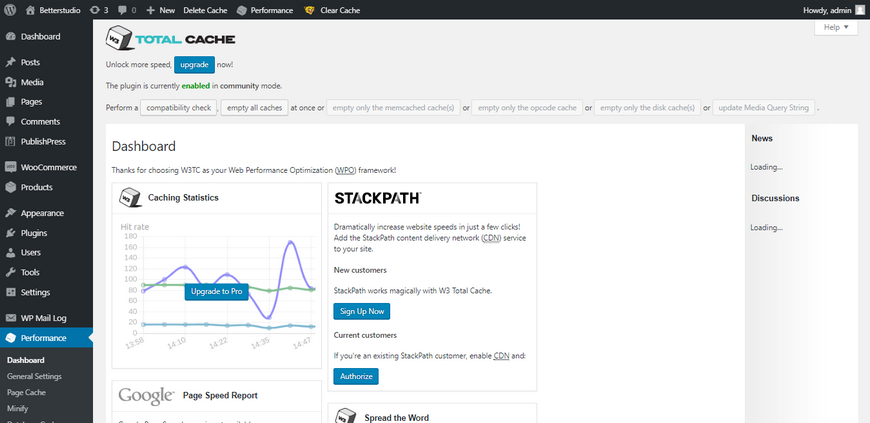

Using WordPress Cache Plugins
There are many WordPress cache plugins. For example, W3 Total Cache, WP Super Cache, WP Fastest Cache are amongst the popular plugins. Simply install one of them and look for the Clear Cache option.
Using Host’s Control Panel
Some hosting providers allow the feature to clear a website’s cache, without installing any plugins. You just need to know if your hosting provider offers this feature or not. If it offers this feature, then you won’t be able to install any cache plugins.

 العربية
