

 Learn WordPress
Are you concerned about the increasing number of unauthorized login attempts on your WordPress website? Cybercriminals may gain unauthorized access to your site by repeatedly attempting to log in with different usernames and password combinations. If so, this article is for you.
In this blog post, we will discuss how to limit WordPress login attempts and protect your website from brute-force attacks. According to Wordfence, 90 million login attempts to WordPress websites were malicious in 2020. This means that if you don’t take measures to secure your login page, your site could be at risk.
These attacks can lead to stolen data, defaced websites, and even complete shutdowns. By limiting login attempts, you can reduce the risk of unauthorized access and keep your site secure.
To help you keep your website safe, we’ve put together a comprehensive guide on how to limit login attempts in WordPress. We’ll explain why limiting login attempts is important, show you how to do it using plugins or code, and provide some tips on creating strong passwords for your users. So, without further ado, let’s get started!
What is Login Lockdown?
Login Lockdown is a security method that limits the number of login attempts on your website to protect it from brute force attacks. It records every failed login attempt and temporarily blocks the IP address after a certain number of failures, preventing further attempts.
This prevents brute-force attacks and unauthorized access to the website’s admin area. by default, users can try as many username and password combinations as they want.
Why Limit Login Attempts in WordPress?
If you’re a WordPress website owner, you need to be aware of the potential security risks of allowing unlimited login attempts. In this section, we’ll cover why it’s essential to limit login attempts in WordPress and how you can do it easily.
1. Protect Your Website from Brute Force Attacks: By limiting login attempts, you can prevent hackers from trying multiple login combinations until they get in. This is known as a brute force attack, and it can cause major damage to your website.
2. Secure Your User’s Data: With limited login attempts, you can ensure your user’s data stays safe and secure. If a hacker gains access to your website, they can steal sensitive information such as usernames, passwords, and personal details.
3. Prevent Server Overload: Unlimited login attempts can put a strain on your server by generating unnecessary traffic. This can lead to slow loading times, downtime, and even crashing – all of which can negatively impact your website’s reputation.
In summary, limiting login attempts in WordPress is crucial for protecting your website, securing your user’s data, preventing server overload, and maintaining a good user experience. With the help of simple plugins, you can easily implement this security measure and ensure that your website stays safe from potential threats.
How to Limit Login Attempts and Enable Login Lockdown in WordPress?
In this section, we will discuss how to limit login attempts and enable login lockdown in WordPress for improving site security. By doing so, you can prevent unauthorized access to your website and keep sensitive information safe from hackers.
You can restrict WordPress login attempts by using the Login LockDown plugin. This plugin gathers information about your users’ IPs and gives you a report.
A Login LockDown plugin blocks a user from accessing your website if they enter the wrong passwords multiple times in a short period.
You can use login lockdown, a wp security login lockdown plugin, that can help you protect your website from brute force attacks.
To enable login lockdown, do this:
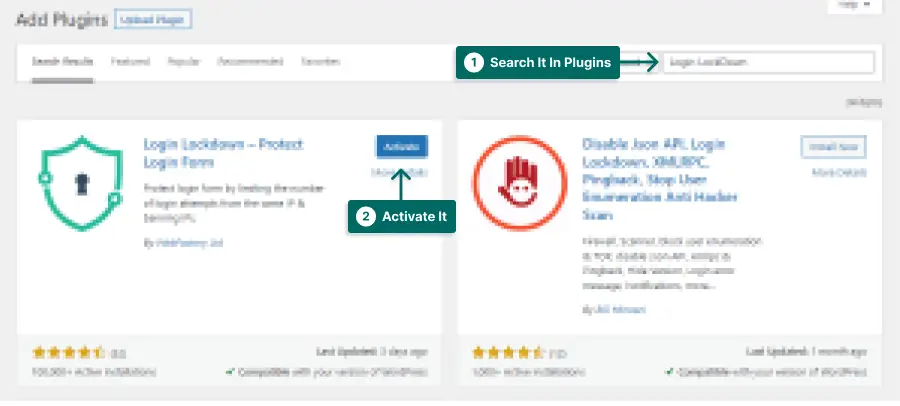
STEP 1: Install the Login Lockdown Plugin from Plugins → Add New.
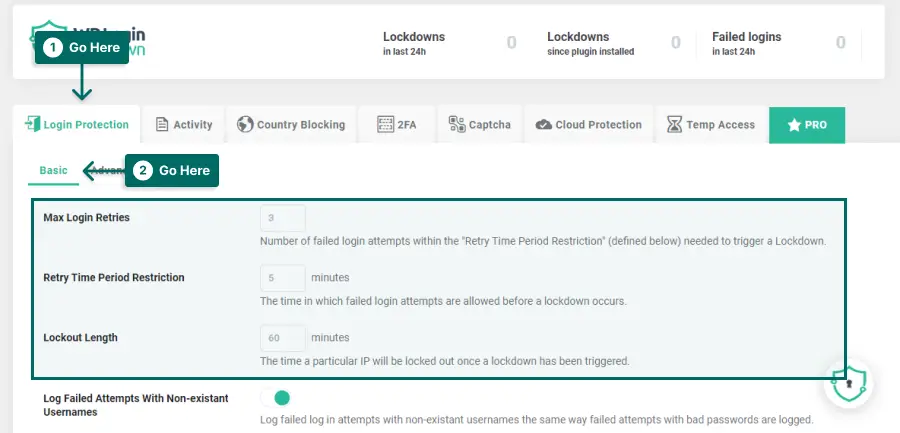
STEP 2: Go to Settings → Login Lockdown.
STEP 3: Go to Login Protection, and in the Basic tab, you can set up the login lockdown.
You can also change your login URL to make sure only specific users can access the page in the first place. Here’s the full tutorial on changing the login URL.
If you want maximum security on your website and make sure your website’s vulnerabilities are not exposed to hackers, use the WPShield Content Protector plugin.
Hackers can use your site’s source code to find our themes and plugin issues and use them. WPShield Content Protector can protect your site’s source code and ensure your site is fully safe by hiding the source code.
Securing your website should be a top priority; If you use WordPress limiting the login attempts and enabling login lockdown is a simple yet effective way to secure your website. By taking these steps, you can protect your website from unauthorized access and ensure your sensitive information remains safe and secure.
How to Unlock WordPress Accounts With Login Lockdown
If you’ve enabled a WordPress login lockdown plugin on your WordPress site, you might be wondering how to unlock an account that’s been locked due to too many failed login attempts. Fortunately, it’s a straightforward process.
Depending on the plugin you use to lockdown failed logins, this method might be a little different, but it is usually a simple way. In the following, I explain how to whitelist an Ip through the Login LockDown plugin and manually from the database.
To unlock accounts with the Login LockDown plugin, do this:
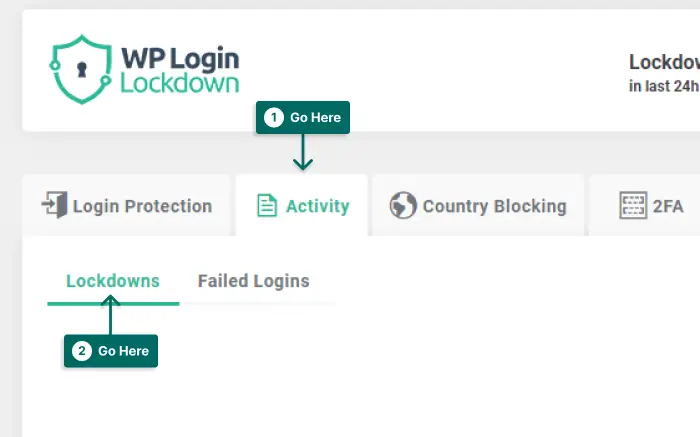
Step 1: Go to Settings → Login LockDown.
Step 2: On the top right, you will see the number of locked-out IPs and failed attempts.
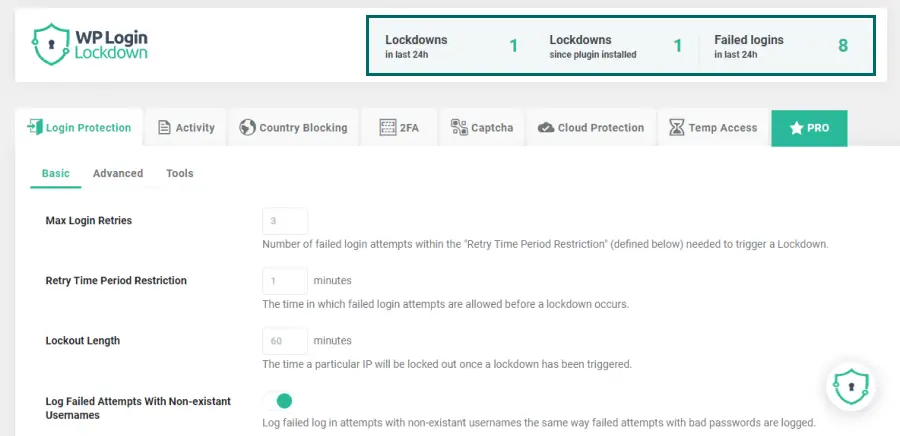
Step 3: Go to the Activity tab.
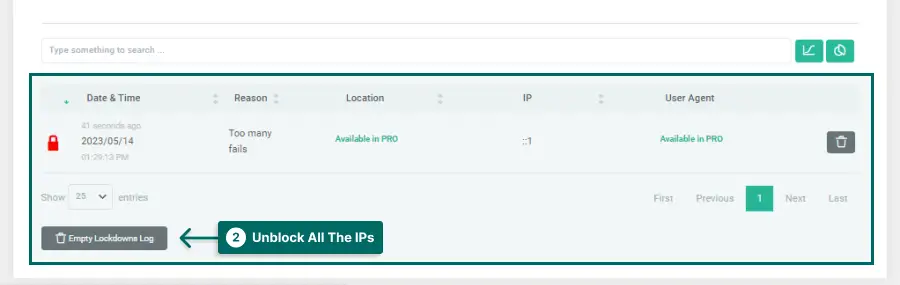
Step 4: Check out the list of blocked IPs and select the ones that you want to unblock.
Step 5: Click on the trash icon to delete a specific IP from the blocked list or click on Empty Lockdowns Log to unlock all the locked IPs.
If you’re certain that the failed login attempts were made by someone who shouldn’t have access to your site, you can leave it at that. But if you suspect that the lockout was triggered by a mistake, such as a typo in the password, you might want to whitelist the IP address that was blocked.
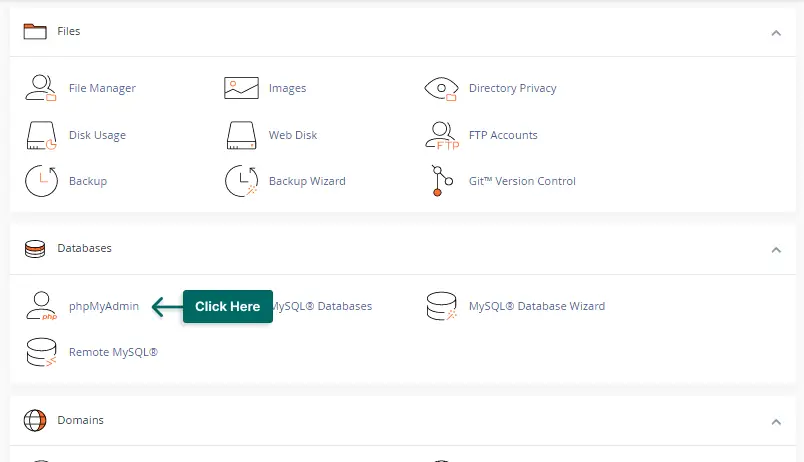
If you logged yourself out and need to unlock your account or any other account, you can use PHPMyAdmin.
To unblock an IP from PHPMyAdmin, follow these steps:
Step 1: Go to the website’s Cpanel, and click on PHPMyAdmin.
Step 2: Navigate to the SQL tab.
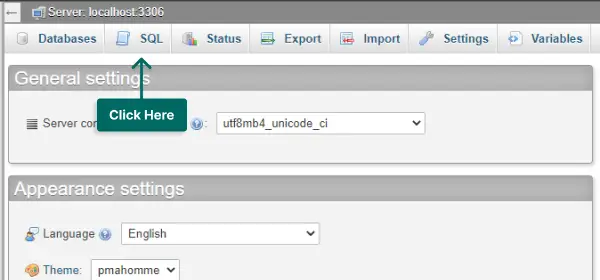
Step 3: Enter the following query and change the date with the release date you want and the IP address you want to unblock.
update wp_lockdowns set release_date=”Year-Month-Day Time” where lockdown_IP=”<IP address>”;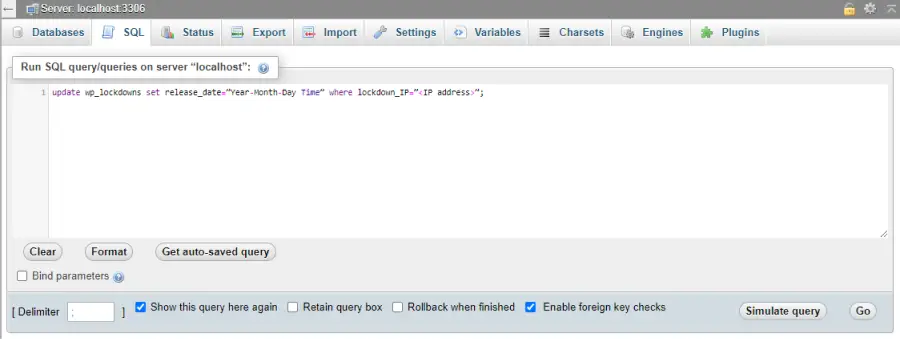
An example for the date:
2023-01-01An example of the time:
6:00PM ESTStep 4: Click Go.
By following these steps, you can ensure that legitimate users are able to access your site even if they accidentally trigger the Login LockDown feature. With Login LockDown and these measures in place, you’ll greatly enhance the security of your WordPress site.
FAQ
Limiting WordPress login attempts reduces the risk of brute force attacks, where someone tries to guess your login credentials by repeatedly trying different combinations of usernames and passwords. This can help protect your website from unauthorized access and potential security breaches.
You can limit WordPress login attempts by using a plugin that restricts the number of login attempts per IP address or user account. Some popular plugins for this purpose include Limit Login Attempts Reloaded, Login LockDown, and WP Limit Login Attempts.
Yes, limiting login attempts can potentially affect legitimate users who mistype their username or password too many times. To avoid this, ensure to set a reasonable limit on login attempts and provide clear instructions for the legit users. You can also hide the source code and the login page to ensure only legit users can find the login page.
Learn how to limit WordPress login attempts to protect your site from brute force attacks. By implementing security measures such as two-factor authentication and using a plugin like Limit Login Attempts Reloaded, you can decrease the likelihood of unauthorized access to your website.
Conclusion
In this article, we discussed the importance of limiting login attempts on your WordPress website to prevent unauthorized access and brute-force attacks. We also provided step-by-step instructions on how to implement this security measure using plugins like Login LockDown.
Thank you for reading our article on how to limit WordPress login attempts. If you have any questions or encounter any problems while implementing these measures, don’t hesitate to ask in the comments section below. We are always happy to help!
If you want to learn more about securing your WordPress website and improving its performance, be sure to check out the BetterStudio blog for more related tutorials.
To stay up-to-date with our latest tutorials and tips, follow BetterStudio on Facebook and Twitter. We regularly share valuable insights and resources that can help you optimize your website and grow your online presence.