Every CMS platform including WordPress has its own advantages and disadvantages.
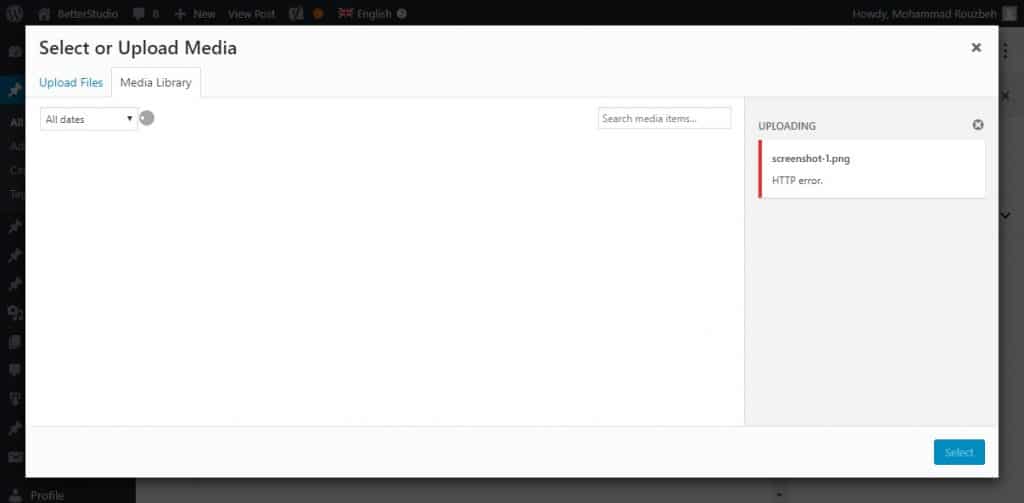
One of the most common errors in WordPress is HTTP error. Unlike other errors in WordPress, HTTP error doesn’t leave any trace behind. Therefore, fixing WordPress HTTP errors can be difficult, time-consuming and you have to try every single way to find the problem and fix it.
In this article, we discuss the most basic ways and some advanced ways of fixing WordPress HTTP error. For example, from renaming an image to refreshing your browser and increasing your PHP memory limit.
Keep in mind, to fix WordPress HTTP error you need to have patience and time. As we mentioned above, this error doesn’t leave any trace behind, therefore, it’s hard to locate the cause of it, unless we tried every method.
Firstly, we begin by explaining the error itself. So you can have a better understanding of it, then we follow up by explaining methods of fixing it.
What is the WordPress HTTP Error?
Before we talk about ways of fixing HTTP error, it’s best to talk about it a bit.
HTTP error often occurs when you are trying to upload video content via your media library.
HTTP error is known as the unknown error in the WordPress community. Because there are a lot of reasons for the occurrence of this error. You don’t know where you need to look and what you need to fix.
One of the difficulties of fixing WordPress HTTP error is that it doesn’t leave any traces behind.
The error log allows you to look for the exact location to fix the error. But when HTTP error occurs, there is no such thing as a log. The only message you can see is the error itself.
How to Fix the WordPress HTTP Error?
There are many reasons behind the WordPress HTTP error. Plugins, images, memory and etc. but when this error occurs, you don’t know where exactly you need to look and what exactly caused HTTP error.

Fortunately, there are many ways to fix WordPress HTTP error. In this article, we discuss every single method to fix WordPress HTTP error.
1. Refresh the Page or Switch Browser
The first step to fix the WordPress HTTP error is to refresh the web page. It’s very simple, right? Don’t be surprised, in a lot of cases a simple refresh can fix this error. Let us review it.
When your browser loses connection to your WordPress website, an HTTP error is displayed on your screen. Ultimately, this causes you to redo your work on your website. This disconnection can be caused by your internet provider as well. Usually, by refreshing the page, this error is easily fixed.
Often, when you open a new tab in your browser or refresh your web page, you are no longer in your WordPress account.
Of course, this has to do with your WordPress timeout settings. This usually means you have reached the time you are allowed to stay in your WordPress dashboard and you need to re-login to access your dashboard again.
Even after logging back in, you may see the HTTP error when uploading a video through your media library. A simple refresh may fix this error.
To fix HTTP error, you can even change your browser. Your browser may be the cause of this error and there may be no errors coming from your website. Therefore, its best to try every possibility.


2. Clear Browser Cache
Clearing browser cache can fix many errors and you may have heard of it many times. It is very important to clear your browser’s cache after a while. Clearing browser cache is a simple way of fixing HTTP error as well as other errors.
What is browser cache? When you visit a website, your browser saves crucial information in its memory. By doing so, your browser can load the same page or website faster the next time you visit.
Why do we need to clear our browser cache? In most cases, you won’t notice or you are unaware of problems your browser cache can cause. Because everything is happening behind the scene and hidden from our eyes.
For example, imagine you have made crucial changes to your website. But no matter how many times you refresh the web page, you are still unable to see the changes you have made. This is when your browser cache needs to be deleted. Because your information is saved in your browser’s memory and every time you visit your website, you see the same page.
Before you completely clear the browser’s cache, it is recommended that you delete a specific page from your browser’s memory.
To delete a page’s cache, in Windows and Linux you can use Ctrl+F5 hotkey. If you are a Mac user you can use CMD+Shift+R hotkey. In addition, for Apple Safari you can use Shift+Reload hotkey.
However, if you want to completely clear your browser cache you must follow the steps below.
Google Chrome
To clear Google Chrome’s cache:
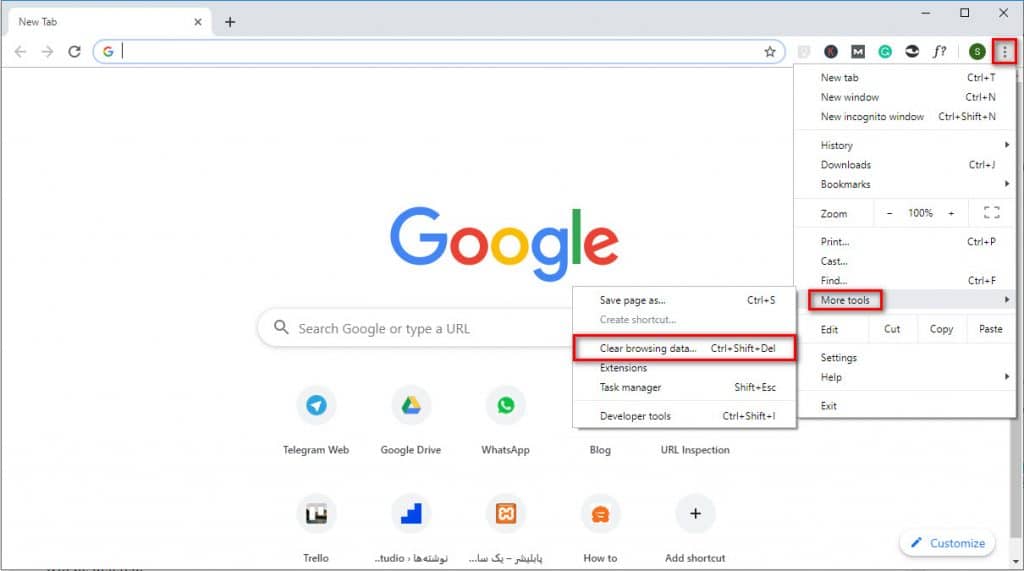
1. From the top right corner, click on the triple line.
2. Click on more tools from the opened menu.
3. Select Clear browsing data. (Ctrl+Shift+Del is the hotkey)

4. Once the clear browsing data page is opened for you. Make sure you have cached images and files selected and nothing else. Otherwise, you lose all of your information saved in your browser. Such as history, cookies, passwords and etc.
5. Finally, click on Clear browsing data to delete your browser’s cache.
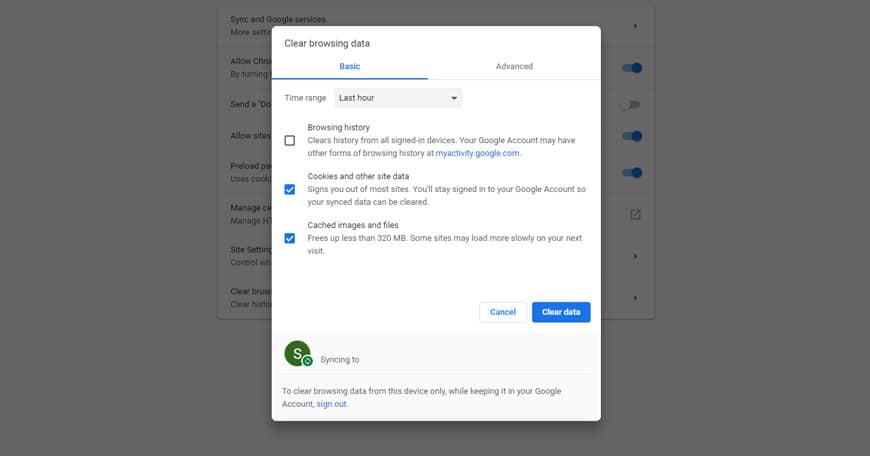

Keep in mind, you can also select the period in which you want your cache removed. To select your desired time-frame, in the clear browsing data window you can select your time-frame right next to the “obliterate the following items from”.
Mozilla Firefox
To clear Firefox’s cache:
1. First, from the top right corner click on the triple lines.
2. Click on Library.
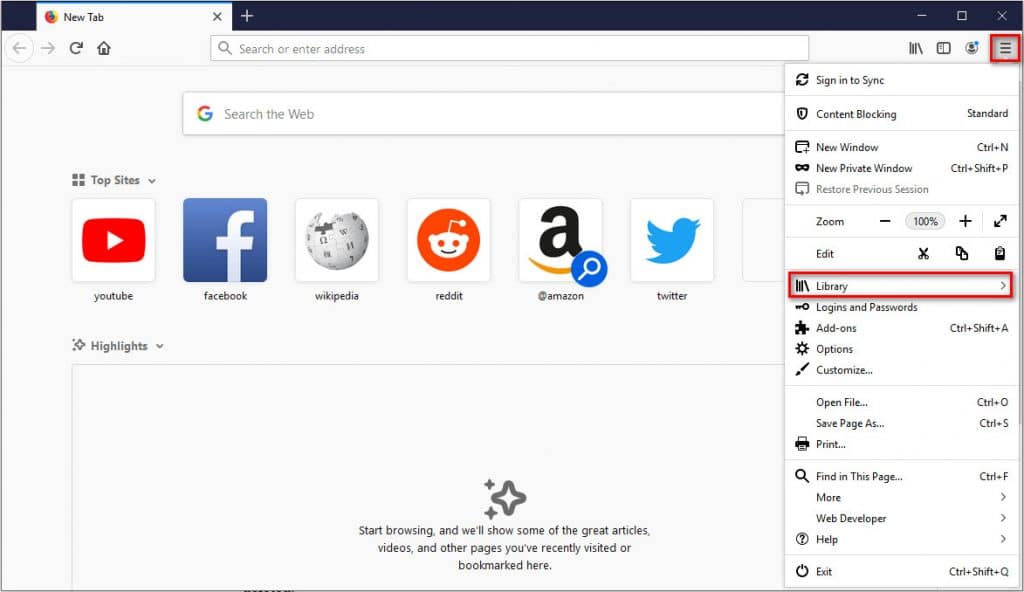

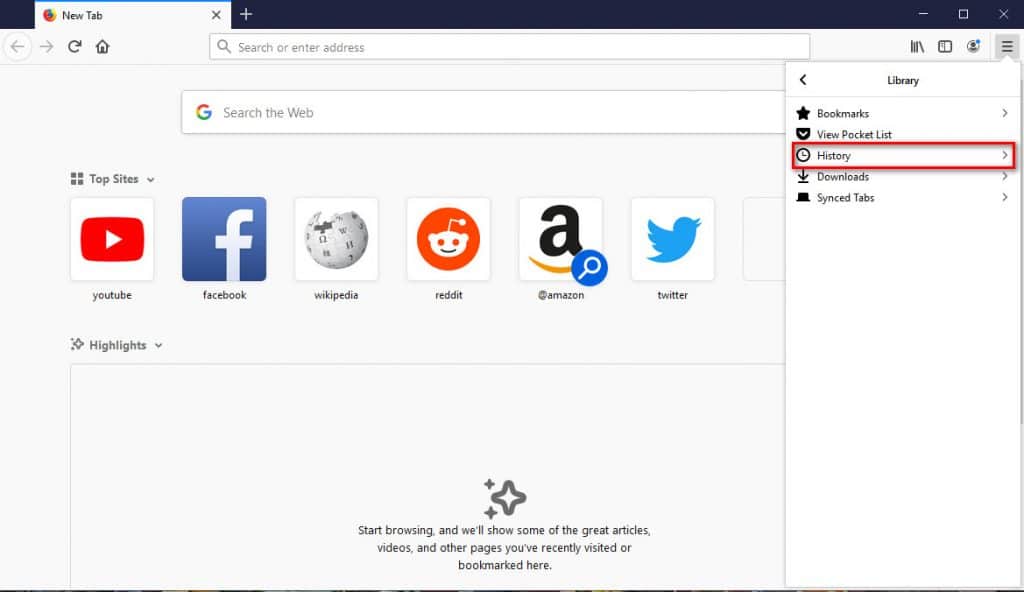
3. Then click on History.

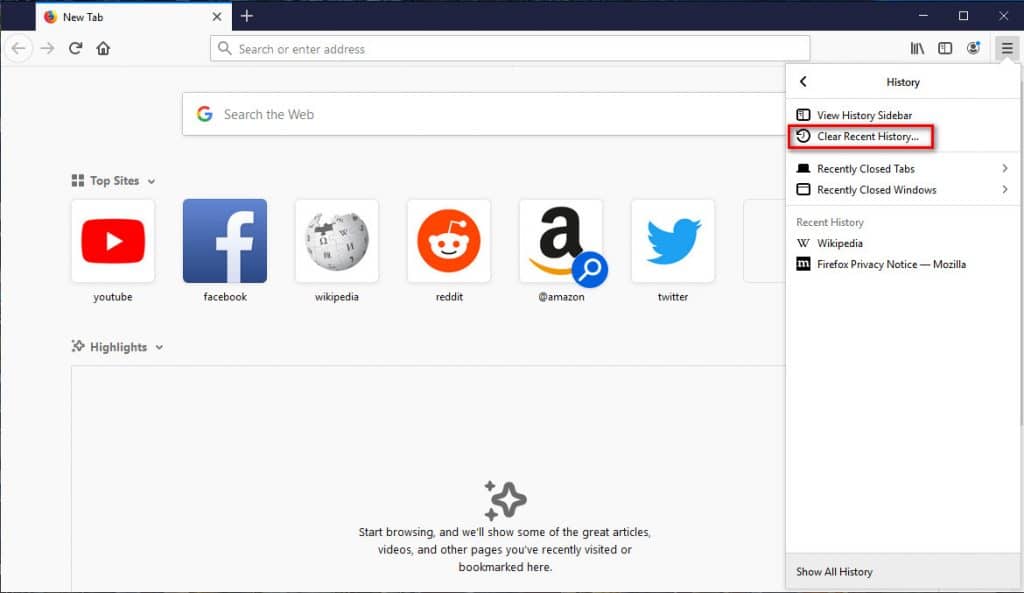
4. Select Clear recent history from the appeared menu.

5. Select “Everything” in “Time range to clear”. Again, make sure only cache is checked and nothing else. Otherwise, you lose your saved information.
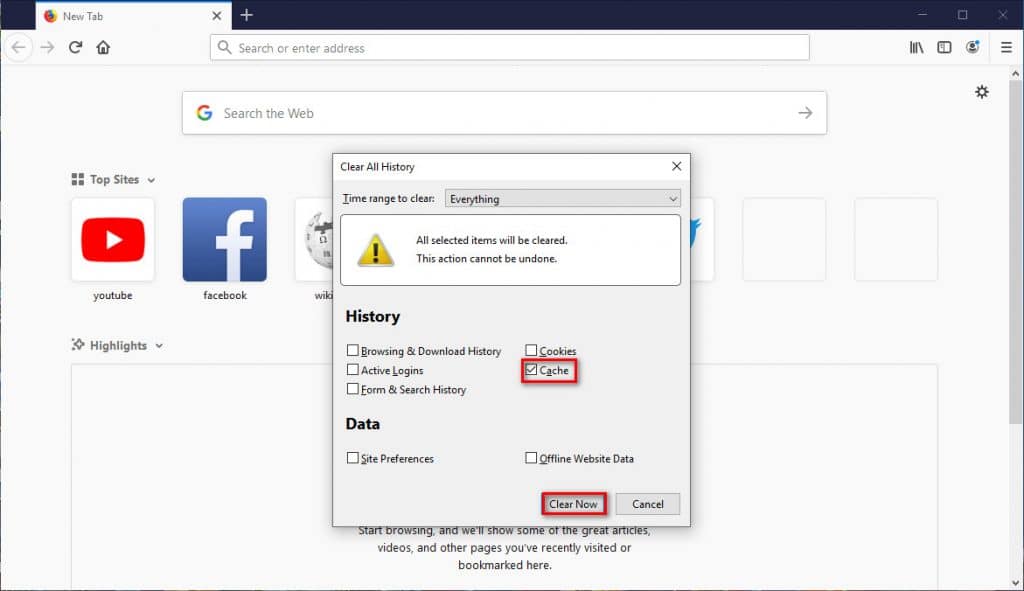

6. Finally, click on clear now.
Safari
To clear your Safari’s cache, first, you need to enable an option to be able to access your browser’s cache. To do so, follow the steps below:
1. Open Safari and from preferences go to Advanced.
2. Then enable “Show develop menu in menu bar” option.
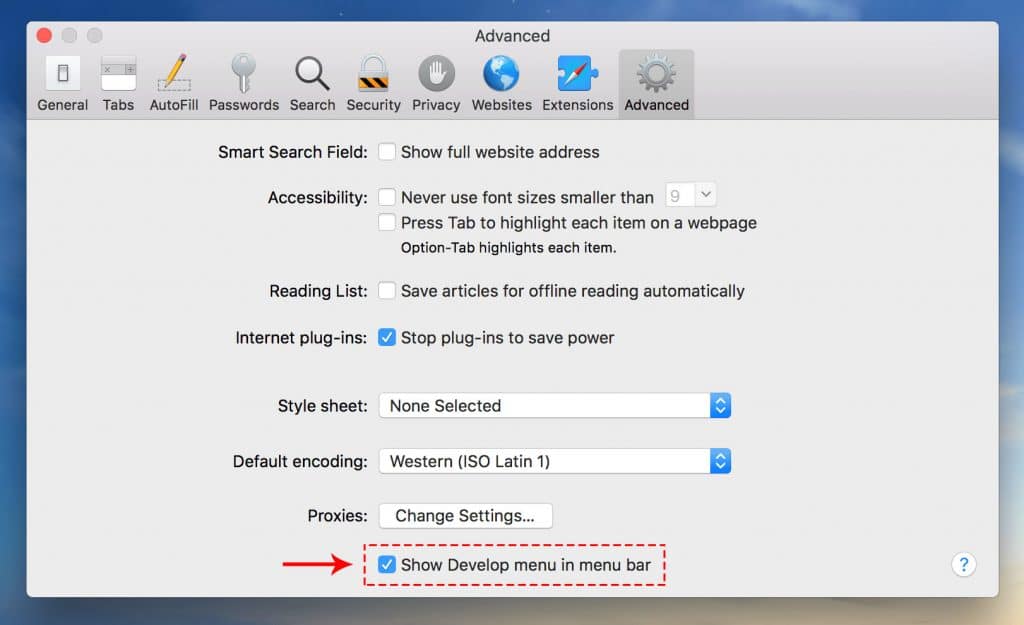

3. Once you have enabled this option, the develop menu is displayed on your toolbar. Click on it.
4. From the opened menu, click on empty caches.
You can easily clear Safari’s cache by following these steps.
Internet Explorer
To clear IE’s cache:
1. Click on the gear icon on the top right corner, then click on safety.
2. Select delete browsing history and make sure “temporary internet files and website files” is the only selected option.
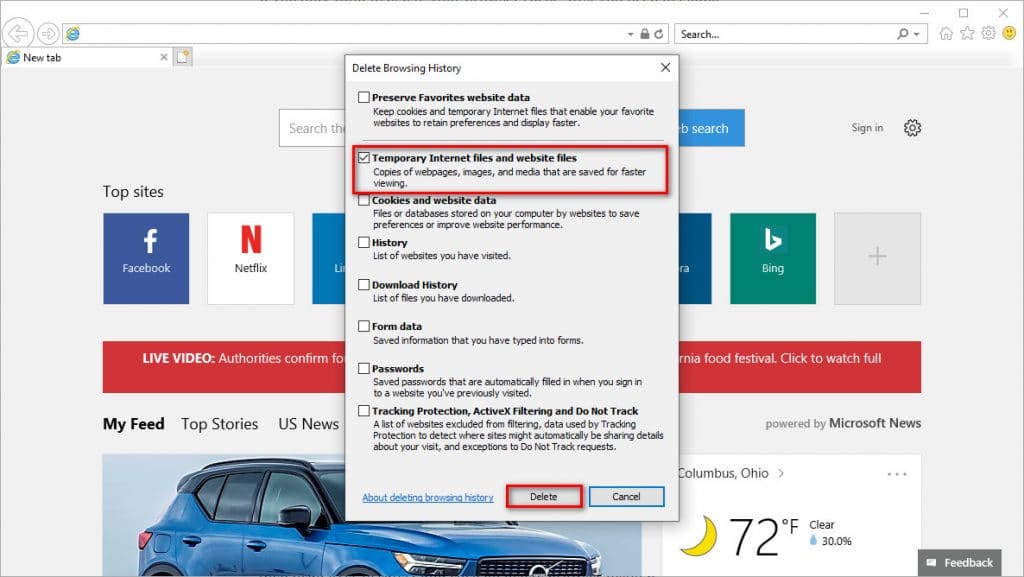

3. Finally, click on delete to clear your browser’s cache.
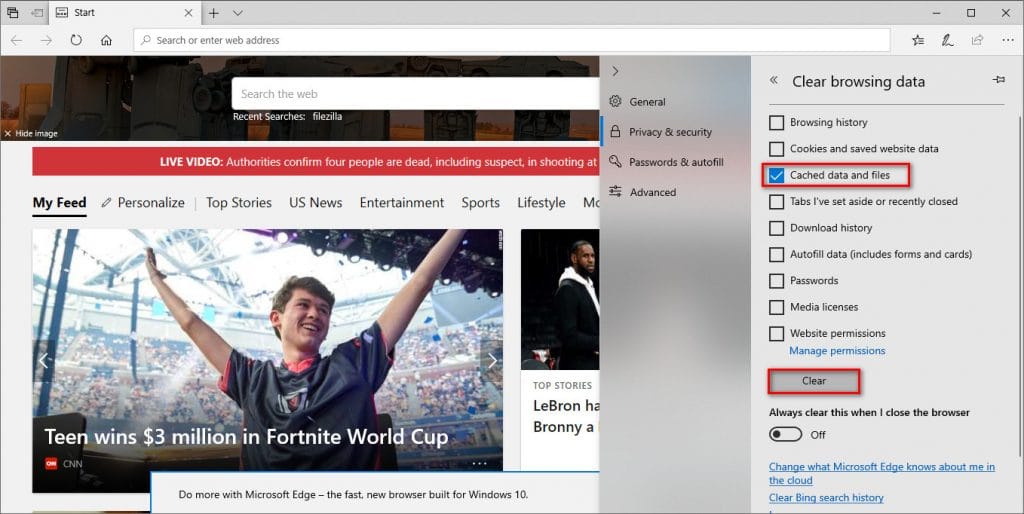
Microsoft Edge
To clear Edge’s cache:
1. Click on the triple dots on the top right corner.
2. Select setting.
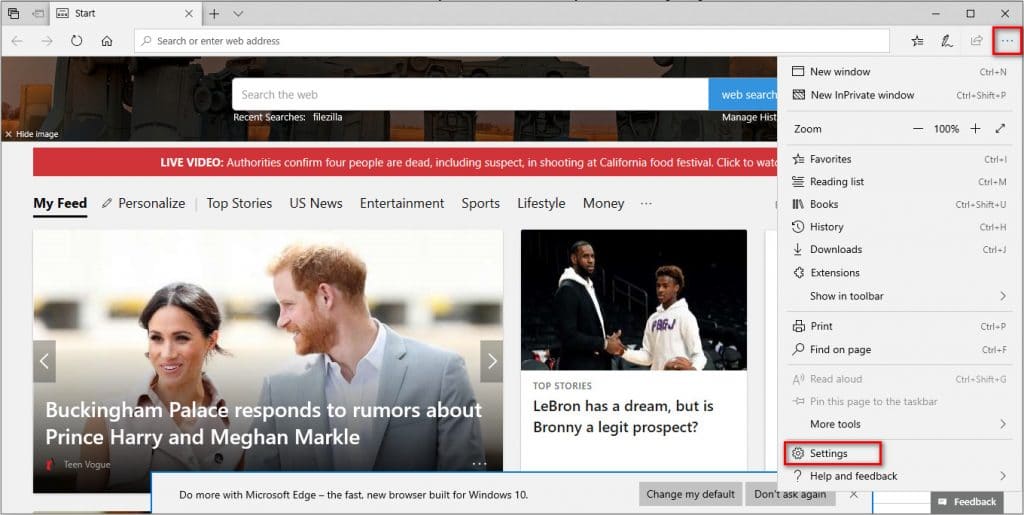

3. Under Privacy & security, from the clear browsing data section click on choose what to clear and click on cached data and files.
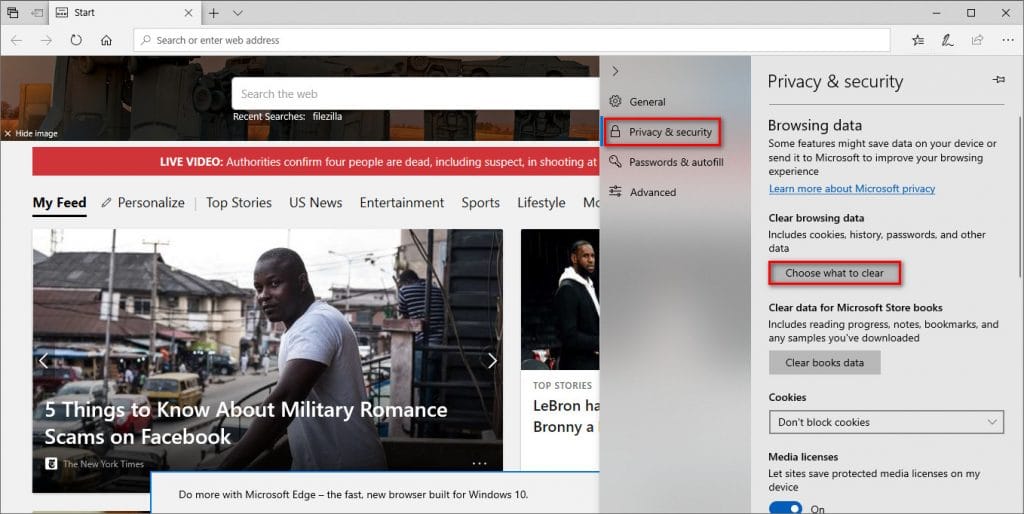

4. Finally, click on clear to clear your cache.

Opera
To clear Opera’s cache:
1. Click on O on the top left corner of your browser.
2. Go to more tools and select clear browsing data.
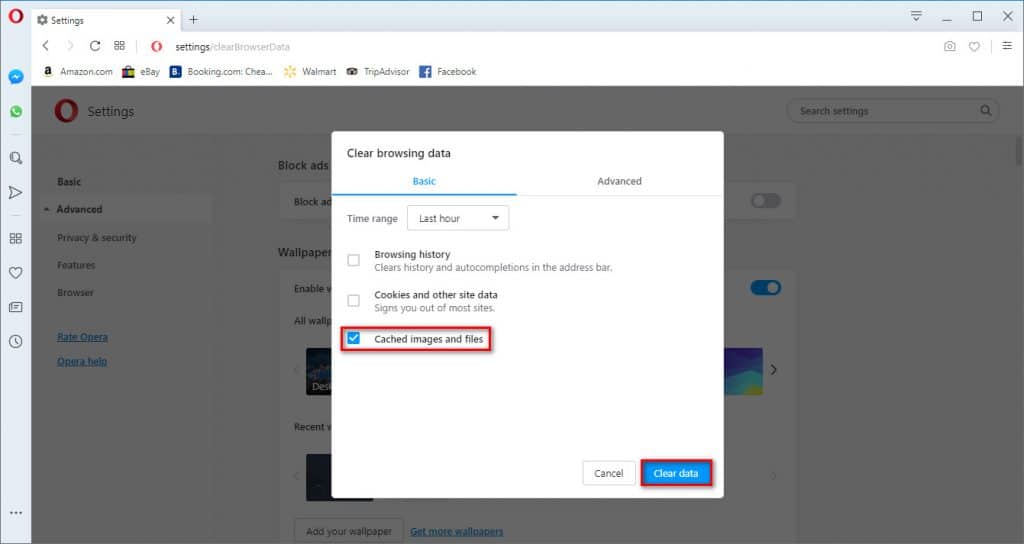

3. Just like Google Chrome, from the obliterate the following items from the menu you can select the time-frame you desire and make sure cached images and files box is checked.
4. Finally, click on Clear browsing data.
This is everything you need to do to clear Opera’s cache.
3. Rename the Image File
Renaming an image is another way to fix WordPress HTTP errors. You may ask, what is the connection between renaming an image and HTTP error?
As you know, if you upload duplicate files to WordPress, by default, WordPress adds a number next to one of them. But sometimes, you may have to manually do this yourself.
For this method, you can’t directly rename the uploaded file. You need to rename it on your computer and re-upload it to your website.
Rename your file using lower-case letters. Also, make sure you use dash (-) to add a number to your file.
For example: filename-01.jpg
4. Reduce the image File size
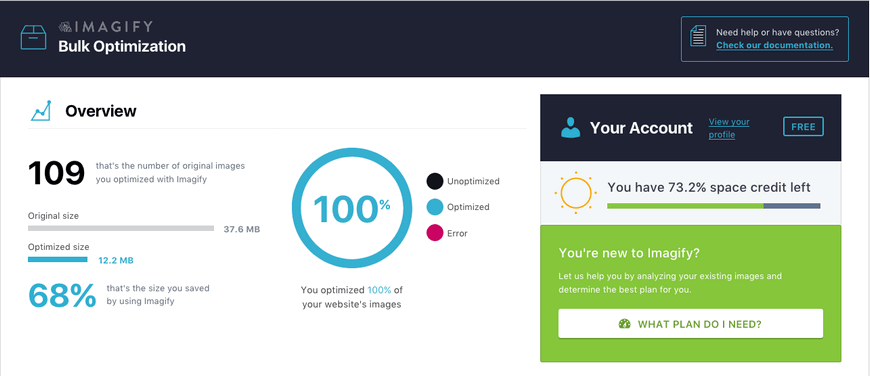
Sometimes compressing your images to reduce their size can fix WordPress HTTP errors.
There are a lot of plugins in the official WordPress plugin store to compress your images. There are also other ways to compress your images without losing their quality. You can check our list of best WordPress image compression plugins to find the best fit for your needs.

5. Try changing the image format
Changing your image format is another method to fix WordPress HTTP error. WordPress may be sensitive to certain formats. Change your image format and find the one that WordPress accepts.
To fix this error, you can change the format of your desired image to either .jpg or .png. Upload your images with different formats and check which one causes HTTP error.
6. Temporarily Deactivate Plugins and Themes (plugin Conflict)
This method can help fix almost every error caused by WordPress. We recommend disabling all of your plugins and change your theme to one of the default themes provided by WordPress.


Sometimes, security or image optimization plugins can cause HTTP error.
Security plugins are very sensitive to what you upload on your website. If HTTP error occurs right after installing a new plugin, deactivate and delete that plugin immediately.
To temporarily deactivate plugins and themes, simply go to the wp-content folder and rename plugins and themes folders to something else. (picture above)
If you don’t want to deactivate plugins on your live website, you can do so on your stage/test website and once you found the broken plugin you can deactivate it from your live website.
7. Increase PHP Memory Limit in WordPress
WordPress HTTP error may also occur when your website has reached its maximum PHP memory limit. PHP memory limit is almost always the answer to different errors in WordPress, especially HTTP errors.
To fix this issue, you need to increase your PHP memory limit. We recommend increasing it to 256 MB. There are many ways to increase your PHP memory limit, below we discuss some of them:

Increase PHP memory limit via wp-config.php
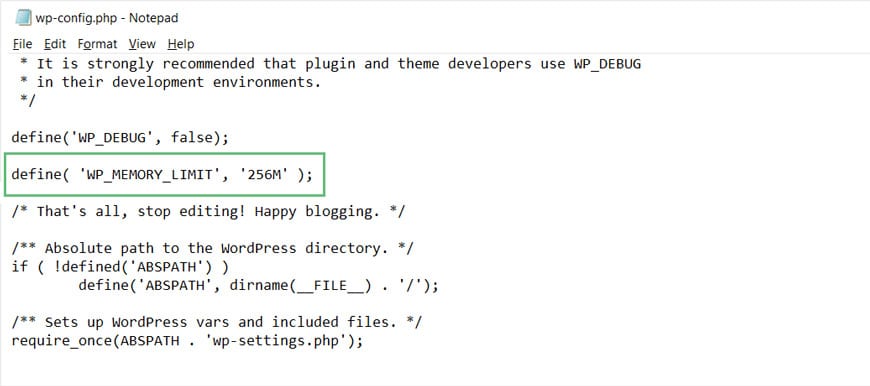
One way to increase the PHP memory limit is via wp-config.php file. All you need to do is copy and paste the code below to your wp-config.php file:
define( ‘WP_MEMORY_LIMIT’,’256M’);Increase PHP memory limit from cPanel
The other way is to increase your PHP memory limit from your cPanel. If you are hosting is cPanel then you have two ways to increase your PHP memory limit.
The first way: Go to the software section and click on select PHP version. Then click on switch to PHP options.
By clicking on memory_limit you can change it to 256MB.
The second way: Go to the software section and click on MultiPHP INI Editor.
From the opened window, scroll down until you find memory_limit and enter your desired number. (again we recommend 256MB)
Increase PHP memory limit via php.ini
If you are not using cPanel, you can change your PHP memory directly from your php.ini file.
To do so, connect to your website with an FTP or SSH client. Look for php.ini in your root directory. (If the file doesn’t exist, you can create a file and name it php.ini)
Look for memory_limit and change the amount to your desired number.
Increase PHP memory limit via .htaccess
With the help of the .htaccess file, you can manage your server. If for any reason, you don’t have access to the php.ini file, you need to use .htaccess file to increase your PHP memory limit.
Connect to your website with an FTP or SSH client. From your root directory look for .htaccess file.
Look for php_value memory_limit in the .htaccess file and increase it to 256 MB.
8. Check Uploads Folder Permissions (Media Folder)
You usually receive a message when file and folder permissions error occurs. This error tells you, you don’t have the required permission to upload a file to your uploads folder in wp-content. Whatever you upload on your website is saved in uploads in wp-content folder.
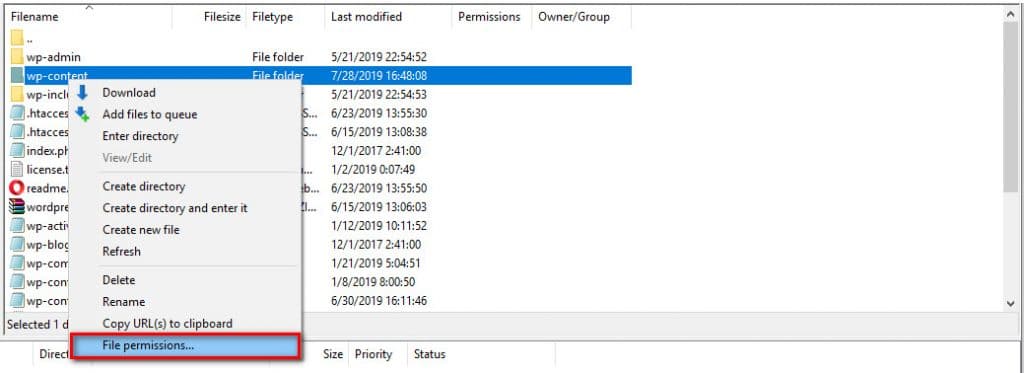

According to WordPress standards, permissions for all of your folders must be 750 or 755. To view your folder’s permission, you need to connect to your website via an FTP client.
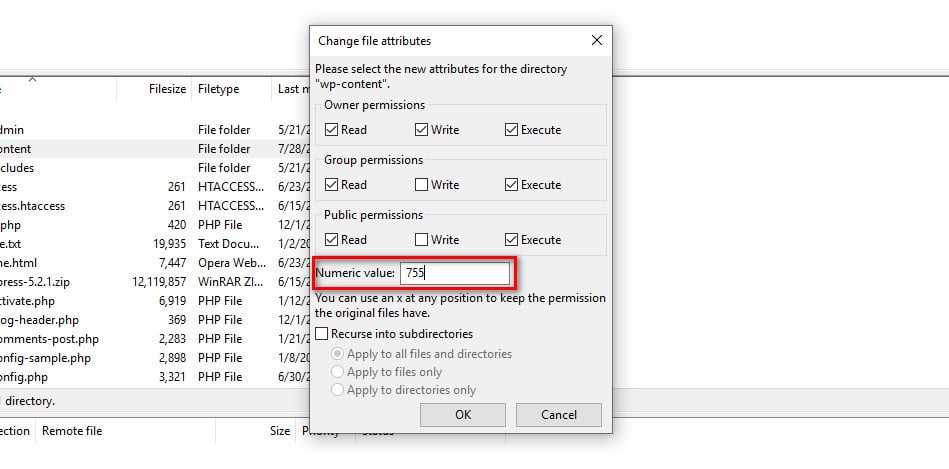

Then right-click on the desired folder and click on file permissions. Here you can change the number to 755.
Keep in mind, if you are manually changing the permissions you need to enable “Apply to directories only and recurse into subdirectories”.
9. Update WordPress PHP version to the Latest
Don’t forget to update your PHP version. WordPress HTTP error may occur when you haven’t updated your PHP. WordPress developers always recommend updating PHP. Updating your website and files not only fixes the errors, but it also increases the security and performance of your website.
If you are using cPanel, you can easily check your website’s PHP version and update it.
To do so, enter your cPanel, from the software section click on select PHP version.
You can view the current PHP version. Also, from the drop-down menu, you can check the supported versions by your hosting provider.
10. Remove Custom Media Library Path
Incorrect media library path can also cause WordPress HTTP error.
This error often occurs when users change their media library path. If you go to your media library settings and see a path folder, delete it. Finally, save your settings.
The only folder that your media files should be uploaded to is wp-content this is the only path recognized by your WordPress website and hosting provider.
11. Disable mod_security
Mod_security is an open-source firewall and sometimes it can cause HTTP error. You can fix this error by deactivating the firewall in your .htaccess file.
Simply copy and paste the code below to your .htaccess file:
<IfModule mod_security.c>
SecFilterEngine Off
SecFilterScanPOST Off
</IfModule>
You can also deactivate this mod from your cPanel. Simply head over to your Security section and select mod_security. Once it opens, set it to off and save your changes.
As you know, the base language of WordPress is PHP. PHP uses two main modules for its library. Imagick and GD Library. Both of these libraries are powerful and they both function well.
However, due to the lack of memory, Imagick can cause issues for WordPress users. WordPress HTTP error is one of the issues Imagick can cause.
To change Imagick to GD Library, you need to copy and paste the code below to your function.php file or your theme’s source code:
functionwpb_image_editor_default_to_gd( $editors){
$ gd_editor= 'WP_Image_Editor_GD;'
$ editors= array_diff( $editors, array( $gd_editor) );
array_unshift( $editors, $gd_editor);
return$editors;
}
add_filter( 'wp_image_editors', 'wpb_image_editor_default_to_gd');
Once you have saved your changes, try to upload an image to your WordPress website. If this method didn’t work, make sure you delete the added code above from your files.
13. Limit Image Editor Library of WordPress by .htaccess
As we mentioned above, Imagick is one of the powerful libraries in WordPress and the only disadvantage it has, is its limited memory, which can cause many errors for your website.
On the other hand, the .htaccess file controls your website. This file can be located in your root directory.
Hosting providers, often limit Imagick to upload one image at a time, to increase the speed and performance of uploading images to the library. Because uploading multiple images at a time can cause WordPress HTTP error.
To manually limit Imagick in .htaccess file, simply copy and paste the code below to your .htaccess file:
SetEnv MAGICK_THREAD_LIMIT 1Now you have manually limited Imagick to accept one image at a time.
14. Install Add From Server Plugin
Your last fix is to install Add From Server plugin. This plugin is offered totally free for WordPress users.
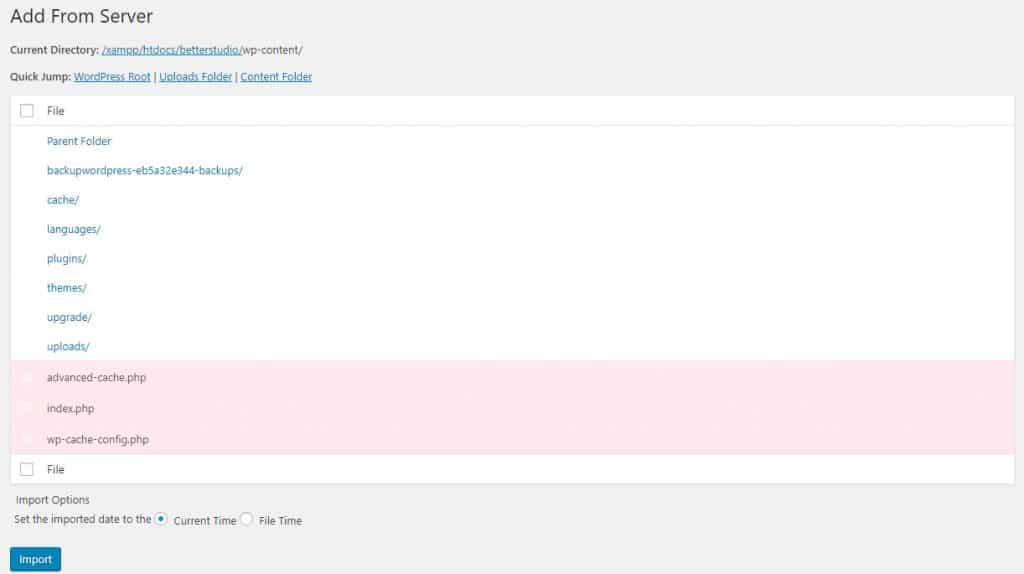

Although, the plugin is just a temporary fix for users who are in the middle of publishing an important post and need to upload images, videos and etc. It allows you to upload big files from SFTP to your website.
As we mentioned, this plugin is a temporary fix to upload your files until you locate the root cause of HTTP error. To download this plugin you can head over to the official WordPress plugin store.
15. Ask Your WordPress Host for HTTP Error
Your last resort to fix WordPress HTTP error is to contact your hosting provider.
If you are tired of testing the ways we mentioned above and you can’t think of any other way, the best solution that comes to mind is to contact your hosting provider. Hosting providers have the essential knowledge about uploading files from server to website and they can help you with such errors.
Many hosting providers come with 24/7 support. You can contact them via a simple phone call or via email.

 العربية
