A WordPress website consists of three main sections, posts, pages, and comments. By default, each section is in its most basic form.
Although in WordPress, you can customize every single file in your theme and change the structurebut we also sugWordPress provides you with the ability to customize every single file in your theme and change the structure, however, we suggest you also check out the WordPress comment plugins that are extremely useful when editing and customizing the WordPress comments.
The comment form underneath every post is of particular importance. But first, this section must be appealing to readers and users. Unfortunately, the default themes are not appealing to WordPress users.
If the comment form is appealing, users get encouraged to post their comments and join in on the discussion in the comment form below your posts.
In this article, we discuss how to customize the WordPress comment form by modifying the codes in your WordPress theme. In addition, we introduce plugins to make this section more appealing.
Change the Font of Comments Form
By using CSS classes, you can change how texts appear inside the input boxes. For example, in the code below, we change the font of author, email address and URL. Simply add the code to your style.css file:
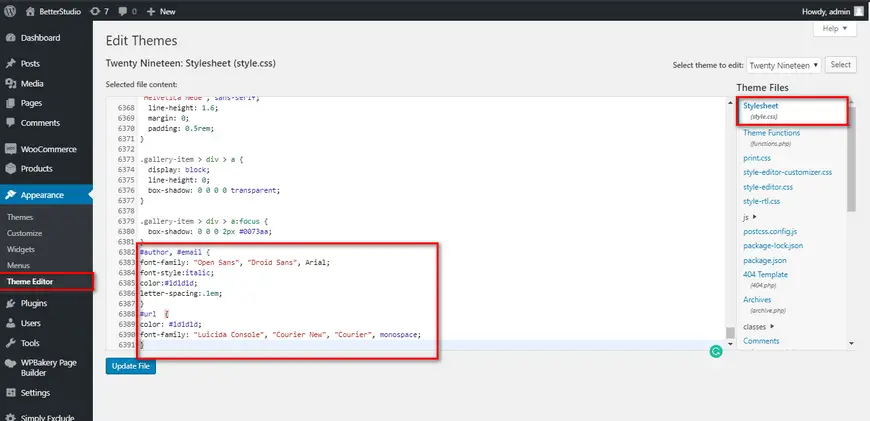

#author, #email {
font-family: "Open Sans", "Droid Sans", Arial;
font-style:italic;
color:#1d1d1d;
letter-spacing:.1em;
}
#url  {
color: #1d1d1d;
font-family: "Luicida Console", "Courier New", "Courier", monospace;
}

Change the Submit Comment Button
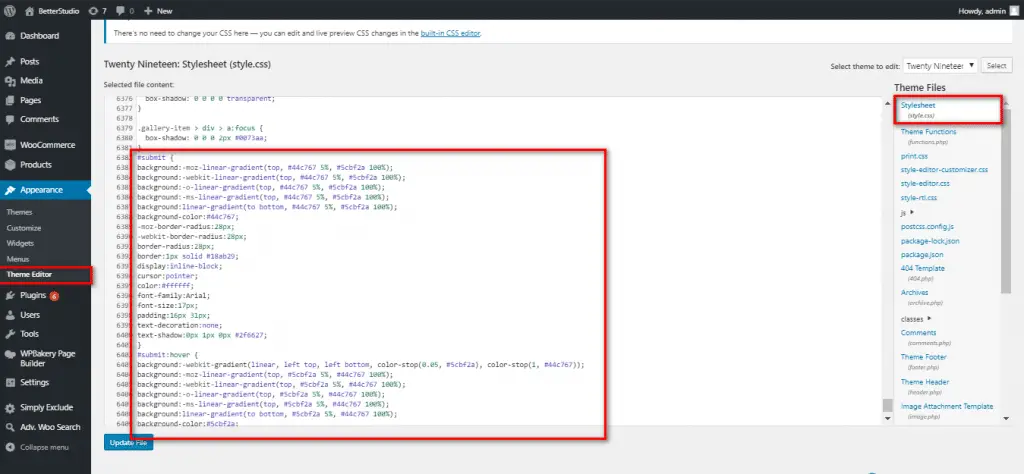

To change the appearance of the submit comment button in WordPress, use the code below in your style.css file:
#submit {
background:-moz-linear-gradient(top, #44c767 5%, #5cbf2a 100%);
background:-webkit-linear-gradient(top, #44c767 5%, #5cbf2a 100%);
background:-o-linear-gradient(top, #44c767 5%, #5cbf2a 100%);
background:-ms-linear-gradient(top, #44c767 5%, #5cbf2a 100%);
background:linear-gradient(to bottom, #44c767 5%, #5cbf2a 100%);
background-color:#44c767;
-moz-border-radius:28px;
-webkit-border-radius:28px;
border-radius:28px;
border:1px solid #18ab29;
display:inline-block;
cursor:pointer;
color:#ffffff;
font-family:Arial;
font-size:17px;
padding:16px 31px;
text-decoration:none;
text-shadow:0px 1px 0px #2f6627;
}
#submit:hover {
background:-webkit-gradient(linear, left top, left bottom, color-stop(0.05, #5cbf2a), color-stop(1, #44c767));
background:-moz-linear-gradient(top, #5cbf2a 5%, #44c767 100%);
background:-webkit-linear-gradient(top, #5cbf2a 5%, #44c767 100%);
background:-o-linear-gradient(top, #5cbf2a 5%, #44c767 100%);
background:-ms-linear-gradient(top, #5cbf2a 5%, #44c767 100%);
background:linear-gradient(to bottom, #5cbf2a 5%, #44c767 100%);
background-color:#5cbf2a;
}
#submit:active {
position:relative;
top:1px;
}

To change the name of the submit comment button in WordPress comment form, use the code below in the functions.php file or add it to the plugin you have to customize WordPress comment form:
$commenter = wp_get_current_commenter();
$req = get_option( 'require_name_email' );
$aria_req = ( $req ? " aria-required='true'" : '' );
$fields =  array(
    'author' => '<p class="comment-form-author">' . '<label for="author">' . __( 'Name' ) . '</label> ' . ( $req ? '<span class="required">*</span>' : '' ) .
        '<input id="author" name="author" type="text" value="' . esc_attr( $commenter['comment_author'] ) . '" size="30"' . $aria_req . ' /></p>',
    'email'  => '<p class="comment-form-email"><label for="email">' . __( 'Email' ) . '</label> ' . ( $req ? '<span class="required">*</span>' : '' ) .
        '<input id="email" name="email" type="text" value="' . esc_attr(  $commenter['comment_author_email'] ) . '" size="30"' . $aria_req . ' /></p>',
);
$comments_args = array(
    'fields' =>  $fields,
    'label_submit' => 'Send My Comment'
);
comment_form($comments_args);
Remove Website URL Field from Comment Form
The URL field in the WordPress comment form is very attractive to spammers.
By simply removing this field you can’t prevent spammers from posting comments on your website, but you stop a spammer from typing an inappropriate URL in the URL field.
In addition, by removing this field, posting a comment becomes much simpler for your users.
To remove the website URL field, copy the code below in your functions.php file:
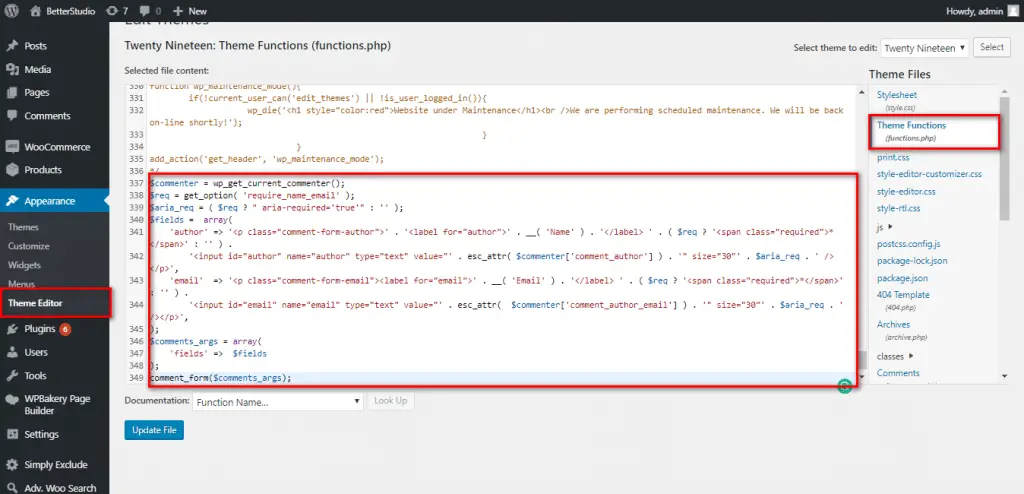

$commenter = wp_get_current_commenter();
$req = get_option( 'require_name_email' );
$aria_req = ( $req ? " aria-required='true'" : '' );
$fields =  array(
    'author' => '<p class="comment-form-author">' . '<label for="author">' . __( 'Name' ) . '</label> ' . ( $req ? '<span class="required">*</span>' : '' ) .
        '<input id="author" name="author" type="text" value="' . esc_attr( $commenter['comment_author'] ) . '" size="30"' . $aria_req . ' /></p>',
    'email'  => '<p class="comment-form-email"><label for="email">' . __( 'Email' ) . '</label> ' . ( $req ? '<span class="required">*</span>' : '' ) .
        '<input id="email" name="email" type="text" value="' . esc_attr(  $commenter['comment_author_email'] ) . '" size="30"' . $aria_req . ' /></p>',
);
$comments_args = array(
    'fields' =>  $fields
);
comment_form($comments_args);
Add a Field to the Comments Form
By using the comment_form_default_fields filter, you can add new fields to the WordPress comment form.
Using filters becomes handy when you want to customize comments form from plugins without manually changing the theme files.
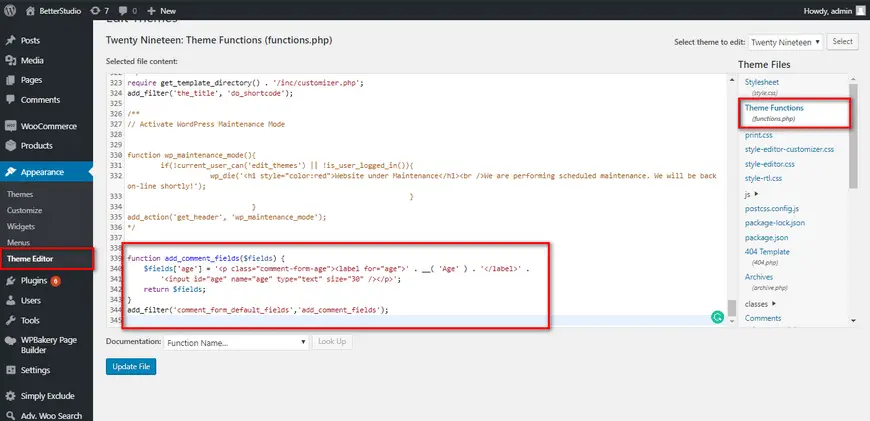

For example, in the code below we will add the age field to the WordPress comment form:
function add_comment_fields($fields) {
    $fields['age'] = '<p class="comment-form-age"><label for="age">' . __( 'Age' ) . '</label>' .
        '<input id="age" name="age" type="text" size="30" /></p>';
    return $fields;
}
add_filter('comment_form_default_fields','add_comment_fields');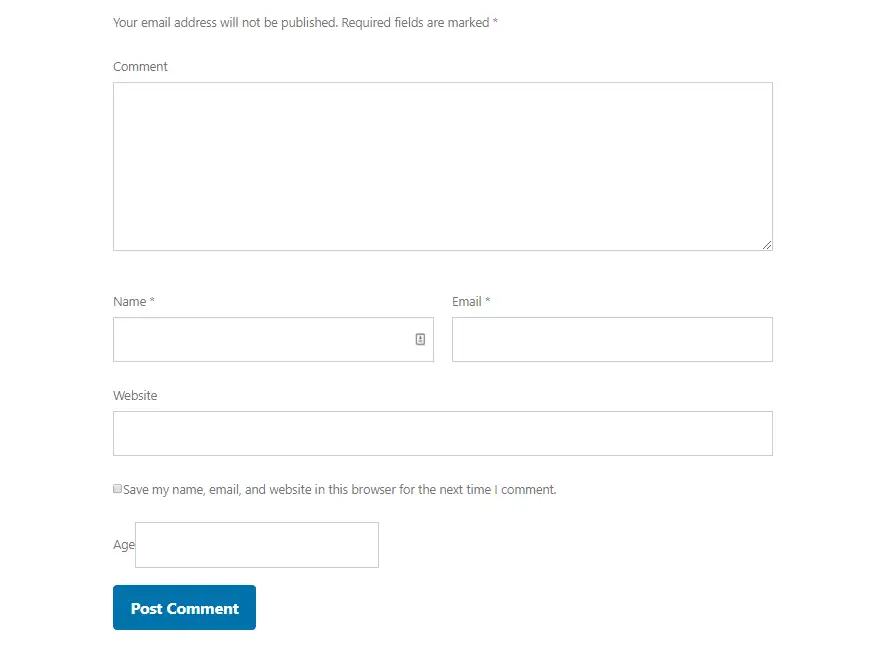

Add reCAPTCHA to Comment Form
reCAPTCHA increases the security of your website and prevents spammers from publishing comments on your website.
The Invisible reCAPTCHA plugin is one of the best plugins you can use to add reCAPTCHA to WordPress.
reCAPTCHA is a service supported by Google and it’s designed to separate bots from people. Only a person can answer its security questions and bots cannot bypass the reCAPTCHA security layers.
As you can probably tell, the Invisible reCAPTCHA plugin is an invisible plugin. It tracks your mouse pointer and IP address to identify if you are a human or a bot.
This plugin filters the comments form and prevents spammers from posting comments. This is one key feature of the Invisible reCAPTCHA plugin.
To add reCAPTCHA to the comment form, from the WordPress dashboard go to Plugins and Add New. Type in Invisible reCAPTCHA in the search box and then proceed to install and activate it. Follow the steps below to configure Invisible reCAPTHCAon your website
This service is supported by Google. Therefore, you need to create an account in Google reCAPTCHA:
- Open this link https://www.google.com/recaptcha/admin/create
- Enter the required information to connect reCAPTCHA to your account.
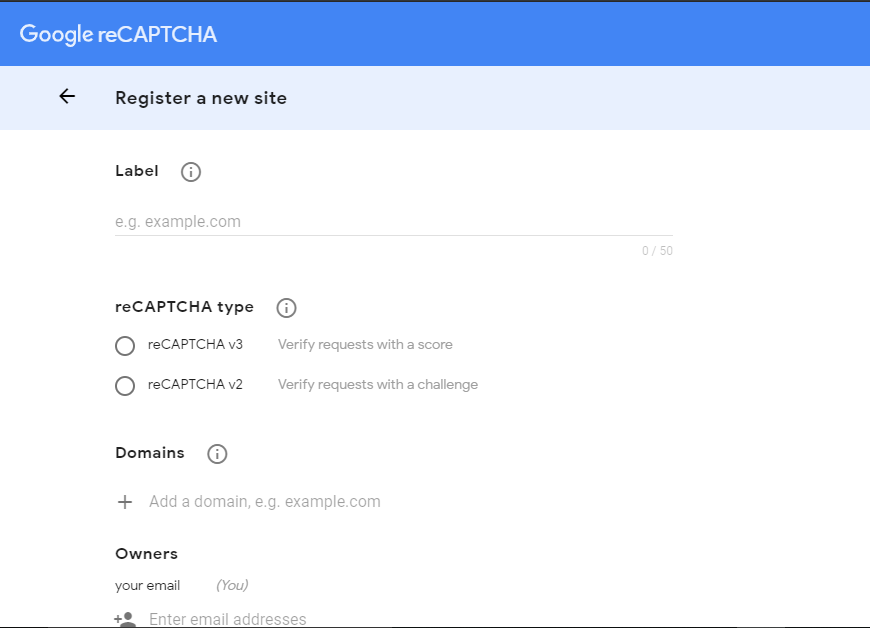

- Then register by clicking on the Submit.
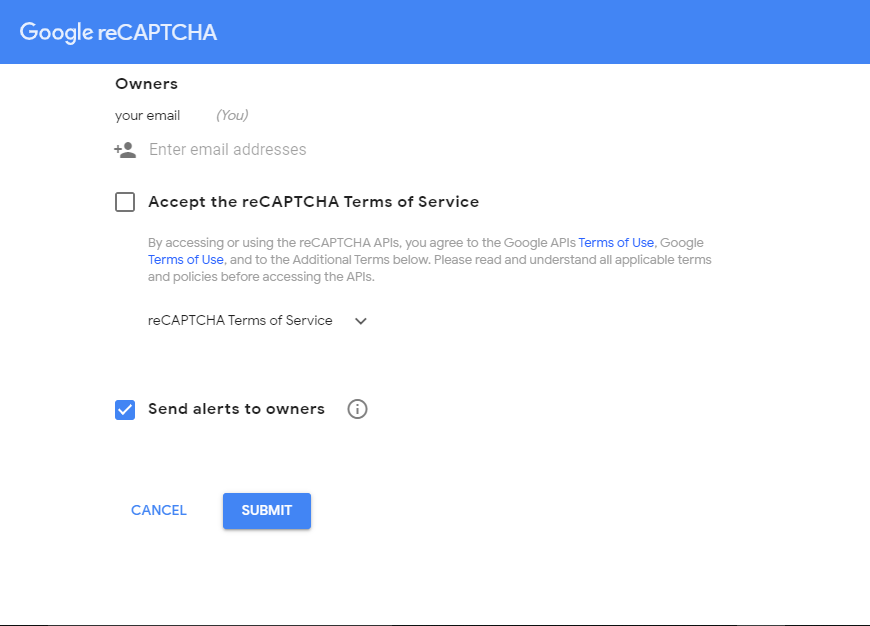

- Once the registration process is over, a Site key and Secret key will be displayed to you. Make sure you copy them in a notepad. You will need these keys to activate the plugin.
- In the next step, we need to activate the features we want. Go to WordPress dashboard and then Invisible reCAPTCHA Settings.
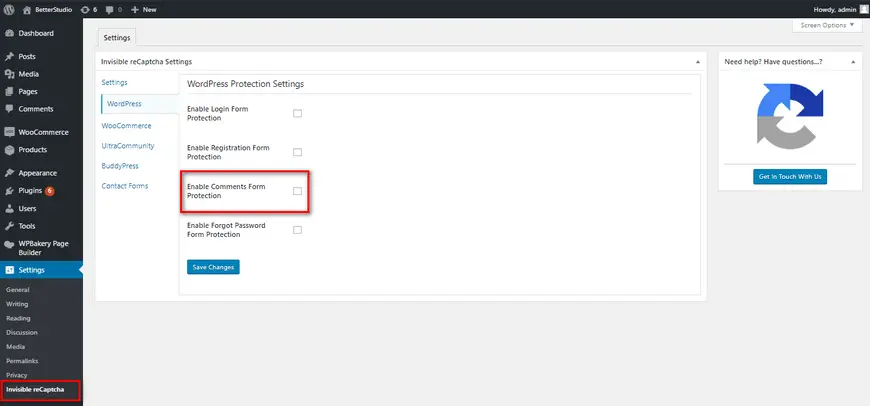

There are a few tabs in the settings. To enable reCAPTCHA in the comment section, you need to check “Enable Comments From Protection”.
Finally, save the changes.
Change the Title of Your Comment Section
To change the title above the WordPress comments form, add the code below to the functions.php file or the plugin you use to customize the WordPress comment form:
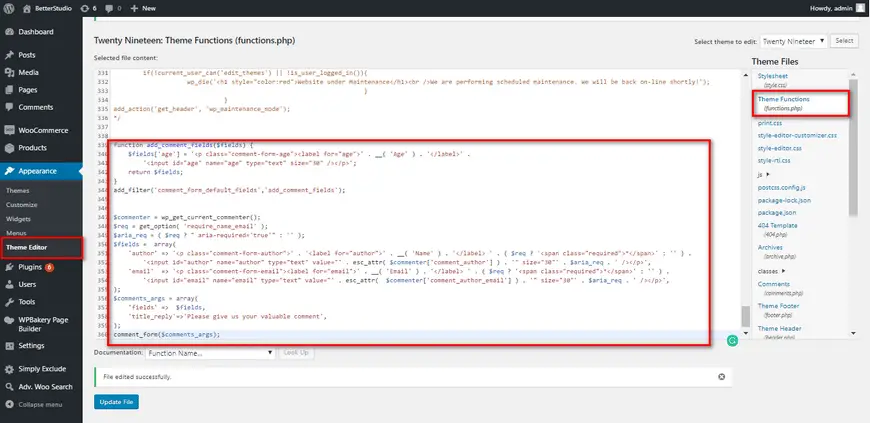

$commenter = wp_get_current_commenter();
$req = get_option( 'require_name_email' );
$aria_req = ( $req ? " aria-required='true'" : '' );
$fields =  array(
    'author' => '<p class="comment-form-author">' . '<label for="author">' . __( 'Name' ) . '</label> ' . ( $req ? '<span class="required">*</span>' : '' ) .
        '<input id="author" name="author" type="text" value="' . esc_attr( $commenter['comment_author'] ) . '" size="30"' . $aria_req . ' /></p>',
    'email'  => '<p class="comment-form-email"><label for="email">' . __( 'Email' ) . '</label> ' . ( $req ? '<span class="required">*</span>' : '' ) .
        '<input id="email" name="email" type="text" value="' . esc_attr(  $commenter['comment_author_email'] ) . '" size="30"' . $aria_req . ' /></p>',
);
$comments_args = array(
    'fields' =>  $fields,
    'title_reply'=>'Please give us your valuable comment',
);
comment_form($comments_args);
Move Text Field to the Bottom of the Form
By default, after WordPress version 4.4, in the comments section, the first field is the text field, then name, email and website URL.
In the previous versions, it was first name, email and website URL then the text field. If you want to use the older format in your website, simply copy the code below to the functions.php file or the plugin you are using to customize the WordPress comments form:
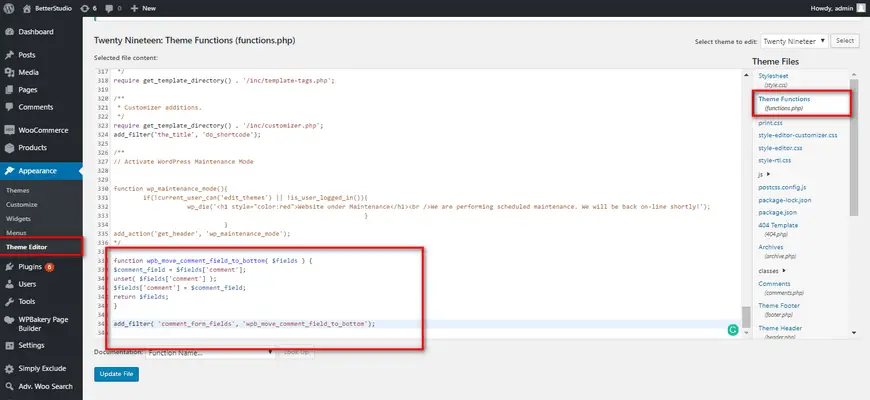

function wpb_move_comment_field_to_bottom( $fields ) {
$comment_field = $fields['comment'];
unset( $fields['comment'] );
$fields['comment'] = $comment_field;
return $fields;
}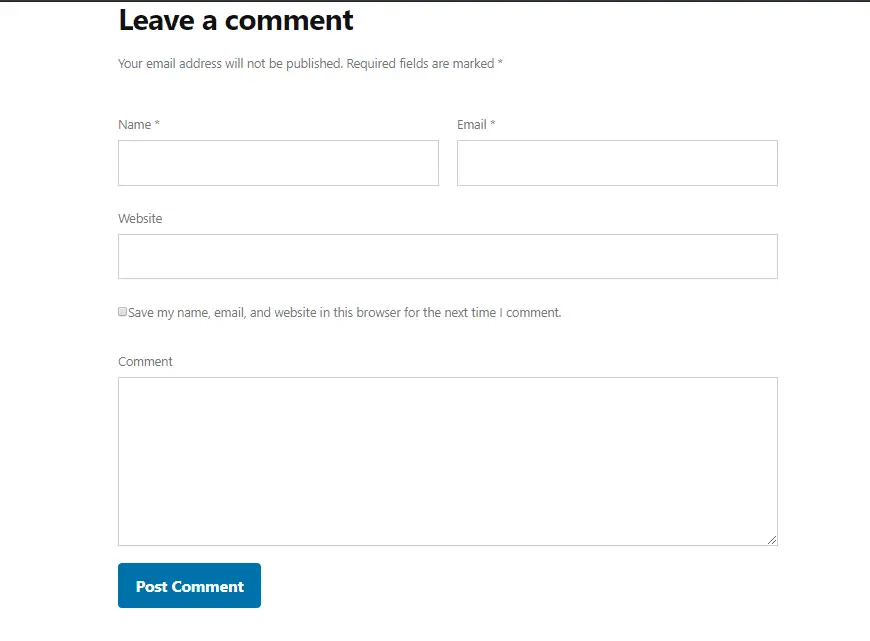

This code simply moves the text field to the bottom of the comments form.
Add Email Subscription to WordPress Comments
When a user submits a comment on your website, he/she may want to get notifications about the replies.
If you consider a Subscribe checkbox in the comment section, users can check and get notifications in their email addresses.
To add this feature, you need to install and activate the Subscribe to Comments Reloaded plugin. In the Settings, click on Subscribe to Comments to configure the plugin.
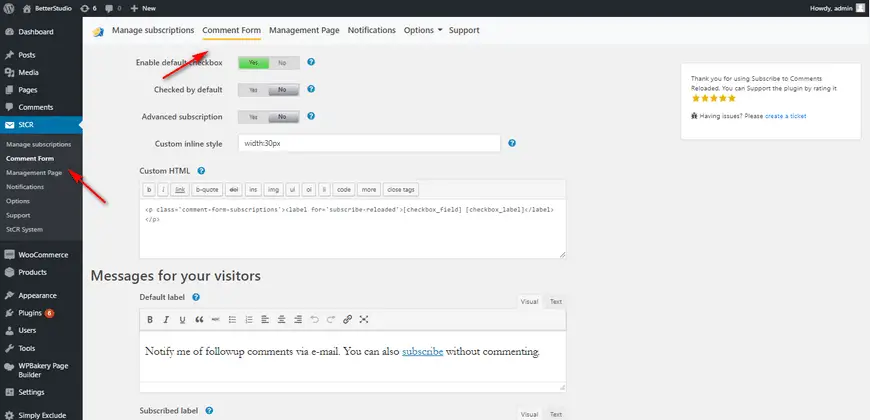

By configuring the plugin, you enable the checkbox in the WordPress comment section. Keep in mind, WordPress users don’t necessarily have to post a comment to subscribe to comments and get email notifications.
Quicktags are the options you see above the text field in the comment form. Quicktags are used to change the font and style of a text, you can use them to bold, add links and etc. to the text.
To add Quicktags, you need to install and activate the Comment Form Quicktags plugin.
Then, in the Settings click on discussions and look for the Quicktags and enable it. Finally, save your changes.
Edit CSS, Add Style to Comments
If you want to change the CSS of your comment section, copy and paste the code below to the style.css file:
/* ## Comments
--------------------------------------------- */
.comment-respond,
.entry-pings,
.entry-comments {
    color: #444;
    padding: 20px 45px 40px 45px;
    border: 1px solid #ccc;
    overflow: hidden;
    background: #fff;
    -webkit-box-shadow: 0px 0px 8px rgba(0,0,0,0.3);
    -moz-box-shadow: 0px 0px 8px rgba(0,0,0,0.3);
    box-shadow: 0px 0px 8px rgba(0,0,0,0.3);
    border-left: 4px solid #444;
}
.entry-comments h3{
    font-size: 30px;
    margin-bottom: 30px;
}
.comment-respond h3,
.entry-pings h3{
    font-size: 20px;
    margin-bottom: 30px;
}
.comment-respond {
    padding-bottom: 5%;
    margin: 20px 1px 20px 1px;
        border-left: none !important;
}
.comment-header {
    color: #adaeb3;
    font-size: 14px;
    margin-bottom: 20px;
}
.comment-header cite a {
    border: none;
    font-style: normal;
    font-size: 16px;
    font-weight: bold;
}
.comment-header .comment-meta a {
    border: none;
    color: #adaeb3;
}
li.comment {
    background-color: #fff;
    border-right: none;
}
.comment-content {
    clear: both;
    overflow: hidden;
}
.comment-list li {
    font-size: 14px;
    padding: 20px 30px 20px 50px;
}
.comment-list .children {
    margin-top: 40px;
    border: 1px solid #ccc;
}
.comment-list li li {
    background-color: #f5f5f6;
}
.comment-list li li li {
    background-color: #fff;
}
.comment-respond input[type="email"],
.comment-respond input[type="text"],
.comment-respond input[type="url"] {
    width: 50%;
}
.comment-respond label {
    display: block;
    margin-right: 12px;
}
.entry-comments .comment-author {
    margin-bottom: 0;
    position: relative;
}
.entry-comments .comment-author img {
    border-radius: 50%;
    border: 5px solid #fff;
    left: -80px;
    top: -5px;
    position: absolute;
    width: 60px;
}
.entry-pings .reply {
    display: none;
}
.bypostauthor {
}
.form-allowed-tags {
    background-color: #f5f5f5;
    font-size: 16px;
    padding: 24px;
}
.comment-reply-link{
    cursor: pointer;
    background-color: #444;
    border: none;
    border-radius: 3px;
    color: #fff;
    font-size: 12px;
    font-weight: 300;
    letter-spacing: 1px;
    padding: 4px 10px 4px;
    text-transform: uppercase;
    width: auto;
}
.comment-reply-link:hover{
    color: #fff;
}
.comment-notes{
    display:none;
}
Customize Comments for a Specific Post Type
You may want to add or remove fields from the WordPress comment form of a specific post type. For example, in the code below you can see the Age field in the Movies post type:
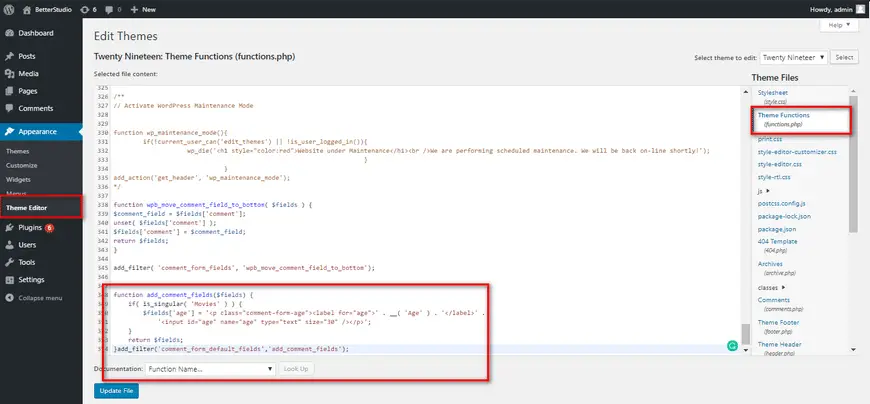

function add_comment_fields($fields) {
    if( is_singular( 'Movies' ) ) {
        $fields['age'] = '<p class="comment-form-age"><label for="age">' . __( 'Age' ) . '</label>' .
            '<input id="age" name="age" type="text" size="30" /></p>';
    }
    return $fields;
}add_filter('comment_form_default_fields','add_comment_fields');
Best Plugins to Customize WordPress Comment Form
As we mentioned before, the WordPress default themes are quite simple.
In addition, although the comments published below each post attracts and encourages visitors to look at the content of the website, some website admins prefer to disable the comment section to prevent spammers from posting a comment.
In any case, if you ever wanted to have a comment section enabled in WordPress, there are many great plugins that can help you customize the WordPress comment form. Let us introduce some useful plugins in this genre:
JetPack
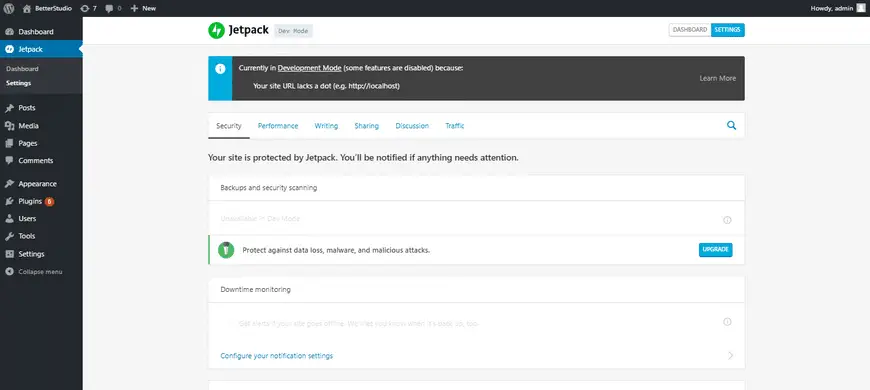

JetPack is more than a comment plugin. You have more than 20 modules in this plugin and the key feature of this plugin is the ability to use the old comments form.
Users can post comments without filling out each of the fields in the comment section, and also, they can use their social media accounts to submit a comment.
However, users aren’t required to use their social media accounts, they can always manually fill in the fields.
Disqus
The Disqus comment system is one of the popular plugins in the commenting genre. Although this plugin is very popular in the WordPress community, it comes with many disadvantages & advantages and has found many supporters and anti-Disqus amongst the WordPress users.
Below are some advantages of this plugin:
- It has a better design compared to the WordPress comment form.
- Users can sort comments based on newer and older. Also, they can suggest their favorite comments to others.
- It recommends other content from your website to users.
- If you have many comments on your website, it’s recommended to use the Disqus plugin to reduce the send & receive from the WordPress server.
- It synchronizes comments with your WordPress database. So you can go back to the WordPress default comment form whenever you want.
- With a Disqus account, users can comment on websites that use this plugin. Therefore, if users are on another website, as soon as they see the reply notification, they can go back to their comments.
The disadvantages of Disqus:
- To comment, you need to have an account with Disqus. You didn’t have to register to post a comment in the old WordPress comment form.
- You need to disable ads. Otherwise, Disqus can use their links on other websites.
- Some users have noticed, after you leave the Disqus services, this plugin leaves its URL in the comment section.
The main reason for its popularity is its friendly interface and the fact that it reduces the size of your comments. Finally, we recommend paying extra attention to the privacy this plugin requires before installing it on your website.
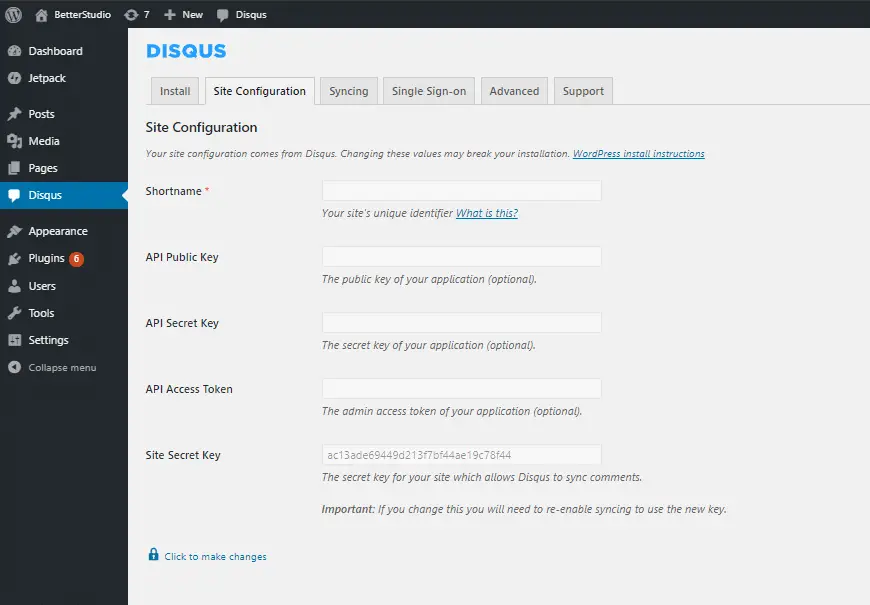

If you are planning to install this plugin on your website, we recommend downloading Disqus Conditional Load as well. This plugin increases the time required to load your comment section, therefore, your website loads faster.
Simple Comment Editing
Simple Comment Editing makes a simple change to the default WordPress comment form. It enables the ability to edit comments 5 minutes after posting them.
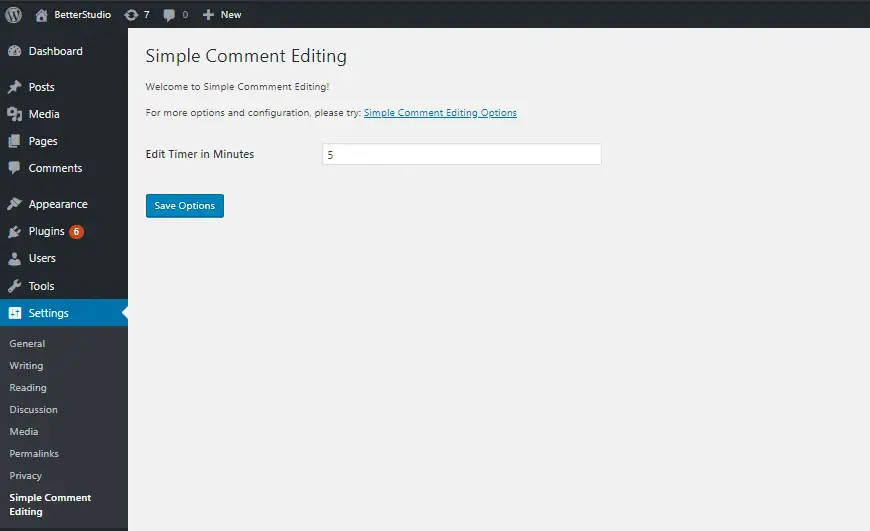

According to researchers, after publishing a comment, users notice they have made spelling mistakes. With this plugin, they have a second chance of publishing the same comment.
Lazy Load for Comments
Lazy Load for Comments doesn’t add any new features to your website, but it optimizes your website. If a website loads fast, its users are satisfied and happy.
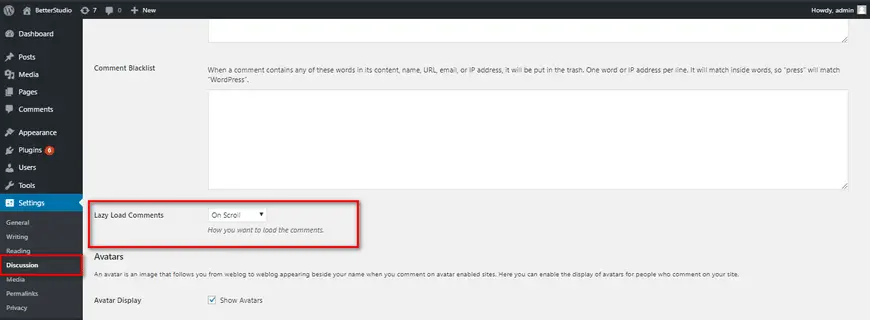

The Lazy Load for Comments plugin reduces the loading time of your comments.
The comment section always appears at the bottom of the page, therefore, by the time users are scrolling down the page or post, the comment section is loaded for them.
Conclusion
The comment section is very important in any website. In simple words, you can build your community in the comment section.
Even though the default WordPress comment form is not appealing to anyone, but luckily, this platform is very customizable and you can customize every section of it, even the comment section.
As a result, based on your website’s design you can customize WordPress comment form.



38 Comments Leave a Reply
The blog is very informative, the illustration that are described is very good.
Thanks 🙏
THANKS
Thanks 🙏
I just loved the code. It’s modern, optimized and working smoothly.
Thank you for sharing.
Freya, UK
Thanks 🙏
Great Article Thank you for sharing this Article.
Thank you 🙏
Thank you for this blog! Such clear and easy explanation!
Thanks 🙏
Thank you administrator for offering to us such helpful data.
Thanks 🙏
Hi, I use Elementor Pro on my website and the Post Comments Widget has two boxes of text that are in other language that the one that I use in my site, how could I change only these texts? Is it possible?
I use Orfeo as a theme.
Hi
In our review, we found that the Elementor post comment widget does not support the language change. Elementor support should be able to assist you with this issue.
that’s good. thanks
Thanks 🙏
very useful
Thanks 👍
Hi there,
It is a nice blog i really read it thoroughly, keep updating us with new one
Thank you
Great information! It’s very helpful for us
Thank you
Thank you so much for the resources and tips on how to use them. I learned a lot from this post.
Thank you
Hi there,
It is a nice blog i really read it thoroughly, keep updating us with new one
Thank you
Thanks for sharing this informative article for blog commenting
Thank you for sharing. Keep blogging on new updates.
What a fantastic post! This blog is so full of useful information I can’t wait to dig deep and start utilizing the resources you have given me. I have a similar article that will surely help.
Very good blog. You have shared useful information on commenting, thanks for this.
its a very interested blog article thank you fir sharing a informative blog content article.
this is a helpful blog article sites for us.
It’s a very good article. So it really helpful for me.
Thanks for sharing these nice posts
Great post, Thank you
Thanks for providing the code to customize comment forms.
Useful to add relevant info only.
Thanks for providing many good helpful articles. Thank you for sharing such a beautiful post with us
Hello! I’ve found this blog really helpful in my commenting journey. Hope to read many more. It gave me the in depth details about the commenting.
Hi there,
It is a nice blog i really read it thoroughly, keep updating us with new one