Do you ever wonder why it’s important to remove default image links in WordPress?
Even though they are easy to create and delete, these links can pose a serious risk when it comes to content theft. In this blog post, we will discuss how to automatically remove default image links in WordPress without putting your website’s content at risk.
When you upload an image to WordPress, a link is automatically added to the end of the filename in the HTML source code. This link is visible to anyone who visits your website, allowing them to access the original image on your server.
In order to prevent content theft, it it important to remove these default image links in WordPress so that spammers cannot steal your images and copy your content for their own purposes. To protect against content theft, it is imperative to remove these default image links in WordPress so that spammers cannot steal your images.
In this blog post, we will show you how to automatically remove default image links in WordPress. We will also provide best practices for protecting your images and other content from being stolen or misused.
As a result of reading this article, you will have a better understanding of how to keep your content safe from theft and misuse at the end of it.
Why You Should Disable Default Image Links in WordPress
In terms of WordPress, there are many ways that you can customize the look and feel of your website. One important customization is disabling default image links that come with WordPress and the website will then look and feel more designed.
Doing this can help protect against content theft and make sure that your images are only used in the way you intended them to be.
As a case in point, here are five reasons as to why you should remove the default picture links in WordPress:
1. Site Security: By disabling the default image links, you reduce the risk of someone stealing your images or using them without your permission.
2. Brand Control: When users click on an image link, it takes them away from your site. This means they may not return to view the rest of your content. Disabling the default image links allows you to keep users on your website and gives you more control over your brand.
3. Image Quality: The default image links can reduce the quality of your images. By disabling them, you can ensure that your images remain sharp and clear.
4. Traffic: Disable the default image links to increase your page views, as visitors will stay on your site instead of being directed somewhere else. This also increases the chance of people engaging with your content and sharing it.
5. SEO: Search engines consider image links when calculating where to rank a page. Disabling the default image links can help boost your SEO and get your pages higher in search engine rankings.
In general, disabling the default image links in WordPress is an important step towards protecting your website, your brand, and your content. It also boosts traffic to your website when it comes to search engines and SEO. Taking the time to disable the default image links is a tiny task that can make a huge difference in your website.
2 Ways to Automatically Remove Default Image Links in WordPress
Some thieves might use your image link to hotlink it to your website. Even if you have the highest protection on your images, they might steal them with a downloader if they access your image link.
Usually, WordPress adds a link to the image’s full-sized version, causing it to be disposed to thieves. I suggest you delete all links surrounding your image pointing to the full-sized version of the image or the link to the lightbox.
Thieves might open the full-sized version of the image and take a screenshot of it.
I removed links surrounding the images in this article using the WPShield Content Protector plugin, which provides security for images and content.
Method 1: Use WPShield Content Protector Plugin
If you need a plugin for WordPress to remove links from the featured image, WPShield Content protector can help secure your pictures.
This plugin also can disable or limit the right-click menu on your images. It can also secure your website source code.
To remove the links around your images, follow these steps:
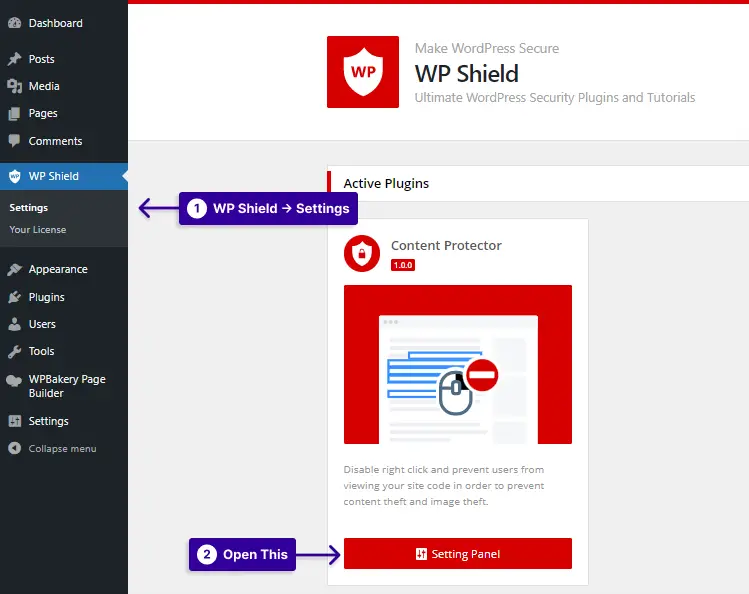
Step 1: First, install the WPShield Content Protector plugin.
Step 2: Install the plugin from Plugins → Add New.
Step 3: Go to WP Shield → Settings.
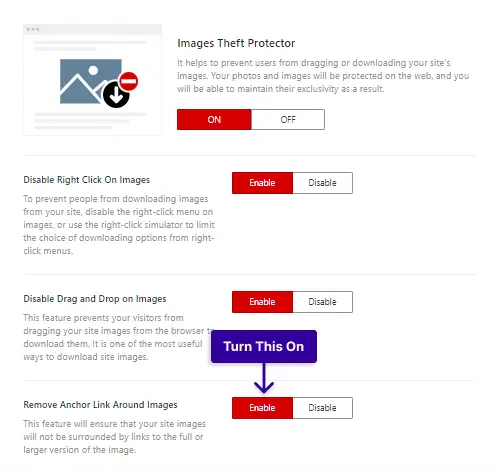
Step 4: Go to Image Protector and enable the Images Theft Protector.
Step 5: Turn on the Remove Anchor Link Around Images option.
With the image protector, you can also disable the right-click, disable drag-and-drop on the images, and image hotlinking.
Important Note: Some users disable JavaScript on their browsers to trick protections and steal content. WPShield Content Protector ensures your website is protected if JavaScipt is disabled.
Method 2: Use PHP Code
Disabling WordPress’s built-in image linking facility is easy, even though you’ll need to add some code.
This method does not give you complete security; some themes and plugins might not be compatible and your image links published that it makes content theft possible on your site.
If you want higher security with other options, like disabling or limiting the right-click on your images, use the WPShield Content Protector plugin.
To remove the link from the image with PHP code, do this:
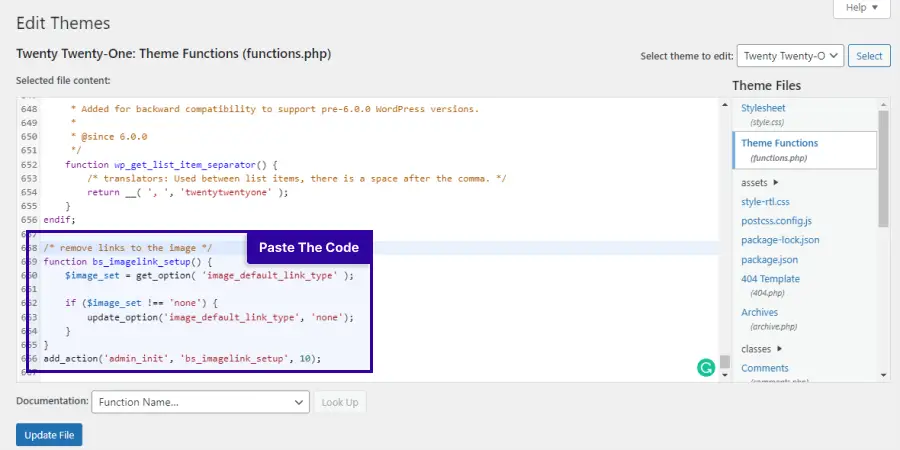
Step 1: Go to Appearance → Theme File Editor.
Step 2: Find the function.php of your theme.
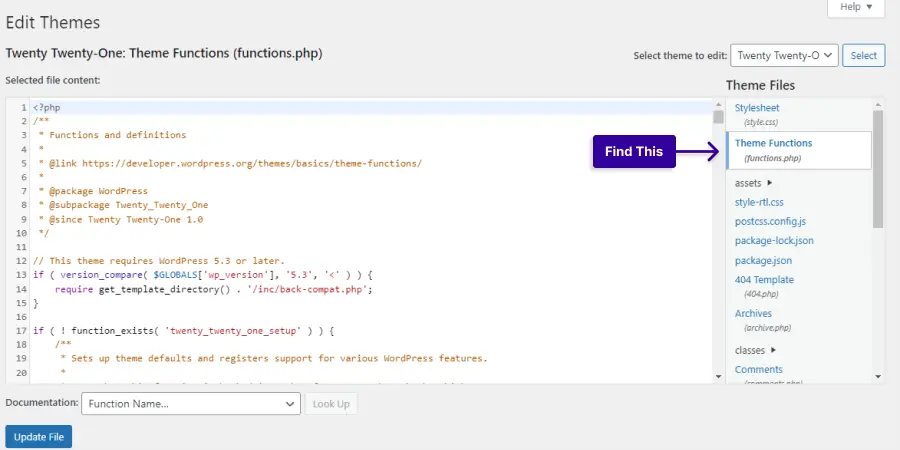

Step 3: Paste the following code to the function.php file.
function bs_imagelink_setup() {
    $image_set = get_option( 'image_default_link_type' );

    if ($image_set !== 'none') {
        update_option('image_default_link_type', 'none');
    }
}

add_action('admin_init', 'bs_imagelink_setup', 10);In simple terms, this code instructs WordPress to update the image_default_link_type option to ‘none’. This option is then stored in your WordPress database.
Try adding an image to WordPress after adding this code. You’ll notice that it doesn’t link to the image file or attachment page.
Conclusion
I would like to thank you for taking the time to read this post on how to automatically remove default image links in WordPress. We discussed a few methods you can use so that unwanted images do not appear on your site.
If you’re looking for more great tutorials related to this topic, make sure to check out BetterStudio’s blog—they have tons of helpful posts.
Additionally, you can follow BetterStudio on Facebook and Twitter for the latest tutorials and tips that are published right away.
Thank you very much for reading this post. If you have any questions or problems regarding this post, please don’t hesitate to ask if you can mention them in the comment section below.


