

 Learn WordPress
Would you like to know how to downgrade WordPress to a previous version? A crucial best practice for WordPress is to keep your plugins and themes up to date. It is also recommended to use the latest PHP version. However, there are some situations in which this isn’t practical.
You may find yourself in a situation where you need to reverse an update and downgrade your WordPress website or a portion of it. Fortunately, methods are available for rolling back each component of your website.
This article will explain what it means to downgrade WordPress when you should downgrade WordPress, how to downgrade WordPress to a previous version, and what you need to check after downgrading WordPress.
What Does it Mean to Downgrade WordPress?
If you decide to downgrade WordPress, you will be reverting to an older version of the WordPress core files.
There are several new releases by WordPress every week that include fixes for bugs, vulnerability fixes, and new features.
There is a list of all current releases of WordPress you can access directly at the WordPress release archive.
When Should You Downgrade WordPress?
It is recommended that you downgrade WordPress to an earlier version if you encounter a conflict with a plugin or theme.
A downgrade to an older WordPress version is generally not recommended since this may expose your website to known vulnerabilities corrected in the latest WordPress core files.
There are, however, a few WordPress plugins or WordPress themes that may not be completely compatible with the new version.
If that happens to you, you might want to temporarily downgrade WordPress to an older version if you don’t want to see those problems again.
How to Downgrade WordPress to a Previous Version?
Before we talk about downgrading your WordPress website, it is highly recommended that you get back up your WordPress website.
There are various ways to downgrade your WordPress site, depending on what you are trying to achieve.
Your website may need to be restored to a previous version, or you may only have to revert to a single plugin or theme rather than the entire WordPress installation.
Here are four methods by which you can roll back your website. As each method addresses a different need, it is advised that you read through them all to determine which method is most appropriate for your particular situation.
Method 1: Downgrade WordPress Manually
Depending on your situation, downgrading WordPress manually may be your best or only option if you are experiencing a severe conflict that prevents you from accessing your website’s back end. To ensure your site is protected, you should back it up before you begin.
Follow these steps to do the process:
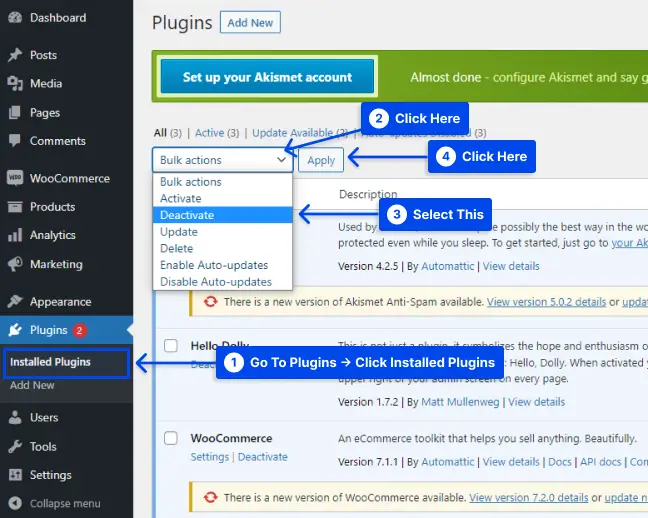
- Deactivate all of your plugins by going to Plugins → Installed Plugins, then check the checkbox next to each plugin, click on Bulk actions, select Deactivate and click on the Apply button.
Suppose you need help accessing your dashboard. In that case, you may deactivate plugins manually by using Secure File Transfer Protocol (SFTP) and a client such as FileZilla.
The tools mentioned above will be necessary for future steps. If you are unfamiliar with them, take a few minutes to get familiar with them.
- Download the relevant version of WordPress.
For best results, it is recommended that you use the latest release, which is usually the second-most recent version of WordPress. You can access the files you’ll need via the WordPress release archive.
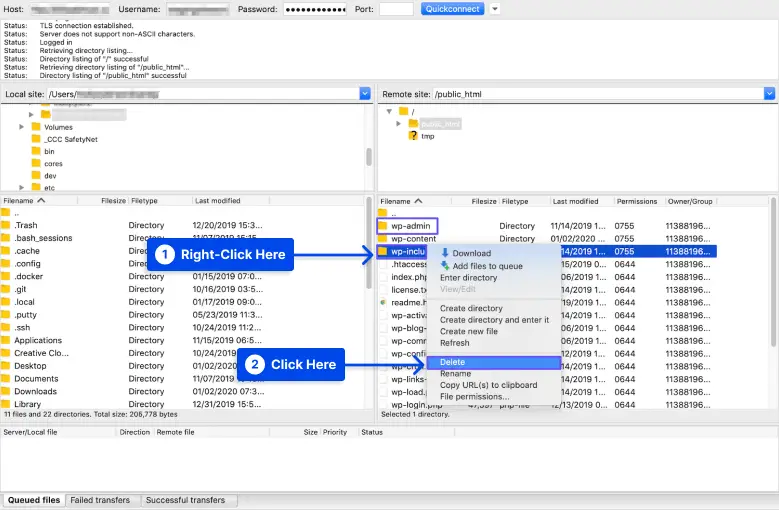
- Access your site’s files using FTP, FileZilla, or another client software, and delete your wp-admin and wp-includes directories.
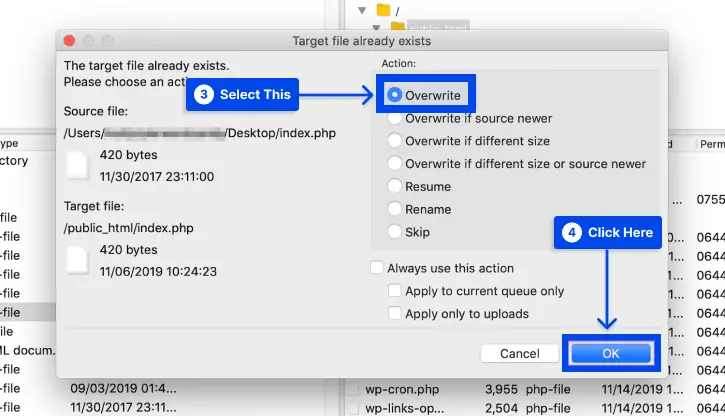
- Upload all the files from the WordPress version you wish to install except the wp-content directory.
- Choose Overwrite, then click on the Ok button when asked if you want to overwrite files.
- Go to your site’s backend.
If your database needs to be updated, you may receive a message asking you to do so. In this case,
- Click on the Update WordPress Database prompt.
- Log in to your site.
The older version of WordPress should now be accessible to you, and you should be able to run it. This is the point when you can re-activate your plugins and work on resolving the conflict encountered initially.
In addition, you may need to disable automatic updates to prevent WordPress from installing another version on your computer.
After your issue has been resolved, you can return to the latest version of WordPress by visiting the Updates section of your dashboard.
Method 2: Downgrade WordPress Using WP Downgrade Plugin
Follow these steps to use the WP Downgrade plugin to rollback WordPress version:
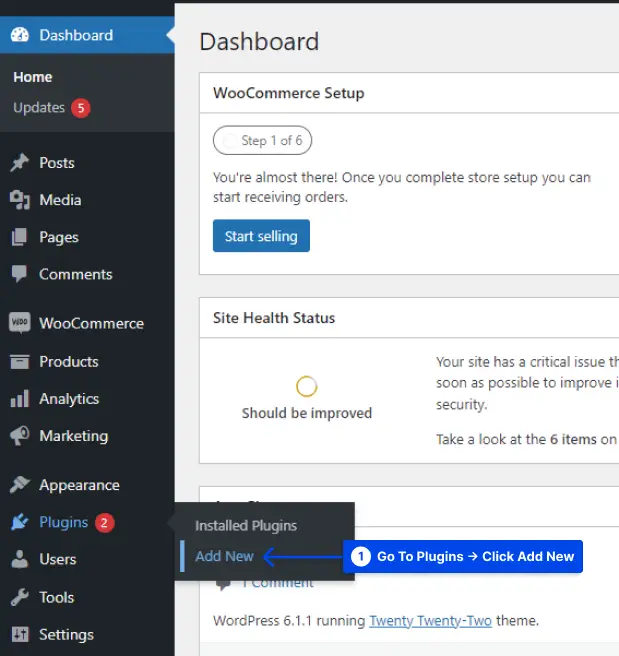
- Go to Plugins in your WordPress dashboard.
- Click on the Add New option.
- Install and activate the plugin.
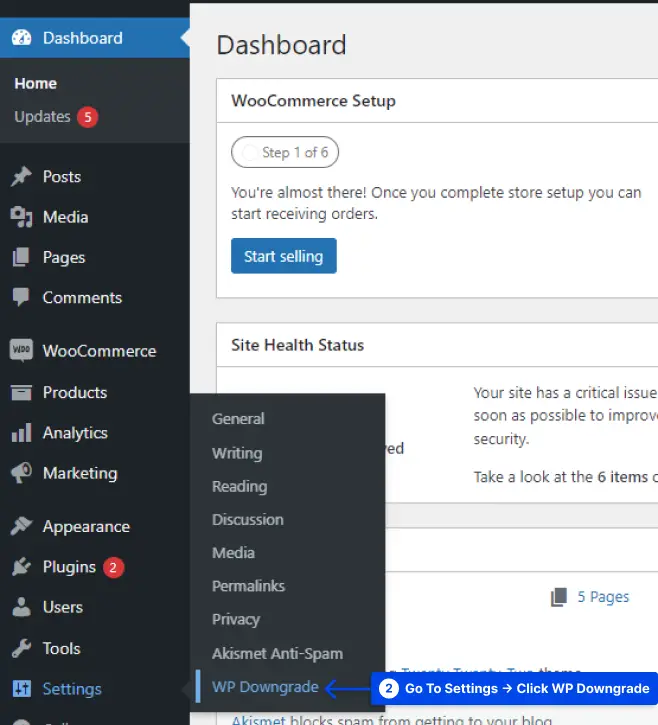
- Go to Settings in your WordPress dashboard.
- Click on the WP Downgrade option.
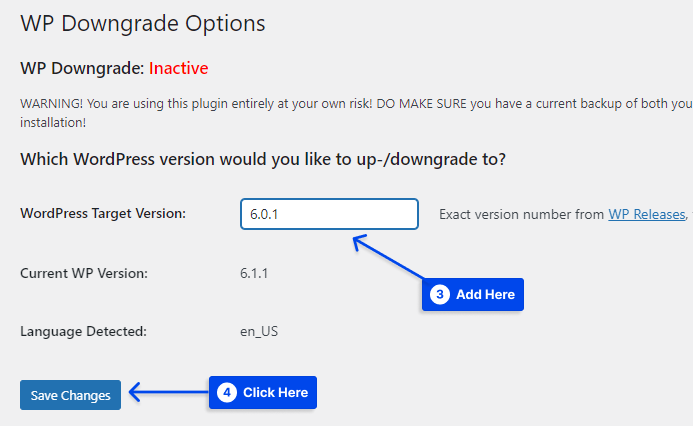
An instruction will appear to allow you to obtain the exact version number for the WordPress version you wish to use.
- Get the number from the provided link, and insert it into the textbox.
- Click on the Save Changes button.
When you complete the process, a message should appear indicating that you must go to the Update Core page.
- Click on the button to proceed.
By clicking on this, you will be taken to the Updates page. There should now be a new button under the heading of the section: You have the latest version of WordPress.
- Click on the button to proceed.
Upon returning to the wp-admin and visiting the Updates menu, you should observe that your selected version is active.
The automatic updates in WordPress should be disabled if you wish to maintain this version for an extended period.
- Click on Switch to automatic updates for maintenance and security releases only to enable only minor automatic updates.
Unless you take action, your site will automatically update to the latest version within 12 hours.
Method 3: Downgrade WordPress using WP-CLI
WP-CLI can also be used to downgrade WordPress to an earlier version. It is pretty simple to follow the steps; however, you must ensure that WordPress Command Line Interface (WP-CLI) is enabled on your system and works properly.
Follow these steps to use this method:
- Locate your site’s SSH credentials and connect to it using the command line.
For most users, the SSH credentials are the same as the FTP credentials.
- Check the existing WordPress core version with the command
wp core version. - Visit the WordPress releases page to locate your target WordPress core version. The exact number will need to be provided.
- Use the command
wp core update --version=5.6 --forceto force downgrade the core version.
Note: Replace 5.6 with your target version number.
If the operation is successful, you will receive a message stating that your WordPress version has been successfully updated, regardless of whether it is a downgrade or an upgrade.
Method 4: Manually Downgrade a Plugin or Theme
As an alternative to downgrading WordPress core, you can manually downgrade a plugin or theme using the same process described in Method 1.
Follow these steps to do this:
- Retrieve the files for the older version of the plugin or theme you want to downgrade.
- Click Advanced View on the WordPress plugin’s feature page to view older versions.
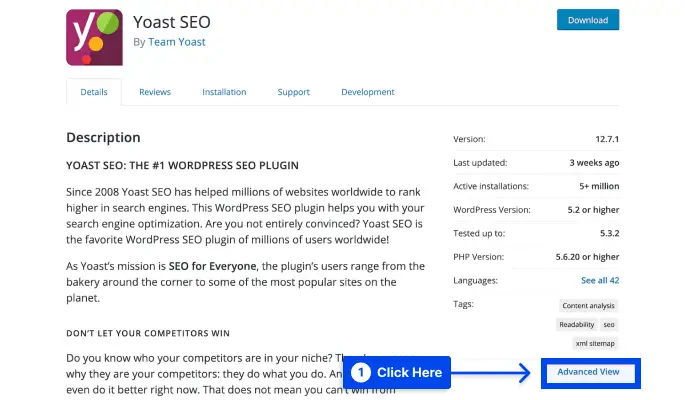
- Select the version you need from the drop-down menu at the bottom of the page, then click on the Download button.
- Unzip the file and save it to your computer.
- Ensure that your site is backed up in case something goes wrong.
- Connect to your server using FTP and your preferred client.
- Go to wp-content → plugins.
- Rename the directory for the existing version of your plugin.
- Upload the folder for the prior version you wish to downgrade.
If this procedure is successful, you can restore the older version of the required plugin. Additionally, you will always have access to the most current version, allowing you to switch back to it anytime.
However, this method becomes more complicated if you use a theme or premium plugin. Rolling themes or premium plugins back is the same. Still, previous versions are not immediately accessible in the WordPress Theme directory.
For premium plugins, previous versions may not be available. You should contact the developer of the plugin or theme if you need help locating the version you need.
What do You need to Check After Downgrading WordPress?
Follow these instructions if you need the site in this lower version for a while and still wish it to function:
Check every page on your website
Change can cause your website to break, and downgrading WordPress is one of the most significant changes you can make.
So, review all of your site’s primary pages, if not all, for missing images, broken formatting, malfunctioning forms, etc.
Access your website by logging in
As a result of installing WordPress, reinstalling WordPress, or downgrading WordPress, the process checks the database version.
It is possible that the database must be updated as well, so you will encounter a prompt when you first log in to wp-admin.
Just follow the instructions on the screen, and you should be good to go. Secondly, access to the WordPress administration area should be available.
There may be times when you can access your website but cannot log into the dashboard. In this situation, you will need to revert the rollback and start over since something went wrong.
Turn off automatic updates
It is recommended that you disable automatic updates for more than 12 hours to keep the changes you have made. You can update via the Updates menu if you are not concerned about the minor releases.
Suppose you require a particular version of WordPress. In that case, you will be required to set constants in the wp-config file to disable minor updates of WordPress as well.
define( 'AUTOMATIC_UPDATER_DISABLED', true );Clear all the caches
It is recommended to clear WordPress caches. Visitors to your website will only be able to access the most recent version of your site by completing this task.
Reactivate your plugins and themes
Once you have verified that everything is running smoothly, you should enable your plugins and themes one at a time.
It is important to note that any one of these could cause your website to malfunction. If you do one at a time, you can check your site immediately after each activation to pinpoint the culprit.
Disable Plugins and Themes Auto Update
To do so, simply copy and paste the two codes below to your function.php file:
add_filter( 'auto_update_plugin', '__return_false' );

add_filter( 'auto_update_theme', '__return_false' );
Conclusion
This article has explained what it means to downgrade WordPress, when you should downgrade it, how to downgrade WordPress to a previous version, and what you need to check after downgrading WordPress.
Our pleasure is to provide you with this article. Thank you for taking the time to read it. Any questions or comments may be posted in the comments section.
Our Facebook and Twitter pages are regularly updated. Please follow them so that you can stay up to date.