

 Learn WordPress
How do you fix image upload issues in WordPress? Images are an essential component of any website since they enhance the overall appearance of your website. Most of us can only imagine writing a blog post incorporating visual elements.
The text on your blog will always play a significant role in the SEO of the site. However, if you include images with your post, you can make the text stand out and drive more traffic to the site.
When frequently uploading images to your WordPress website, you may encounter an error message sometimes when you can’t upload images in WordPress or can’t upload images to the WordPress media library.
However, there is no fear; even the most obscure image uploading problems, such as when media files exist in the upload folder but not showing up, can be corrected.
This article will discuss what causes image upload issues in WordPress and present various effective methods to fix them.
What Causes The Image Upload Issue in WordPress?
Typically, WordPress image upload issues are caused by incorrect file permissions. Your WordPress files are stored on your web hosting server and require specific permissions.
In this case, WordPress cannot read or upload files on the hosting server due to incorrect file permissions.
There are several reasons why this may occur. One is a misconfiguration of your shared hosting server, where the permissions are changed without your intervention.
For example, a web hosting provider may have unexpectedly conducted an upgrade that changed file permissions.
If everything else functions correctly, you can fix the image upload issue by applying the correct file permissions to your website.
How to Fix Image Upload Issues in WordPress?
One of the most common image problems in WordPress is the failure to upload images. Fortunately, this can be resolved easily, and you can do it yourself.
Various methods will be described in this section to help you easily fix the image upload issue in WordPress:
Method 1: Check File Permissions
You can solve the image upload issue in WordPress by changing the file permissions. Follow these steps to do this:
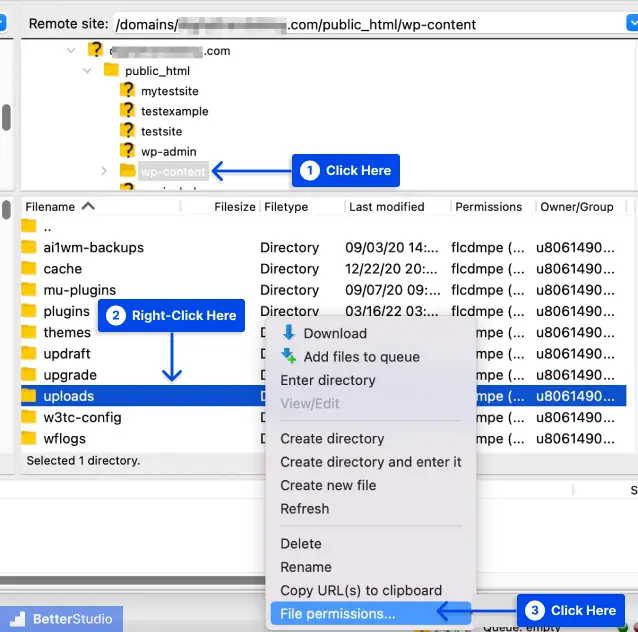
- Connect your website through FTP.
- Go to the /wp-content/ folder.
- Right-click on the uploads folder and select File permissions.
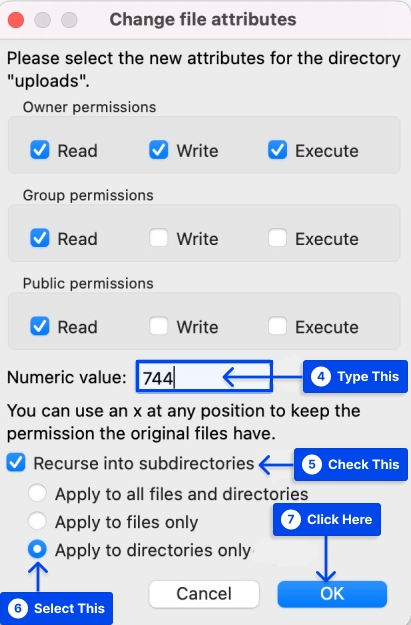
- Type 744 into the number value box.
- Check the box next to the option Recurse into subdirectories.
- Select the radio option that says Apply to directories only.
- Click on the OK button.
The file permissions will now be applied to the directories by your FTP client. If it doesn’t work, try to set the value to 755 and do the rest of the process again.
It is then necessary to set the permissions for all the files in the uploads directory. Follow these steps to do this:
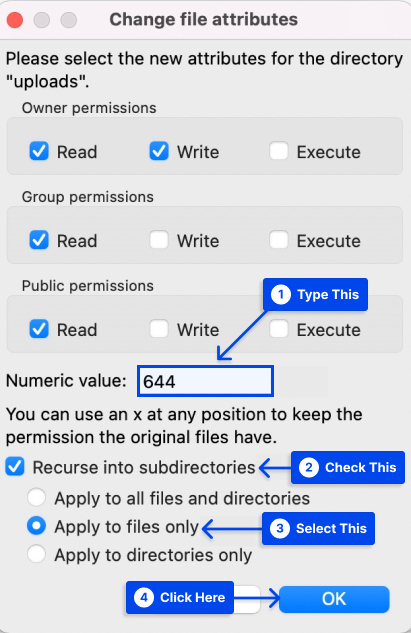
- Right-click the uploads directory and select the File permissions option.
- Set the numeric value to 644 in the file permissions dialogue box.
- Check the box next to Recurse into subdirectories.
- Select the radio option that says Apply to files only.
- Click the OK button.
FTP client now changes the permissions of all files in the uploads folder. It is now possible to return to your WordPress administrator area and attempt to upload the images again. It should resolve your website’s image upload problem.
Method 2: Check File Size
There is also the possibility that the image is too large in dimensions and file size. Image compression tools can be used to reduce the image’s size.
If you have this problem frequently, you can increase the limit by adding the following code to your site’s php.ini file:
upload_max_filesize = 128M

post_max_size = 128M

max_execution_time = 300
Method 3: Invalid Image File Name
The file name may cause WordPress image upload issues, mainly if it contains special characters ($, *, &, # …) or accent letters (ñ, á, é).
If this is the case, rename the file and remove the special characters and accents, then upload the file to WordPress once more.
Method 4: Increase the Memory Limit
You may encounter an HTTP error when you attempt to upload an image to your WordPress website.
It is possible for this to occur when server resources are low, or there is unusual traffic on the server. It is always worthwhile to wait a few minutes before re-uploading the image.
You may exceed the WordPress memory limit if the issue still needs to resolve itself.
A secure file transfer protocol (SFTP) will allow you to increase the amount of memory PHP uses on your server.
Follow these steps to do this:
- Connect to your via SFTP.
- Open your wp-config file.
- Add the following code to the file, which will increase the limit to 256MB:
define( 'WP_MEMORY_LIMIT', '256M' );Alternatively, if this does not resolve your issue, there is the possibility that threading is the problem.
In WordPress, images are processed either through the GD Library module or the Imagick module, depending on which is available.
In order to increase the speed of image processing, Imagick uses multiple threads. However, some shared hosting providers restrict Imagick’s use of multiple threads. As a result, HTTP errors may occur.
A simple fix for this problem is to add the following code to your .htaccess file:
SetEnv MAGICK_THREAD_LIMIT 1.Method 5: Clear Your WordPress Site Cache
You can resolve your image upload issues by clearing your WordPress site cache if your site is using a caching plugin.
It depends on the caching plugin you selected and how you proceed if you believe caching might cause this error.
For example, if you’re using the W3 Total Cache plugin, you can clear the cache by following these steps:
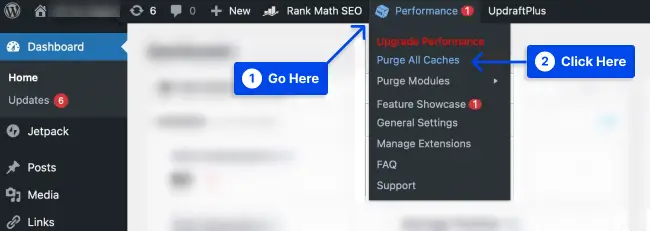
- Go to your WordPress dashboard.
- Go to Performance from your WordPress toolbar.
- Click on Purge All Caches.
You should start by checking out the plugin’s Settings menu if you need help clearing the cache in your particular plugin. You can also find official documentation on the developer’s website.
Method 6: Deactivate All WordPress Plugins
WordPress relies heavily on plugins to function. If you are using any plugins, disable them one at a time to see if this resolves your image upload issue.
So, follow these steps to deactivate your WordPress plugins:
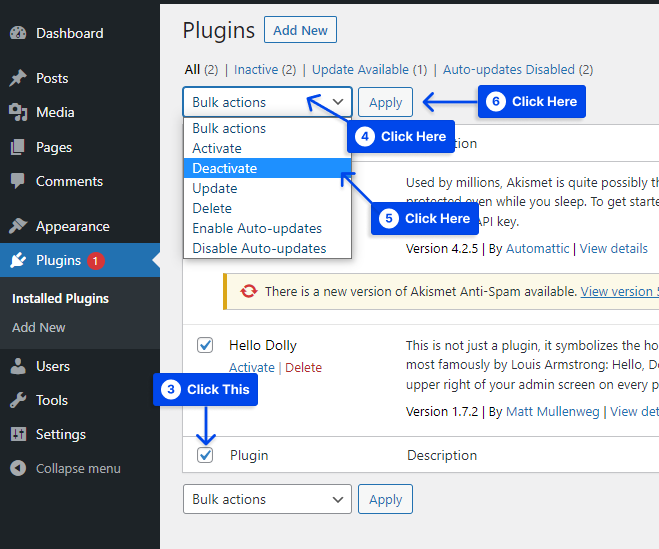
- Go to Plugins in your WordPress dashboard.
- Click on the Installed Plugins option.

- Choose plugins from the list.
- Select the Deactivate option from the drop-down menu.
- Click on the Apply button.
Note: If this does not resolve the issue, you may contact the plugin developer to see if they can assist you in solving the trouble with your website’s image uploads.
Method 7: Try the Browser Uploader
When all of the above approaches have been exhausted and you are still experiencing problems, you can use the built-in file uploader in your browser.
The browser uploader does not support drag-and-drop or multiple file selections like the WordPress image uploader.
In some cases, however, it may be beneficial to use this workaround to upload a file quickly.
Follow these steps to use this method:
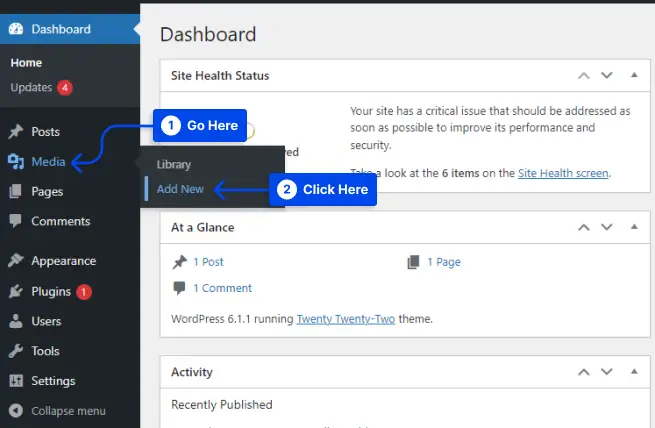
- Go to Media in your WordPress dashboard.
- Click on the Add New option.
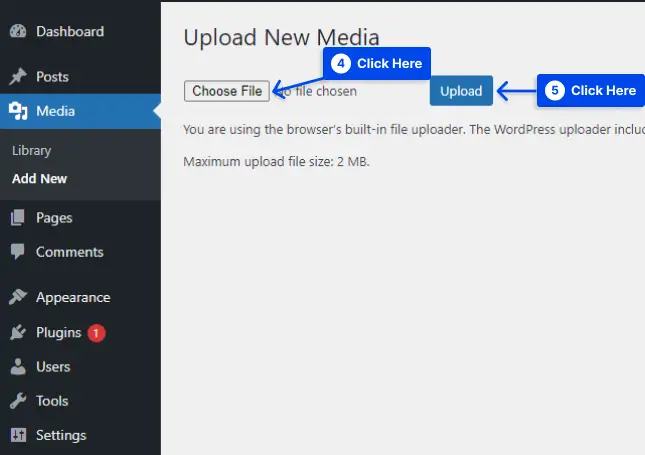
- Click on the browser uploader link.

- Click on the Choose File button.
This brings up the file selection dialogue, where you can choose the image as usual to upload.
- Click on the Upload button.
As a test, you can upload an image using the WordPress standard image uploader to determine whether this fix has resolved your issue with image uploads.
Method 8: Switch To Another browser
There are occasionally problems with HTTP when using Google Chrome. Changing your browser may assist you in determining whether your website is causing the problem or your browser.
If you can upload the file using another browser, you should contact the support team for your chosen platform to find the cause of the problem.
Method 9: Check the PHP Version
You must check the PHP version of your site. Anything lower than version 7 is likely to cause problems, mainly if you are using the most recent version of WordPress.
PHP 7.4 or higher is recommended for WordPress, although it will also function with older versions.
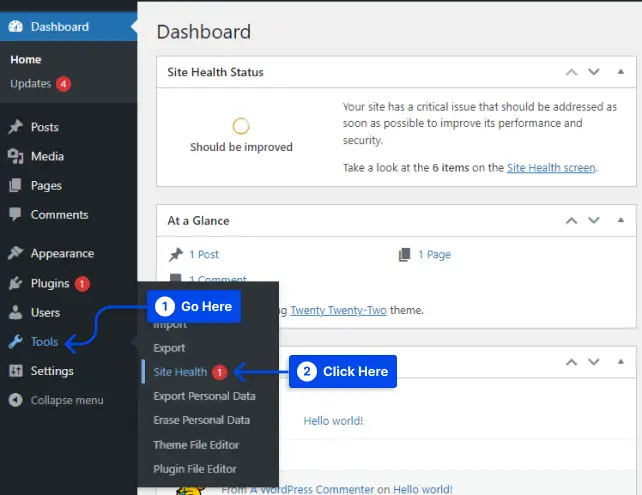
Follow these steps to check the PHP version of your site:
- Go to Tools in your WordPress dashboard.
- Click on the Site Health option.
- Click on the Info tab.
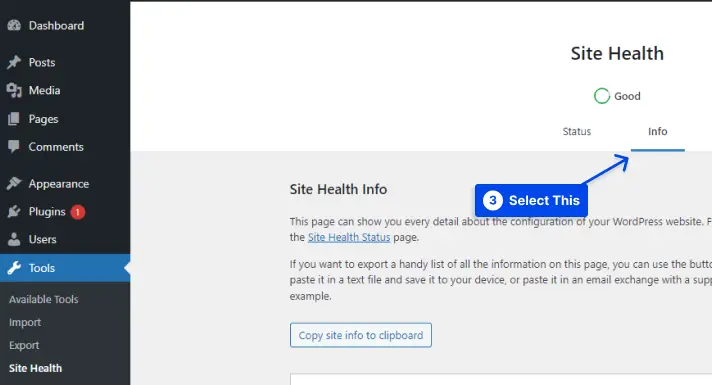
- Choose the Server section.
- Check the PHP version.
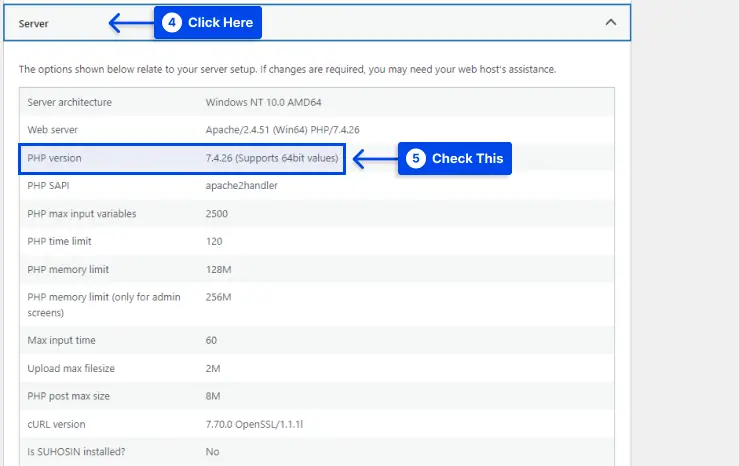
If you are experiencing difficulty uploading an image, you can update the PHP version from the hosting dashboard.
Once you have updated the PHP version, you should no longer experience any issues with image uploads.
Method 10: Readjust Image Editors to Use a Single Thread
WordPress uses Imagick and the GD Library as its default image editor. With these editors, you can process images using multiple threads, accelerating the image’s display.
In some cases, all web hosts do not support the multi-thread feature. If this occurs, an HTTP error may occur when an image file is uploaded.
In order to resolve this issue, you will need to make the necessary changes to the .htaccess file. Follow these steps to do this:
- Open your website through FTP.
- Open the .htaccess file within the WordPress root folder.
- Add the following code to the file:
SetEnv MAGICK_THREAD_LIMIT 1- Verify that this has resolved the issue of an undefined image being uploaded.
The following code can be tested if it is not:
# Exclude the file upload and WP CRON scripts from authentication Satisfy Any Order allow,deny Allow from all Deny from noneMethod 11: Fix Missing Temporary Folder Error in WordPress
An error regarding a missing temporary folder prevents users from uploading images, updating WordPress, and adding add-ons.
The main cause of this error may be the PHP settings on your web server. Depending on the PHP settings, you can store some data in a temporary folder, which must be relocated as soon as possible.
WordPress must have access to these folders when uploading an image, updating your WordPress, and installing a plugin.
If these folders cannot be accessed, you will receive an error message entitled Missing temporary folders.
Follow these steps to do this:
- Connect to your host with an FTP client or through cPanel.
- Look for wp-config.php file.
- Open the folder in an editor, or download it to your computer and re-upload it later.
- Copy and paste the following code before “
That’s all, stop editing! Happy blogging”:
define('WP_TEMP_DIR', dirname(__FILE__) . '/wp-content/temp/');- Save the changes and re-upload the file.
- Go to the wp-content folder.
- Create a new folder and call it “Temp”.
- Go back to your WordPress website and try to upload your image again.
Method 12: Fix the HTTP error while uploading an image in GoDaddy
You may be familiar with GoDaddy as a popular web hosting service. cPanel can be accessed through GoDaddy.
In order to correct an HTTP error when uploading an image in GoDaddy, you must copy and paste the following code into your function.php file:
<?php

add_filter( 'wp_image_editors', 'betterstudio_change_graphic_lib' );

function betterstudio_change_graphic_lib($array) {

return array( 'WP_Image_Editor_GD', 'WP_Image_Editor_Imagick' );

}

?>
Method 13: Fix the HTTP error while uploading an image in DreamHost
In DreamHost, HTTP errors may occur when uploading images are the most common errors that go unnoticed.
In most cases, you will need to change your hosting provider, or you can resolve the issue by deactivating your themes and plugins.
However, the best course is to deactivate or delete your plugins and themes first.
Conclusion
This article has discussed why image upload issues occur in WordPress and various effective methods to fix these problems.
Please accept our sincere thanks for reading this article. You are welcome to post your questions or comments in the comments section.
As a follower of our Facebook and Twitter pages, you will be updated on our latest articles.