How do you change the link color in WordPress? The role of links on modern websites is crucial, regardless of whether they are used for navigation or conversions.
It is possible, however, that the WordPress theme default URLs style do not meet your standards, and you might wish to change the link color in WordPress.
Fortunately, you can change the link color in WordPress by using the editor options, plugins, or custom code.
It is possible to add custom colors to your links and make them stand out from the background or blend seamlessly with your design.
This article will explain why to change the link color in WordPress and present six effective methods.
Why Change the Link Color in WordPress?
Your website must contain links. For example, if you feature content on your blog that includes links both inbound and outbound, your search engine optimization (SEO) can be enhanced.
When ranking your content, Google uses link click-through rates (CTRs) to determine which links should be built into your SEO strategies.
Furthermore, you can use links to direct your visitors to other pages on your website. By directing your visitors to more of your content, you will be able to keep them engaged for a longer time.
In order to attract clicks, a link must, however, be visually appealing. In the case of too-light link colors, they may blend into your content, resulting in low click-through rates (CTR). It is possible, however, that too bright links may reduce the credibility of your website.
Therefore, if you are not experiencing many link clicks, you might want to explore the option of experimenting with colors.
By optimizing your link color, you will increase visibility, align it with your brand colors, improve credibility, and enhance the appearance of your website.
Visitors who view your website will want to see an attractive design. It is possible to improve the user experience by using an eye-catching link color and prevent users from leaving your website quickly.
How to Change Link Color in WordPress (6 Methods)?
A change in the color of your links gives you greater control over your website’s design and makes navigation simpler for your visitors.
In this section, you will learn how to change the color of links in WordPress using six different methods.
Method 1: Change Link Color in WordPress by Editing CSS
By adding custom CSS code to your WordPress website, you can change the color of your links. Follow these steps to do this:
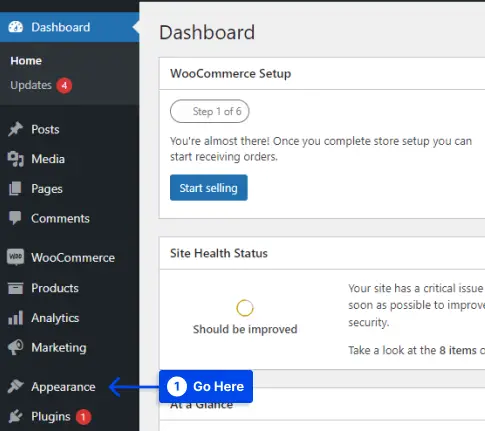
- Go to your WordPress admin dashboard.
- Navigate to Appearance.
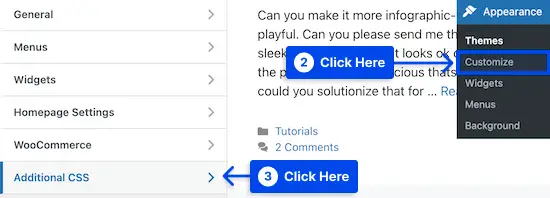
- Click on the Customize option.
- Click on the Additional CSS option in the menu.
You will be brought to a screen where you can add your custom CSS code on the left side of the page by clicking on this option.
- Customize the overall link color.
If your visitors have never clicked the link, this is the color they will see.
Here is an example of CSS code you can use:
a {
     color: #FFA500;
}
Changing this value will cause the link color to be changed to orange. Make sure the #FFA500 color is changed to the desired color.
- Change the link hover color.
Consequently, when a user hovers over a link, the color will change to draw the user’s attention.
An example of CSS code can be found below:
a:hover {
     color: #FF0000;
     text-decoration: underline;
}
As a result of typing the code above, the link color will turn red, and the text will appear underlined when a visitor hovers over it. Make sure to change the #FF0000 color to one of your choices.
- Change is the link color after a user clicks a link.
You can use this feature to make navigation of your WordPress blog easier and to see which links your visitors have already visited.
You can change the color of the visited link by using the CSS code below:
a:visited {
     color: #0000FF;
}
The blue color #0000FF must be changed to a color of your choice.
- Make your changes live by clicking the Publish button.
If you would only like to customize the links in your posts and pages, you may use the code sample below:
.entry-content a {
     color: #FFA500;
}

.entry-content a:hover {
     color: #FF0000;
     text-decoration: underline;
}

.entry-content a:visited {
     color: #0000FF;
}
The code sample above accomplishes the same task; however, .entry-content only targets links within your content.
Method 2: Change Link Color By Using WordPress Global Styles Feature (Block Themes Only)
With WordPress 5.9, you can customize the entire site through Full Site Editing (FSE). With the Global Styles interface, you can modify more significant elements of the theme instead of using the Customizer tool.
It should be noted, however, that most WordPress themes do not currently support this new functionality.
In order to carry on with this method, you should ensure that you are using the WordPress Block Editor and a theme that is compatible with the WordPress Block Editor.
Follow these steps to change the link color using WordPress Global Styles Feature:
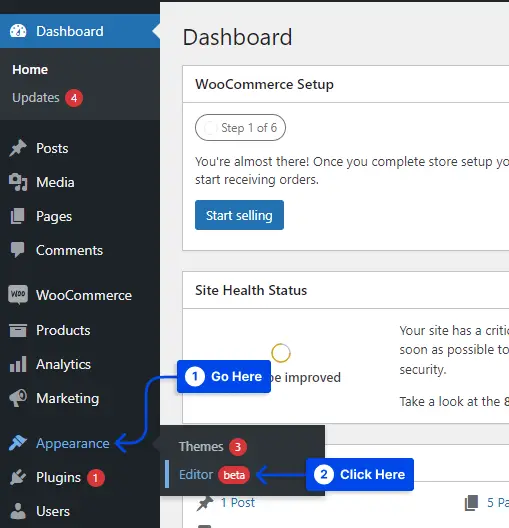
- Go to Appearance in your WordPress dashboard.
- Click on the Editor option.
You will be directed to the Full Site Editor by clicking this option.
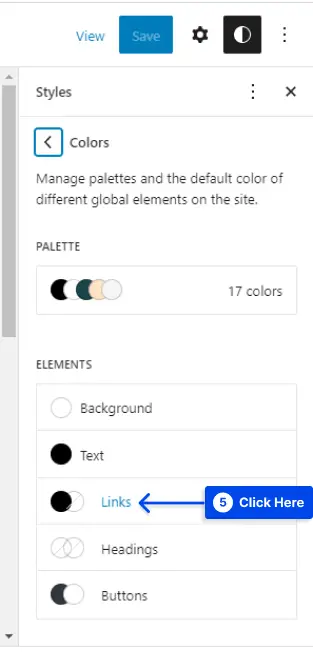
- Go to the top-right corner of your screen and click on the duotone circle button.
Upon hovering over this button, you will discover that you are in the Styles section.
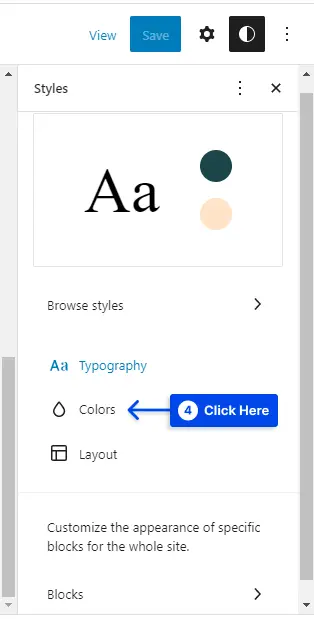
- Click on the Colors option in the Styles tab.
You can alter the color scheme of your theme by doing this.
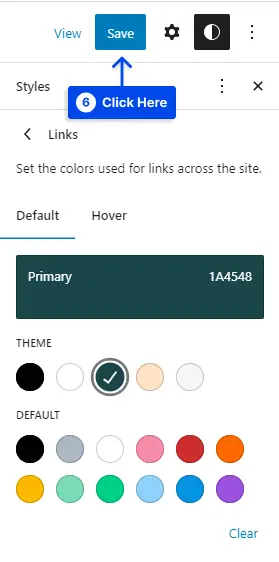
- Click on the Links option.
This section will show different default colors depending on your selected theme. The color picker, however, allows you to choose a custom color.
In the text box, the custom hex code will automatically enter once you select the color you wish to use.
- Click on the Save button after choosing your color.
The Global styles tool enables FSE, so by using this tool, you will be able to update your link colors throughout your entire website.
Method 3: Change Link Color By Using WordPress Customizer
There may be many reasons why you do not wish to upgrade to a block theme. For example, you might require more control to make more subtle adjustments.
Alternatively, a limited selection of available block themes may not meet your requirements.
Regardless of the situation, you can easily change the color of your links by using the Customizer tool. Follow these steps to use it:
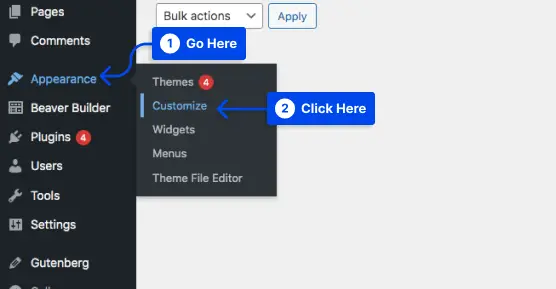
- Go to Appearance in your WordPress dashboard.
- Click on the Customize option.
When you click this, the Customizer will launch automatically.
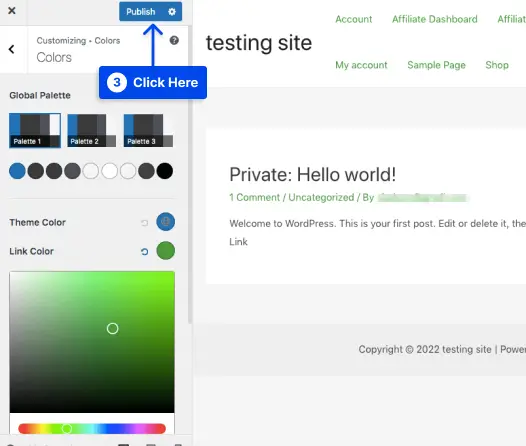
- Locate the Color Editing tab once the Customizer has opened.
This will differ from theme to theme.
In this section, you will find various settings related to your theme’s colors.
- Go to Link Color, Accent Color, or Primary Accent based on your theme.
- Select your color using the color picker.
Alternatively, you may enter the hex code of your color in the text box.
- Click on the Publish button when you’ve chosen your color.
The colors of all your website’s links will be updated as a result of this step.
Method 4: Change Link Color in Gutenberg Editor
Among the most popular editor systems of the past few years is Gutenberg, which is part of WordPress’s default editing system. Those who are avid Gutenberg users will find this method helpful.
Follow these steps to change the link color in Gutenberg:
- Open a post/page with Gutenberg.
- Select some text.
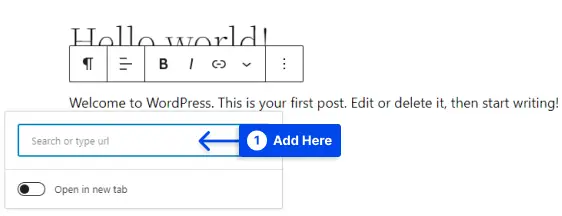
- Add a link to the text using the hyperlink icon and press Enter.
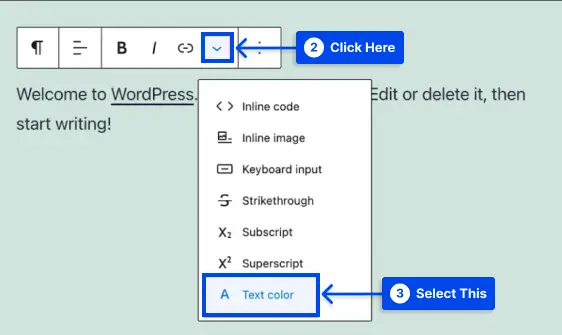
- Click on the dropdown arrow next to the link icon while selecting the link text.
- Choose the Text color option.
This option displays WordPress’s color picker, enabling you to choose a custom color for your selected text.
- Choose your preferred color.
- Click on the Update button at the top-right corner of your page.
Method 5: Change Link Color in Elementor Page Builder
In Elementor page builder, you can build and customize every aspect of your website, including colors, using an easy-to-use visual page builder.
Follow these steps to change the link color in Elementor:
- Open a page from your WordPress dashboard.
- Click on the Edit with Elementor option.
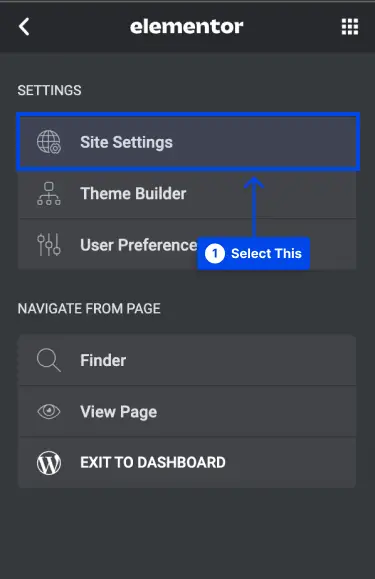
- Click on the three lines at the top-left corner when Elementor is opened.
- Select the Site Settings option.
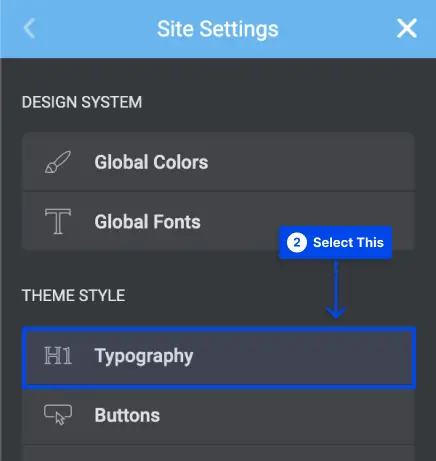
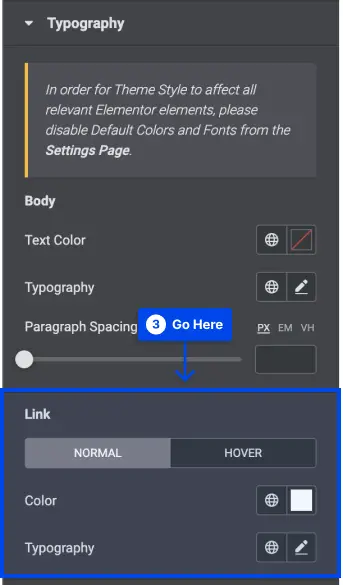
- Go to the Typography section.
- Go to the Link heading in the Typography section to adjust the color.
- Click on the Update button when you’re done.
Method 6: Change Link Color in The Divi Page Builder
The purpose of this section is to explain how you can change the color of your links in WordPress with Divi page builder.
The Divi Builder is an easy-to-use and fast tool for creating unique web pages in a short amount of time. In Divi Builder, you can adjust the colors of individual links.
Follow these steps to change the link color in the Divi Page Builder:
- Create a new page and edit it using the Divi Builder.
- Choose the text to which you wish to add a link.
- Click on the hyperlink icon in the pop-up menu.
- Enter the URL in the pop-up window.
Now you will see the default color for links, which is blue.
- Click on the paint bucket icon to change the link color.
You will be able to customize the color of the link using the color palette that opens.
- Select your preferred color.
- Save your changes.
Conclusion
This article has explained why to change the link color in WordPress and presented six effective methods.
Our sincere appreciation to you for taking the time to read this article. If you have any comments or questions, please do not hesitate to post them in the comment section.
We regularly update our Facebook and Twitter pages with new articles, so please follow us for the latest news.


