WordPress gives you the ability to manage several sites form the same dashboard. This useful feature is called WordPress Multisite.
In this article, we talk about WordPress Multisite, its advantages, and disadvantages. Also, we teach you how to install it step by step.
Keep in mind, this feature may not be applicable to all WordPress users. Because this adds new layers of settings to your WordPress.
Also, you should pay attention to your security and performance in order to provide your users a secure and fast website.
What is WordPress Multisite?
WordPress Multisite is a feature added to WordPress in 2010. This feature allows you to control multiple WordPress websites with one platform, one WordPress database, and shared plugins and themes.
The administrator can control the website with one dashboard. You can also use subdomains of a single domain under a single server for different websites.
WordPress Multisite Pros & Cons
Now that we know what is WordPress Multisite, let us discuss its advantages and disadvantages:
Advantages of WordPress Multisite
- The ability to manage multiple websites with one dashboard.
- With only one update your WordPress version, plugin, and themes of your websites are updated.
- The main admin can change the privacy settings for every website in the Multisite.
Disadvantages of WordPress Multisite
- You are allowed to have one main admin. Only the main admin can define websites on the network. Website admins can only work and manage their websites with the permissions the main admin has provided to them.
- The main admin must be experienced in WordPress and needs to know how to edit the core files on the server.
- Most plugins and themes are designed for normal WordPress websites and you need to look for plugins and themes compatible with WordPress Multisite.
- If the server is hacked or there is an error within your server, it impacts all of your websites in the network.
Why use WordPress Multisite?
At first glance, WordPress Multisite may be very useful, but keep in mind, WordPress Multisite is not meant for every WordPress user.
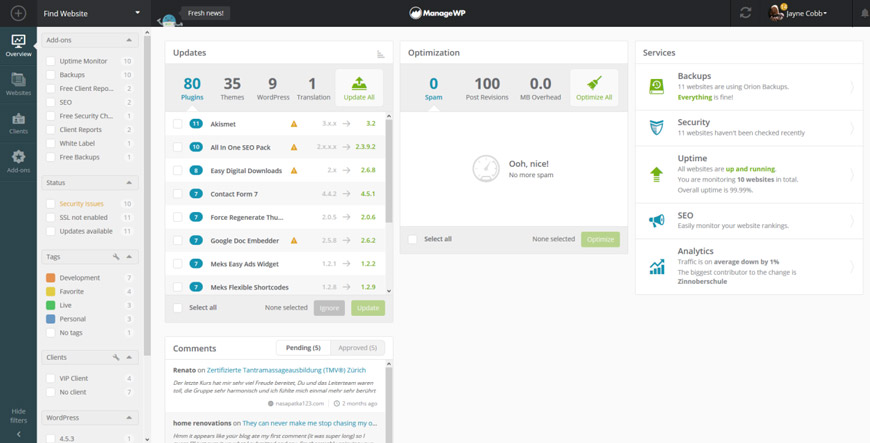
Using this feature may increase the complexity of your job. Also, there are other third-party tools you can use to manage multiple websites at the same time (for example, ManageWP).

WordPress Multisite allows you to control multiple WordPress websites over one network. These websites use a shared server, IP address, and network.
Although, the third-party tools we mentioned above, are designed to be used outside of the WordPress environment.
Also, some of these tools are premium and you need to pay a subscription fee to use them. You can also manage websites with different servers and domains with these tools.
Why Not use WordPress Multisite?
Using the WordPress Multisite is not recommended if you belong to any of the categories below:
- If you manage one website.
- If you don’t have time to update your WordPress and its files.
- If choosing the right hosting provider with enough bandwidth and space to control Multisite is costly for you.
- If The websites you control use different hosting providers.
- If The websites you control use the same hosting provider but they are related to different brands and not to each other.
- If Due to security purposes, your hosting provider may recommend you to use one account and IP for each of your websites.
- If you are unable to control a network of websites in terms of controlling and troubleshooting performance and security issues that may occur.
- If your admins require unlimited permissions to manage WordPress.
- If you need to use plugins that are not compatible with the WordPress Multisite.
- If each website requires its own themes and plugins. One big advantage of WordPress Multisite is the ability to share plugins and themes to save memory space.
Who Should Use WordPress Multisite
If you belong to any of the categories below, you need to use WordPress Multisite:
- If you want to manage all of your WordPress websites by logging in once.
- If you want to let other admins keep your website updated.
- If you have a network of websites that share one server.
- If you are a developer and you want to display your portfolio not as images or videos but as an active subdomain of your main website.
- If you want to launch different branches of your website with different themes and subdomains.
- If you want to allow others to use your network and build their own websites. In other words, monetizing your network.
- If you want to reduce the cost of having multiple websites by having them on one server. (although, you need to increase your space and bandwidth which may be costly)
- If you are using the same plugins and themes on your websites. In this case, by installing them once all of your websites can use them.
- Using WordPress Multisite allows you to update all of your WordPress core, themes, and plugins at once.
Best WordPress Multisite Examples
Now that we know exactly what is WordPress Multisite, it’s time to introduce examples of it to find out how exactly it works:
WordPress.com
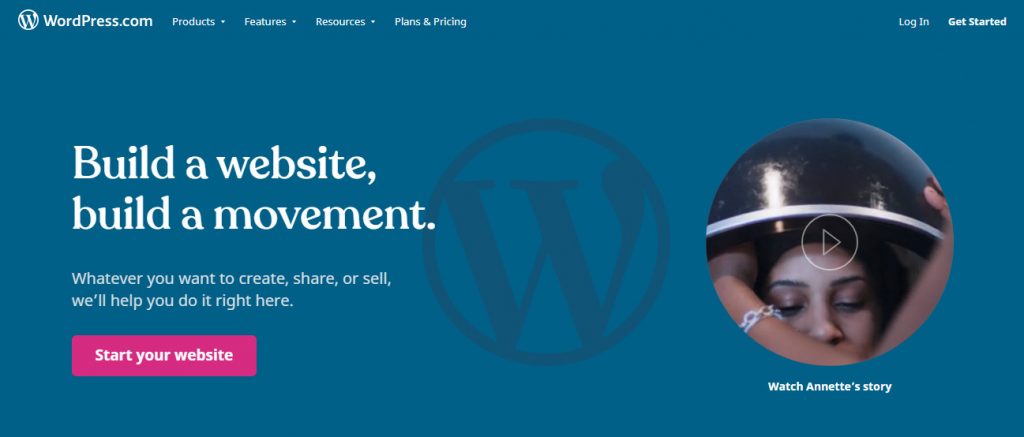

WordPress itself is a known example of Multisite. WordPress allows its users to create their websites in the WordPress network. These websites will be launched under WordPress.com subdomain. However, users have limitations but they can manage their websites nonetheless.
The University of British Columbia


This University uses WordPress Multisite to sort out its subdomains and different departments of this University belong to the main UBC website.
Thomson Reuters


This website has Thomson Reuters features and allows its users to use them as well. By clicking on each you get redirected to a new subdomain.
New York Times
This website is a great example of an online news station. All of its blogs are subdomains of the main website.
How to enable Multisite Network in WordPress?
After explaining the advantages and disadvantages of WordPress Multisite, you still want to install it, follow the steps below:
Install WordPress
If you want to launch a new website, first you need to install WordPress.
But if you want to install WordPress for Multisite purposes, you can define your website network based on https://subdomain.mainsite.com or https://mainsite.com/subdirectory.

Generally, it’s easier to use subdirectory because you don’t need to configure your domain’s DNS in your hosting provider.
However, if it’s been more than 30 days since the launch of your website, you have no choice but to use a subdomain.
Backup your website
If you currently have a website, make sure you get a backup of your website (that is the core of your website’s network). Therefore, before anything, use a plugin to get a backup of your website.
If you don’t know how to backup WordPress, we have written a complete guide.
Disable your plugins
Before enabling WordPress Multisite, disable all of your plugins. Once you are done, log out of your WordPress account.
Update your wp-config.php file
Now you need to update your WordPress files to enable WordPress Multisite.
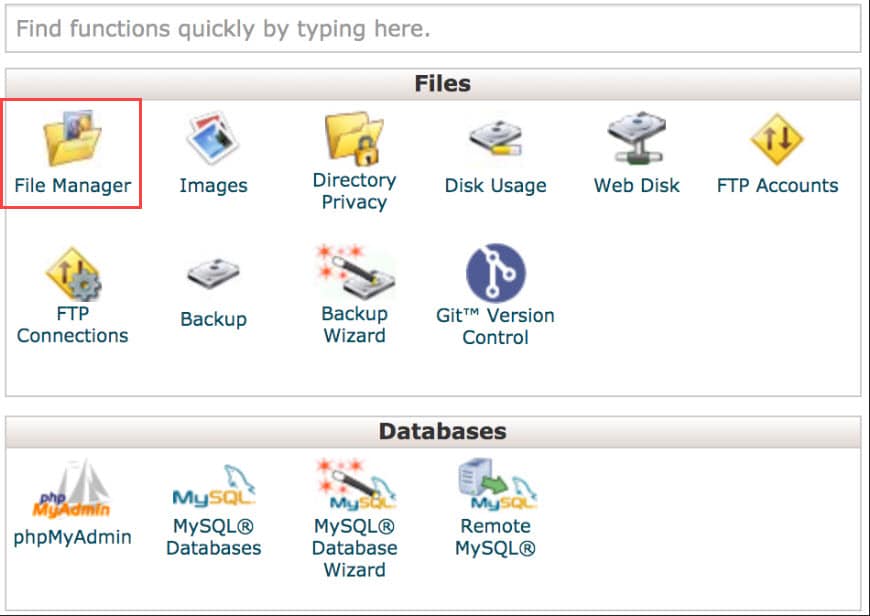

Login to your hosting cPanel and from Files Manager, update your files. Go to your website’s root directory (public_html) and locate the wp-config.php file.
In this file, copy and paste the code below, above the “/* That’s all, stop editing! Happy blogging. */” line:
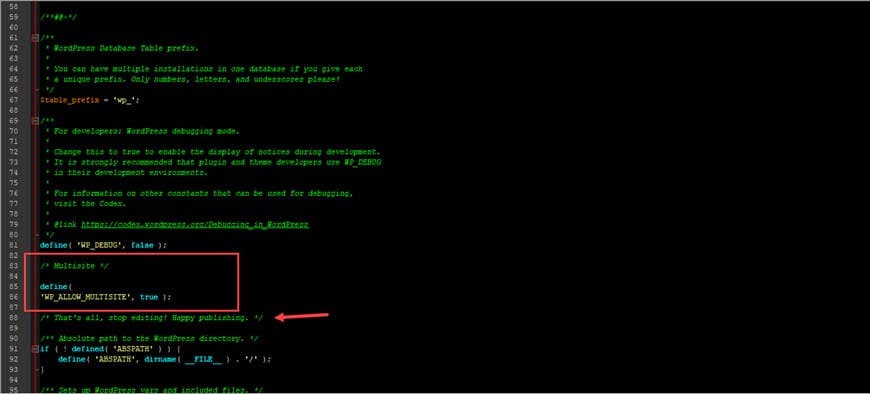

/* Multisite */
define( 'WP_ALLOW_MULTISITE', true );
Make sure you save your changes.

Install WordPress Multisite
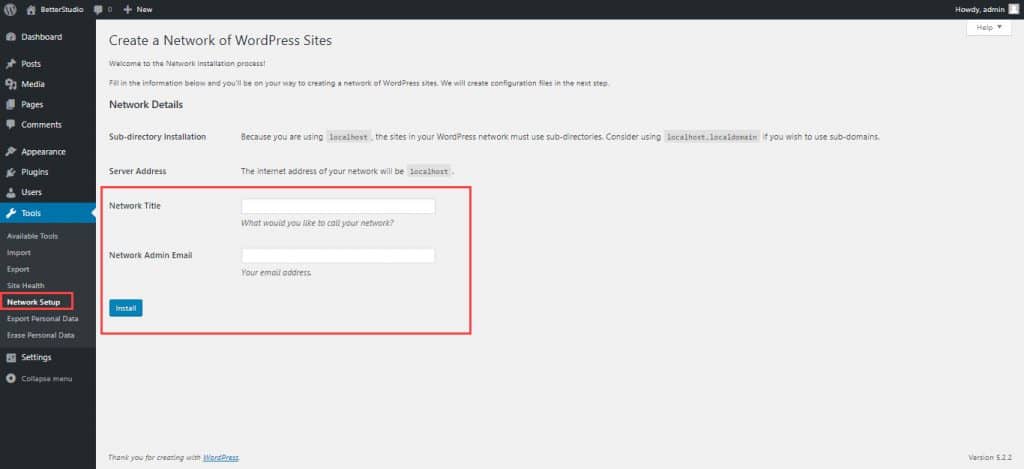
Login to your WordPress account. From your dashboard go to Tools and click on Network Setup.
Choose a name for your network and if needed assign another admin to your website.
Now click on Install. Your web host may ask you to create a Wildcard Subdomain. In this case, follow the rest of the guide.
Enabling Sub-Domains in Multisite by Adding Wildcard Subdomain
If your WordPress Multisite network works on a subdomain rather than a subdirectory, your website users can create a website with Wildcard Subdomains.
In this network, every new website has its own subdomain and Wildcard configurations eliminate the need for a separate configuration for each subdomain.
Below, we give you examples of how to create Wildcard Subdomains.
Apache
In the httpd.conf file or any other file that contains your VirtualHost account, type in the code below:
ServerAlias *.example.com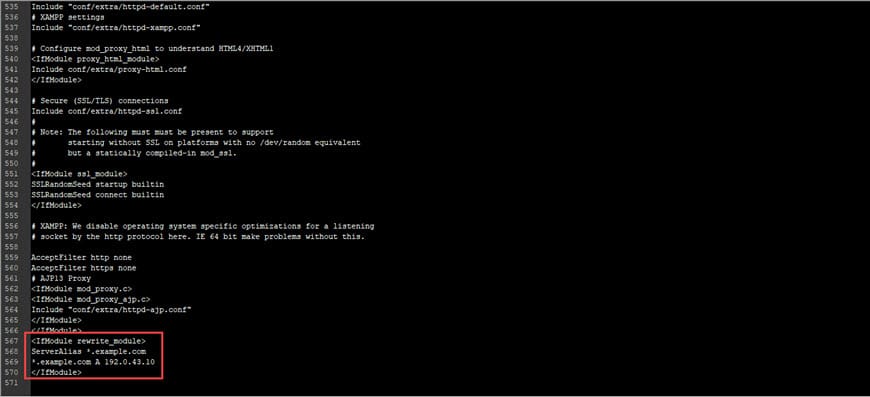

Also, use the code below as your wildcard DNS:
*.example.com A 192.0.43.10cPanel
Create a subdomain in your cPanel and call it wildcard. This subdomain must be placed where the wp-config.php file is.
DirectAdmin panel
From User Panel click on DNS Management. Enter the following entries in 3 separate columns:
*A xxx.xx.xx.xxx
Replace xxx.xx.xx.xxx with your IP address. Click on Admin Panel (if you can’t access it, contact your hosting provider), from Custom Httpd locate yourdomain.com. Copy and paste the line below in the entries and save your changes:
ServerAlias *.|DOMAIN|If you want to delete the changes you have made, simply delete the line you copied and save the file again.
If you are unsure which option is for you, contact your hosting provider.
WordPress Multisite Network Settings
After installing WordPress Multisite, you will see two pieces of code on the next page.
Go back to FTP or your File Manager. Enable “Show hidden files”. Open wp-config.php file and edit it again. Copy and paste the code below:
define(‘MULTISITE’ ,  true);
define(‘SUBDOMAIN_INSTALL’ ,  true);
define(‘DOMAIN_CURRENT_SITE’,  ‘…………………….’ );
define(‘PATH_CURRENT_SITE’,  ‘/’ );
define(‘SITE_ID_CURRENT_SITE’,  1 );
define(‘BLOG_ID_CURRENT_SITE’,  1 );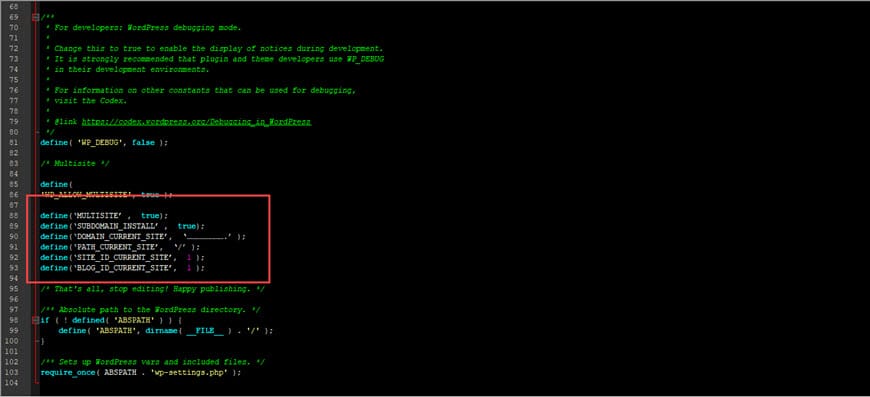

Finally, save your changes.
Now you need to edit your .htaccess file. Usually, this file is hidden in your server. If by enabling “show hidden files” you still cannot see the .htaccess file, enter the line below at the end of your URL:
“&showhidden=1&saveoption=1”Copy and paste the code below to your .htaccess file:
RewriteEngine On must be replaced with the current code. If you couldn’t find the .htaccess file, you can create a file and copy and paste the code above to it and upload it to your server. Once you are done, it should look like this:
Save your changes and login to your WordPress account.
Managing Sites in WordPress Multisite Network
If you are the main admin of WordPress Multisite, you must have noticed the difference by now. Below, we introduce you to new options you see in the WordPress Multisite:
Settings
The first step is to configure your network. Now that you have entered your network name and email address for the main admin, you can follow the steps below:
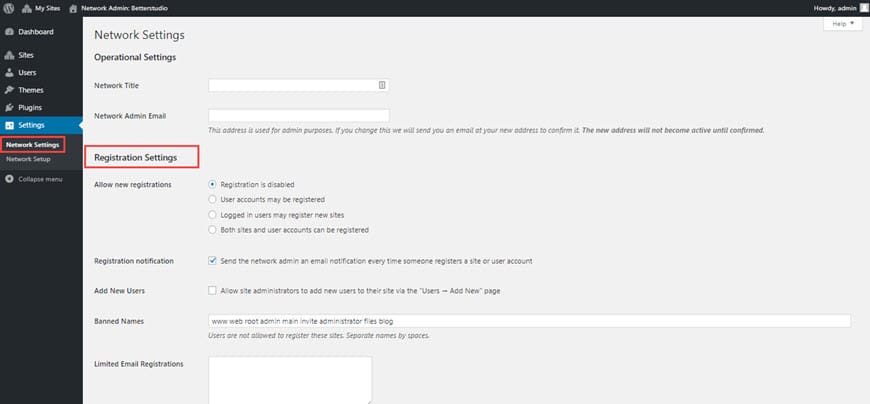

Registration Settings: This option is for users who want to build a new website on your network. Also, it allows your admins to create new users on your websites.
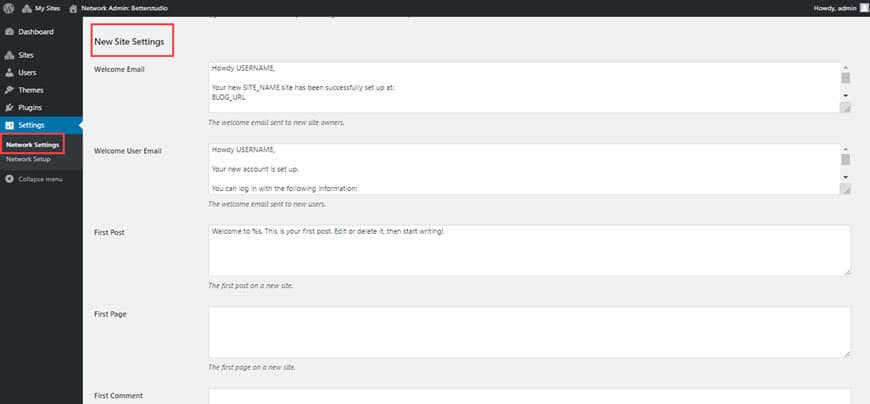

New Site Settings: In this section, you can customize messages. If your admins create new content on your websites, they receive these messages.
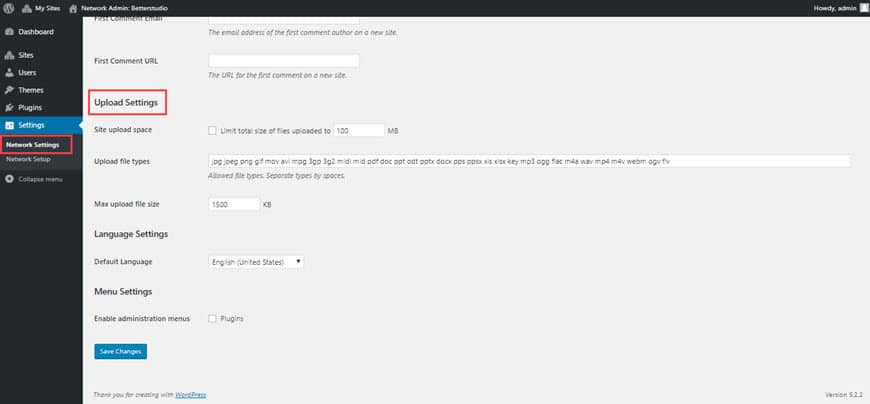

Upload Settings: In this section, you configure upload settings for your admins and users.
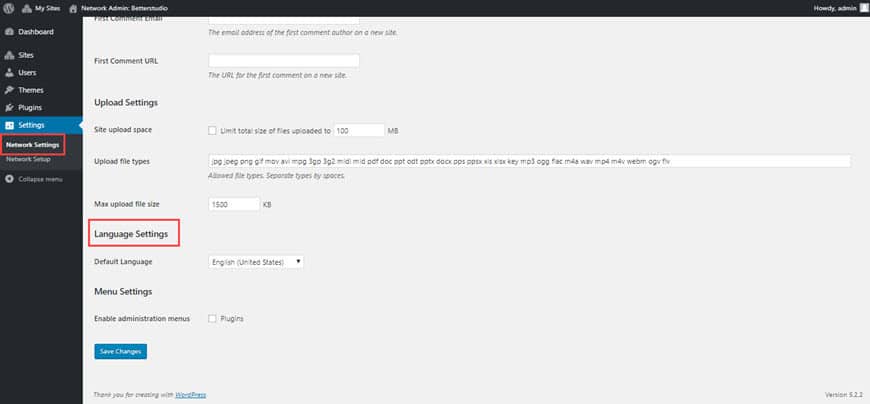

Language Settings: In this section, you can configure the network language.
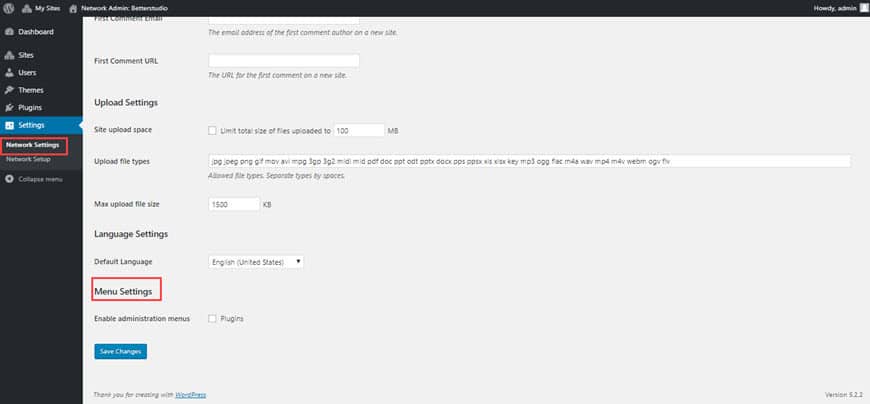

Menu Settings: If you want to enable this option for your admins, you need to select your desired plugins and activate them. Otherwise, you can leave this area blank, by doing so, only the main admin can access the installed plugins.
Websites
WordPress’ user-experience is still the same. However, the Sites module is added. In this section, you can add new websites to your network. To create a new website, first you need to choose a title, address and finally an admin.
Once the admin logs in with its email address, the new website will be published. In the My Sites section, from the menu-bar, you can enter your required information.
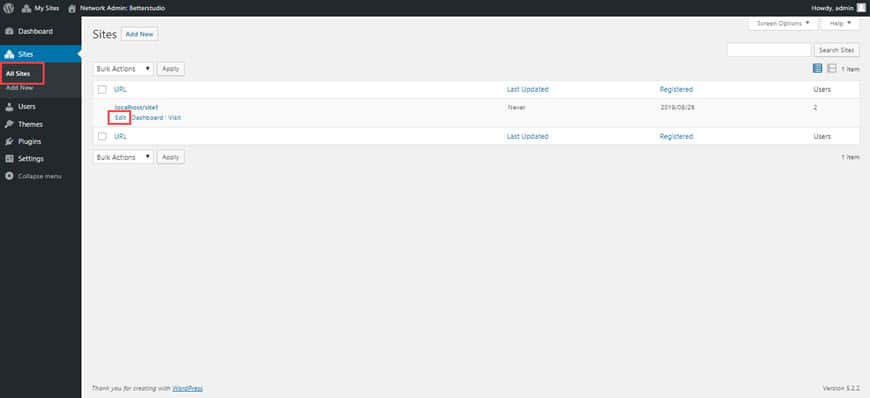

If you still want control over the settings and authorized users, from Sites click on All Sites. Underneath the blog’s name click on Edit and configure your settings.
Users
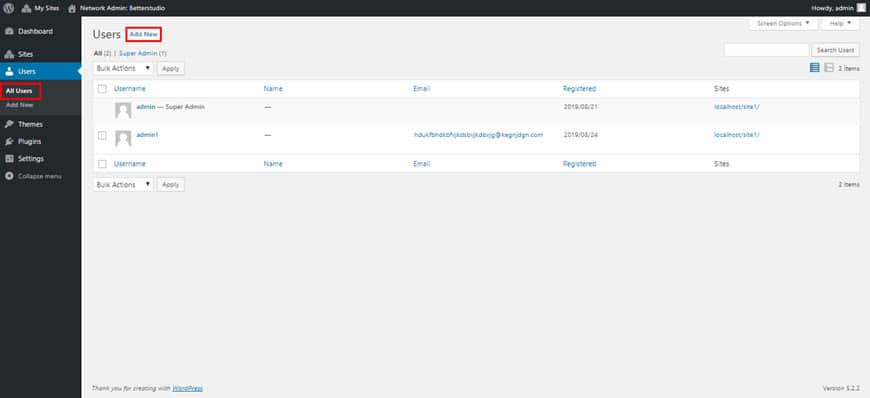

In this section, you can add or remove users.
Themes
In this section, you have many sections.
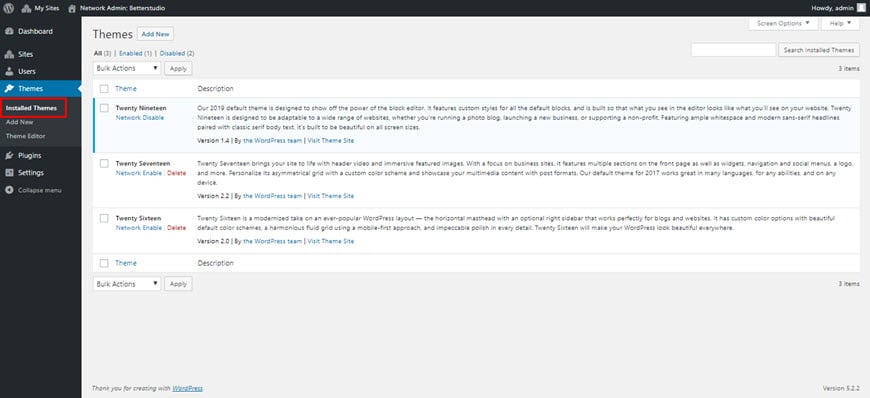

You can go to the themes section of each website and enable individual themes.
You can also visit the themes section in the sidebar and check for all the available options. In this section, you can specify all themes for users to design seamlessly.
Plugins
The main difference between plugins and themes is the fact that only the main admin can choose plugins for the entire network and website admins can choose from the available plugins list.
But, they are not allowed to install any plugins outside of the list and network.
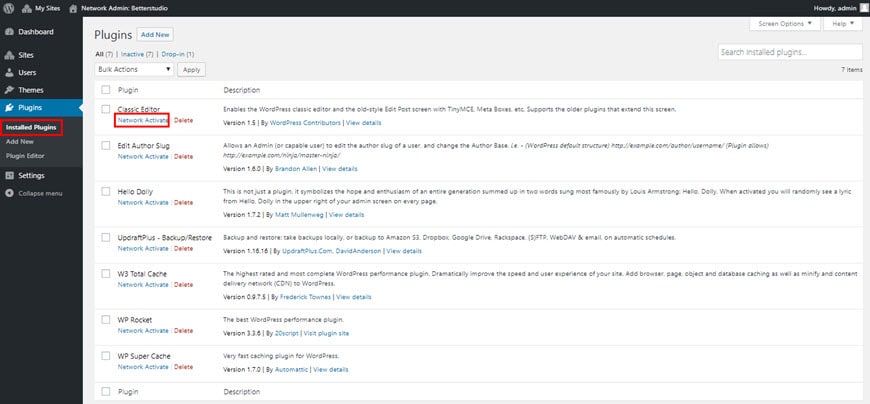

If the plugins you were using on your normal version of WordPress are disabled, you can use the backup we talked about at the beginning of this article and enable them on your website.
Updates
To ensure your network’s security, it is highly recommended to keep updating your WordPress core, plugins and themes.
If you see one update notification in your WordPress dashboard, and if you update it, all of the websites in your network will be updated as well. Because there is only one copy of WordPress core, plugin, and theme for the entire network.
Conclusion
In this article, we discussed WordPress Multisite and pointed out its advantages and disadvantages. Also, we explained how you can install and configure it. We hope that this article was helpful to you. If you have any questions, please ask them in the comment section below.


