Certain pages are just to be seen by developers or specific users. One of the ways to keep a page exclusive is to password protect it.
As you know, WordPress is the most popular and powerful CMS. It is also developed to share your content. There are many tools designed to improve the accessibility of your content and also WordPress password protect plugins are available.
But sometimes you need to password protect a WordPress page. Well, WordPress has thought of that as well.
What Is a Password Protected Page in WordPress?
A password-protected page in WordPress is a page where your visitors need to have a password to access a web page and its content.
Otherwise, they cannot access the content on the page. This feature allows you to add a password to your webpage in WordPress and only allow certain users with the password to have access to it.
When you are creating a post, by default, your Post Visibility is set to Public. This means anyone can have access to your post. This is good for users who want to have the maximum traffic on their website.
On the other hand, users who want to protect their content with a password they can do so. You don’t need to install any plugins to add this feature to your posts. This ability is built into WordPress.
Why Password Protect a WordPress Page?
Now that you know, you can password protect a WordPress page, the question is, why do we need to password protect a WordPress page?

There are many reasons for this. For example, you may publish a unique post on your website. In this case, you don’t want anyone to steal your post up until the big reveal. Therefore, you need to password protect it.
The other reason, you may want to show your content to a certain group of visitors. This group can be your close friends or customers who have purchased the right to see the content on your website. Therefore, you may want to password protect your crucial content, events, and tutorials.
The Difference Between Password Protected Page and Private Page
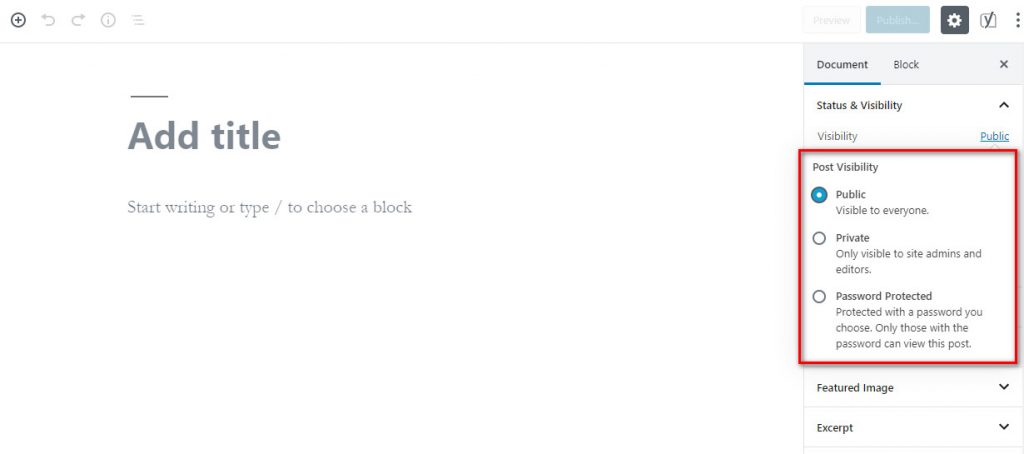
The simplest way to add a password to a page or a specific post is to use different visibilities. As we mentioned above, after creating a post or page in WordPress, Post Visibility appears on the top right corner and it offers a few options.
Public
This is selected by default. Once this option is selected, everyone can view your content without any restrictions.
Password Protected
When you select this option, only people who have the password can access the post or page.
Private
In this option, your post or page is protected based on your user roles. Therefore, if a user has the right role, he/she can access the private content.
As you can probably tell, in both Private and Password Protected options, you can protect your content.

When you set your Post Visibility to Password Protected, you can simply choose a password for your post or page. Therefore, only users who have the password can access your content.
You can also password protect one or two pages with the same method. However, you need to create multiple passwords.
Once you password protect a page, it doesn’t get deleted from your website. However, it is only accessible for users who have the password.
By choosing a password for your WordPress pages, Protected will be added to your page titles.
By seeing the word Protected before your content, your users realize that the content is password protected. However, this feature has advantages and disadvantages.
In Private status, users don’t need to remember and enter any passwords. Your users can access private pages based on their user roles.
If they have the right role, they can access the private. Otherwise, it shows a 404 error.
Therefore, the main difference between Private and Password Protected is that you don’t need to type in any passwords for the private pages.
If your users have the right user role, they can access the page. Otherwise, they won’t be able to see the page anywhere on your website.
How to Password Protect a WordPress Page or Post?
Now it’s time to add a password to your pages or posts. This is easily done by changing your Visibility status. As mentioned above, by using the Password Protected option, you can password protect your desired pages and posts.
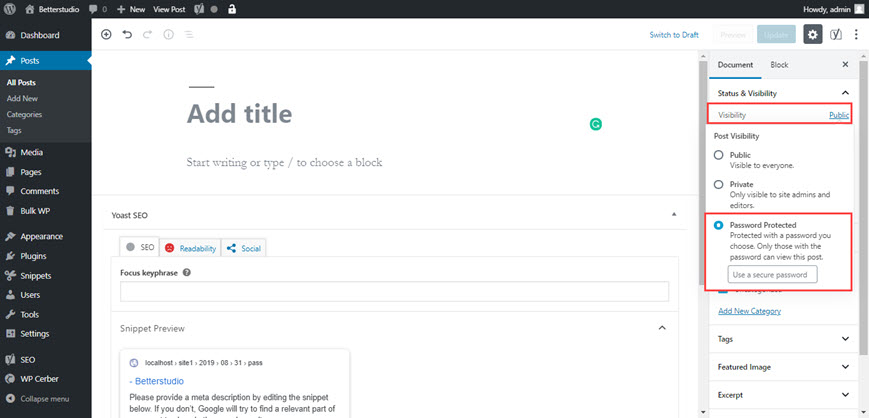

After selecting Password Protected, a box appears where you can type in your desired password. This password can be numerical, characters or both. After selecting your password, you can save your page or publish it.
This is all you need to do to password protect a WordPress page. However, make sure you remember the password or write it down in a notepad.
How Can You Access a Password Protected Page?
When your users visit a password protected page, they see the image below:
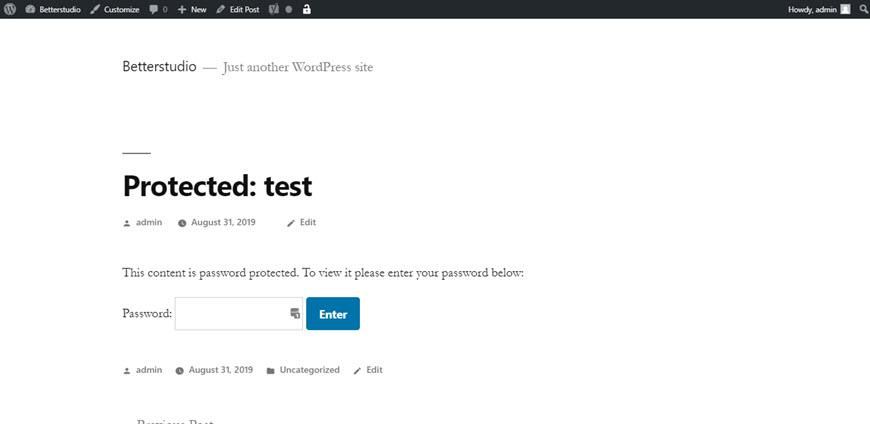

If your users have the password, by entering the password and clicking on Enter they can visit the page.
Should I Use the Same Password for Every Password Protected Page?
What would happen if you use the same password for all of your pages?
In this case, your users can have access to all of your password protected pages with the same password.
When a user visits a password protected page they need to type in the password. However, if they visit another password protected page with the same password, they don’t need to enter the password again.
If you have multiple Password Protected pages on your website, it is best to link them to one page. Therefore, your users don’t need to search for your other password protected pages on your website.
How to Password Protect Entire WordPress Website?
We didn’t use any plugins up to this point. However, what if you want to password protect your entire WordPress website?
Then you need to install a plugin. We recommend using the Password Protected plugin.
To use this plugin, you only need to download the plugin from the official WordPress website, then install and activate it on your website.
After activating, from your WordPress Settings go to Password Protected.
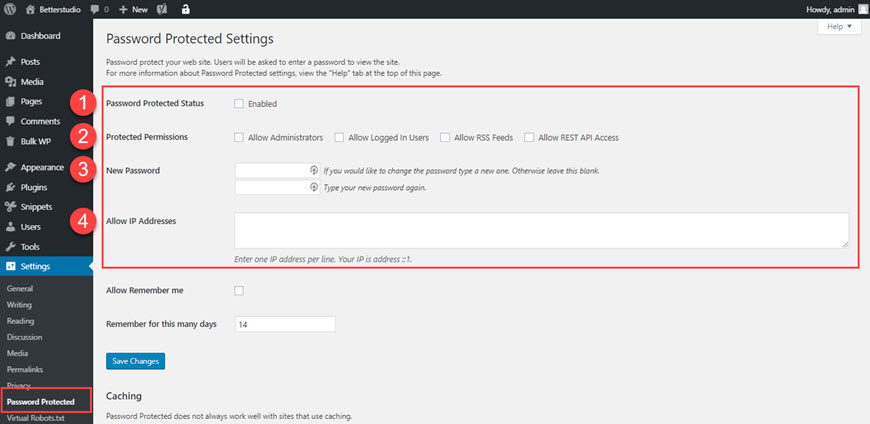

In the Settings, if you enable the Password Protected Status, your entire website will be password protected.
Protected Permissions
If you select this option, your users with the right permissions (role) can enter your website without typing in any passwords.
As you can see, in the New Password field, you need to choose a new password.
Allow IP Address
If in the IP address section, you type in your desired IP Addresses, they don’t need to enter any password to enter your website.
Once you are done, make sure you save your changes by clicking on Save Changes.
If your visitors don’t belong to any of the categories mentioned above, they will see a page asking for a password.
Keep in mind, if your users have a direct link to your content or an image, they can access it without entering any passwords.


