As you probably know, WordPress is regularly updated. Themes, plugins or any add-ons you may have installed are updated on a regular basis.
Most developers strongly believe regularly updating the WordPress core, plugins and themes is a must for every WordPress website. However, some updates have a negative effect on the website and may lower the performance of your site. In this article, we explain how to disable auto-update in WordPress.
Most WordPress updates remove bugs and add new features to the CMS. In addition, these updates increase the security of the WordPress platform. But this doesn’t mean that you should leave an auto-update on and let it download and install any updates.
The auto-update in WordPress was introduced after the 3.7 version. Let us discuss the advantages and disadvantages of auto-update in WordPress and then how to disable it.
Advantages and Disadvantages of Auto Update in WordPress
The auto-update has many advantages and disadvantages. Let us point out a few of each.
Advantages
- One key advantage of auto-update is the fact that you don’t need to worry about updating WordPress manually. If there is any update for theme, plugins or the core, WordPress will do it automatically.
- As mentioned above, keeping WordPress updated at all times increases the security of the platform.
- With every update, developers eliminate any bug that was reported to them. Therefore, in the new versions, there may be no bugs at all.
- We often see new features with every update. For example, in WordPress version 5 a new editor was introduced to the community. This editor eliminated the need to install editing plugins.
Disadvantages
- After each update, you may see a slight change in each of the core files, themes, and plugins, and your configuration may reset.
- It’s often the case where with every new update, the plugins and themes are no longer compatible.
How to Disable Auto Update in WordPress with Code?
As always, before making any changes to the core files of WordPress, it’s best to get a backup of the entire website and database.
To disable auto-update in WordPress with code, we need to make some changes to the core files. Therefore, getting a backup is necessary. To learn how to get backup of the WordPress website, read our related article.


With an FTP client or hosting panel, go to File Manager and locate the wp-config.php file. Then, open the file in an editor and add the code below to it and save it.
define(‘WP_AUTO_UPDATE_CORE’, false );Keep in mind, this command only disables the auto-update for the WordPress core files. To disable auto-update for every section of WordPress uses the code below:
define(‘automatic_updater_disabled’, false );We highly recommend using the comment command when adding new lines to any files. For example:
/* Allow only minor WordPress updates */
define(‘WP_AUTO_UPDATE_CORE’, minor );
By using this code, WordPress updates itself if there is an emergency with the website or to eliminate any existing bugs and it won’t update itself for any minor updates.
In addition, using the code above maintains the security of your website and by every security update the security increases as well. Once the bugs are removed from the WordPress core files and plugins, the opened window for hackers closes. Also, you won’t plugins and themes configuration due to incompatibility.
If you want to re-enable the auto-update in WordPress, simply change the value in the code above from False to True. For example:
define(‘WP_AUTO_UPDATE_CORE’, true );How to Disable Auto Update in WordPress with a Plugin?
There is a plugin for every piece of code you need to add to the core files. Disabling auto-update in WordPress is no different. There are many plugins in the WordPress plugin store for this purpose.
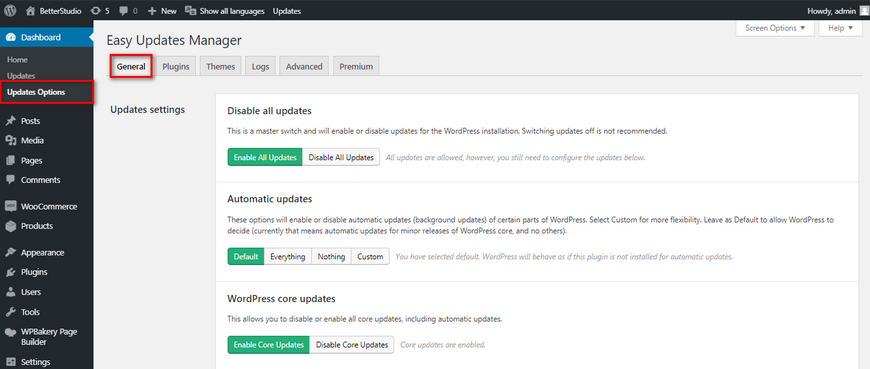
Easy Updates Manager is one of the most popular plugins in this genre. To begin, download, install and activate the plugin. Then, look for its name in the plugins and click on configuration.
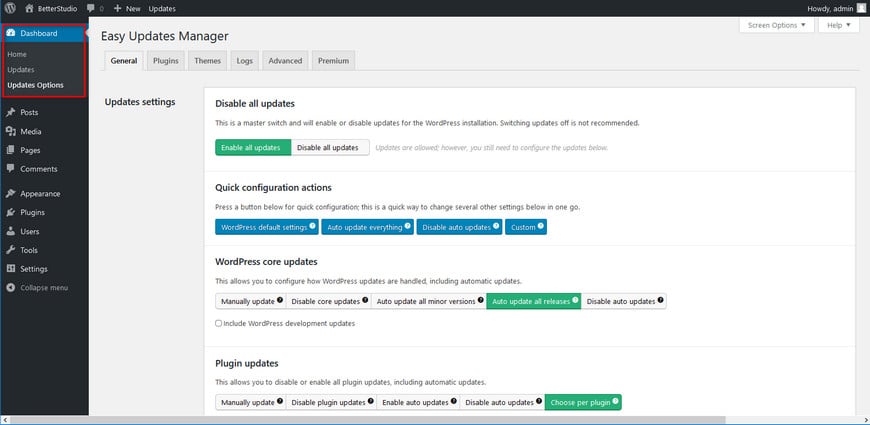
In the General tab, you can see the general settings.


The configuration options this plugin allows you to do are:
- Disabling all updates
- Enabling all updates
- Using the default configuration for updates
- Allowing auto-updates for all sections
- Disabling auto-update
- Custom updates (In this section, you can specify which parts of the WordPress should be auto-updated)
Disable Auto Update in WordPress for Themes and Plugins
Other than the core files in WordPress, themes, and plugins have auto-update as well. We will introduce a few ways to disable this feature in WordPress.
With a Plugin
You may need to use a plugin to disable themes and plugins auto-update in WordPress. The plugin we introduced above is one of the best plugins you can use to disable auto-update for plugins and themes.
With Easy Updates Manager plugin, this feature is easily disabled and enabled. In this plugin, there are two tabs for plugins and themes where you can disable and enable the auto-update.
To download the Easy Updates Manager plugin, follow the steps below:
- Log in to the WordPress dashboard.
- Hover over Plugins and click on Add New.
- In the search box on the top right corner type in Easy Updates Manager.
- Click on Install Now then Activate.


Once the plugin is activated, it will appear under Dashboard. Click on it to configure it.


In the Plugins tab, every installed plugin on the WordPress website appears and you can choose whether to disable or enable the auto-update individually.
Themes are exactly the same. Click on the Themes tab and begin your configurations.


By Using Code
To disable auto-updates for themes and plugins in WordPress, we need to make some changes to the function.php file.
For themes, use the code below:
add_filter( ‘auto_update_plugin’,’_return_false’);And for plugins:
add_filter( ‘auto_update_plugin’,’_return_false’ );These codes disable the auto-update for themes and plugins. With the help of the plugin mentioned above, you can specify to have an auto-update for any plugins you need to update on a regular basis. Same works with themes.
Conclusion
Don’t forget, WordPress updates are very important. Especially new updates that eliminate any bugs and increase the security layers of WordPress. Therefore, if the auto is disabled, make sure you manually update the core files.


