Would you like to know how to add a WordPress favicon to your website? It is most commonly known that favicons are the tiny icons that appear next to website names when in browser tabs.
Though they originated there, your WordPress favicon can also be found on browser bookmarks, iOS home screen buttons, and many other items. Therefore, it plays a vital role in establishing your brand.
It is essential that your favicon or ‘site icon’ is correctly used so that users can easily recognize your website. By doing so, the site can increase brand awareness and even improve its User Experience (UX).
This article will explain why you should add a favicon to your WordPress site, how to add it with various methods, and how to create a favicon.
Why you should Add a Favicon to Your WordPress Site?
Favicon establishes the identity of your website, as we mentioned earlier. However, it also enhances the usability and user experience of your website.
In most browser windows, users have a large number of tabs open. As the number of tabs increases, your website’s title will be hidden.
A favicon is used to identify your website and enable users to switch quickly to the tab they are interested in.
In order to increase your visibility on mobile devices, you can ask your users to add your site to their home screens.
The icon or favicon of your site is also used when a user adds your site to their mobile device’s home screen.
How to Add a WordPress Favicon to Your Website?
Users can identify your website with a favicon, and those who visit your site more frequently will become familiar with that small symbol.
As a result, your brand will become more recognized by your audience and more trustworthy. This section will demonstrate five methods for adding a favicon to your WordPress website.
Method 1: Using the WordPress Customizer to Upload Your Favicon
With the release of WordPress 4.3, all WordPress sites will be equipped with a site icon feature that allows the uploading and cropping images to serve as favicons.
Most users will find this the quickest and easiest method for adding a favicon icon to their WordPress sites. Ensure that your image is at least 512×512 pixels, and WordPress will take care of the rest.
Follow these steps to use this feature:
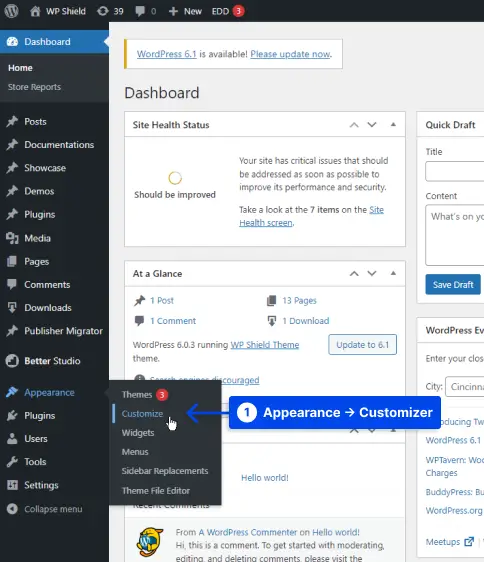
- Go to your WordPress dashboard.
- Go to Appearance.
- Go to Customize.
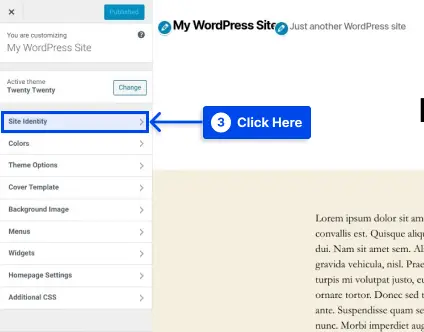
- Click on the Site Identity tab.
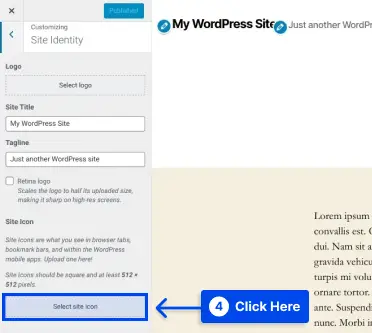
- Click on the Select site icon button at the bottom of the Site Icon section.
Upon clicking the button, you will be presented with the WordPress Media Library interface.
- Select an existing image in your Media Library or upload a new one.
Note: You must unzip the package you downloaded before creating your favicon if you used RealFaviconGenerator to create the favicon.
- Click on the selected image, then click on the Select button in the bottom-right corner of the Media Library.
If your image is not already a perfect square, WordPress will allow you to crop it.
It is possible to use the box to highlight the portion of the image that you wish to use as your icon. Your cropped image will be displayed on the right side of the interface as a preview.
- Click on the Crop Image button to finish your work.
- Click on the Save & Publish button to make your favicon live.
It is possible for you to return to this interface in the future if you wish to change your favicon.
Method 2: Installing a Plugin to Add Your WordPress Favicon
Suppose you want a plugin solution to the native WordPress site icon functionality. In that case, you can use a free plugin named Favicon by RealFaviconGenerator.
This favicon generator plugin offers similar functionality to the native WordPress Customizer. Still, it provides additional compatibility options for various devices and app icons.
Follow these steps to use this plugin:
- Install and activate the plugin via your WordPress dashboard.
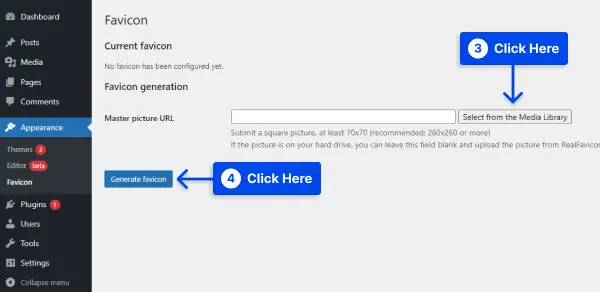
- Go to Appearance.
- Click on Favicon to create your favicon set.
- Click on the Select from the Media Library button to select or upload an image that is at least 70×70 px. The ideal WordPress favicon size is 260×260 px.
- Click on the Generate favicon button.
This plugin will take you away from the WordPress site to the website of RealFaviconGenerator when you click that button.
- Select Generate your Favicons and HTML code at the bottom of the site.
In the meantime, you will be directed back to your WordPress dashboard while processing the tool.
After the process has been completed, you will then be able to view how your favicon will appear on different devices in the plugin’s interface.
Method 3: Manually Adding Your Favicon via FTP
Suppose you prefer to add your favicon manually to your WordPress site. You can do so via File Transfer Protocol (FTP) or File Manager if your host supports cPanel.
With this method, you will also need to create a favicon for your website. A WordPress favicon can be manually added via FTP to a website by following these steps:
- Access your site’s files either through an FTP client or through the File Manager in your hosting account’s cPanel.
- Ensure your favicon file is uploaded to the root directory of your website.
- Add the code RealFaviconGenerator provided you with earlier to your theme’s header.
Adding it to your theme’s header can be achieved with a plugin such as Insert Headers and Footers, or paste the code directly into your theme’s <head> section by editing your theme’s header.php file.
In addition, using the Insert Headers and Footers plugin guarantees that your favicon will remain intact if you change WordPress themes.
- Save your changes.
Method 4: Use Your Theme Options
If the WordPress Customizer does not have the option to change the favicon, you may still find the option in your theme settings.
It is not uncommon to find themes these days that offer many options that are not all standardized.
Thus, the only way to determine if your theme includes the option to create a favicon is to check the theme’s settings. If there is such an option, you can use it to make a favicon easily.
Method 5: Set Different Favicon Per Page
There may be times when you wish to display a different favicon on each WordPress page, for example, if you host multiple pages with one WordPress installation or want to have a different favicon for another reason.
All you need to do this are a favicon and a WordPress child theme. Follow these steps to use this method:
- Upload your favicon to the media gallery.
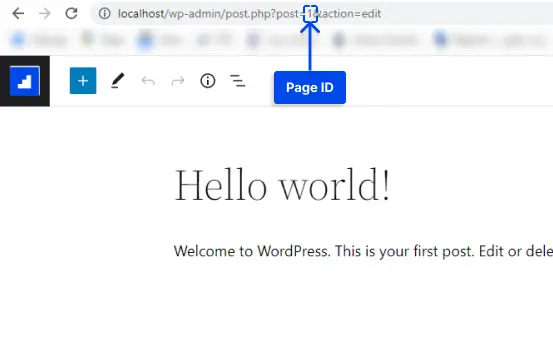
- Find the ID of the page where you want to put a different favicon.
You can easily find your WordPress page ID by using the following steps:
- Go to your WordPress dashboard.
- Go to Pages.
- Click on All Pages.
- Choose the page for which the ID is needed and open it in edit mode.
- Take the URL and ID of the page.
- Drop the code below in your child theme’s functions.php and replace the content with the URL and ID of your page:
add_filter( 'get_site_icon_url', 'betterstudio_filter_favicon', 10, 3 );

function betterstudio_filter_favicon ($url, $size, $blog_id) {

	if ( is_page( REPLACE_THIS_WITH_PAGE_ID ) ){
		$url = 'REPLACE_THIS_WITH_FAVICON_PATH';
	}

	return $url;
}
How to Create a Favicon
It is possible to use your brand’s logo as your website’s favicon or icon. It is recommended that your site icon image have a maximum width and height of 512 pixels.
A square image should be used for the site icon. However, if you wish to use an image more significant than a square, WordPress will allow you to crop the image once it has been added.
An image editing program such as Adobe Photoshop or Gimp is recommended to create an icon that is precisely 512×512 pixels. In this manner, you can ensure that your image maintains the exact proportions.
It is possible to use a transparent image or to fill it with a color of your choice as the background. There is no restriction on the image format; it can be a png, jpeg, or gif.
Tips for Creating a WordPress Favicon
In your multisite network, you will be able to have unique favicons for each of the sites, and the easiest way to achieve this is to use a plugin such as the one illustrated in this article.
Editing your theme’s files to enable unique favicons for each network site is significantly more complicated than using a plugin.
You might also consider using a Content Delivery Network (CDN) to serve your favicon images. Your favicon images are stored on your server using all five methods described in this article.
You can, however, enhance your site’s performance even further by using a Content Delivery Network (CDN).
Use Cloudflare or a similar service such as KeyCDN. Visitors’ browsers will retrieve your favicon from your CDN instead of your site’s server when you install these services.
With a plugin such as CDN Enabler, your WordPress favicon URL can automatically be rewritten to comply with the above methods.
Conclusion
The purpose of this article was to explain why you should add a favicon to your WordPress site, how to add it using various methods, and how to create one.
This article is intended to provide you with helpful information. We welcome your questions and comments in the comment section.
Our latest articles are available on Facebook and Twitter, so please follow us on these platforms.


