How do you hide page and post titles in WordPress? Occasionally, when previewing your work in WordPress after you’ve designed a page or written an article, you realize that the page title looks out of place.
The WordPress platform does not provide a simple method for preventing titles from being displayed. Besides that, customizing the title isn’t easy since it depends on your WordPress theme.
You should be aware that you can hide the title of a page in WordPress if it appears too large and obtrusive.
Initially, you may be tempted to delete the heading from the page, but you should know that it can affect your ranking on search engines.
This article will explain why hide the page titles and how to hide page and post titles in WordPress with four methods.
Why Hide the Page Titles?
You may not need a title on every page of your website. Although titles are expected for blog posts, other types of content don’t benefit much from them.
The same design principles that are appropriate for a blog may not be appropriate for the rest of the website. For example, it is unnecessary to include a “Home” title on your homepage and could even be viewed as unprofessional.
Similarly, it would be unhelpful to have a heading at the top of your “About” or “Services” pages. A heading may not be needed on this type of page, as it speaks for itself.
Most of the time, you do not want to remove the title entirely, maybe it is simply its placement or the theme’s style that is bothering you.
Whenever your page title is in a strange place or does not fit well with your design, it can be hidden, and an H1 heading can be inserted. However, there is no easy way to hide a page’s title, just as it is not as simple as deleting an image or a paragraph.
You should consider headings in your SEO strategy and how search engines interpret your page hierarchy. A few considerations need to be made before hiding all your titles.
The Importance of Search Engine Optimization
For search engines like Google to index websites, they use robots called crawlers, which visit websites and index the pages within them.
Their indexing process involves reading elements such as the title page text and page hierarchy to determine the page’s purpose.
The purpose of this process is to display relevant content to people searching for specific terms and improve the search engine ranking of sites that follow the best SEO practices.
Commonly, the title of the snippet you see when you search for something matches the title of the article you have found. The title of a page is determined by the HTML title tag or, if the title tag is absent, by the H1 heading.
In the absence of either of these conditions, the search engine will make its title from the title found in the first heading found by it or from a random string of text it finds. The search engine snippets may end up looking very bad because of this.
When your H1 heading is removed, and nothing is substituted, you may negatively affect your search engine rankings and click-through rates.
Usually, search engine crawlers ignore hidden components, so only hiding the page title won’t affect your ranking.
For crawlers and users to understand what your page is about, you should provide an H1 heading and, if necessary, an H2 or H3 heading.
The presence of H1 headings isn’t required for search engine optimization; however, they provide page structure and should be considered in any SEO strategy.
In this situation, the easiest solution is to use a plugin such as Yoast SEO which allows you to customize the “SEO title” for every page on your website.
Even though you still receive great search engine results, you can remove the annoying heading without incurring any penalties.
The Difference Between Title Tag and H1 Heading
In addition to the title tag, the H1 heading affects how search engines understand the content of your website; however, they are often the same, so what are the differences?
The title tag is an HTML <title> element that is part of your website’s underlying code but is usually invisible to the human eye. However, crawlers can read this data and use it for the search engine snippet’s title.
WordPress Themes are usually configured to match the title of your post or page when you enter it in the backend; Besides that, SEO plugins can modify it manually if you wish.
Alternatively, visitors will be able to see H1 headings. You can use headings to organize your content and make it easier to read by nesting sections, while H1 serves as a title for your page.
Your post/page title will be converted into an H1 heading by most WordPress themes, and the <title> tag will be set behind the scenes.
The HTML <title> tag is prioritized by search engines over the H1 tag. An H1 heading will be used instead of a tag if there is no <title> tag. The distinction is important even though there is little functional difference between the two.
How to Hide Page and Post Titles in WordPress?
This section will provide you with various methods to hide page and post titles in WordPress:
Method 1: Hide Post or Page Title Using Customizer
We strongly recommend you back up your WordPress site before commencing with this process.
In addition, some of the methods require editing theme files, so a backup protects you against possible data loss if an error occurs. However, there is no need to worry, this method is easy to follow and is geared toward beginners.
Hide All Page Titles
Here is a method that will assist you in hiding every title on every page of your WordPress website. Follow these steps to use it:
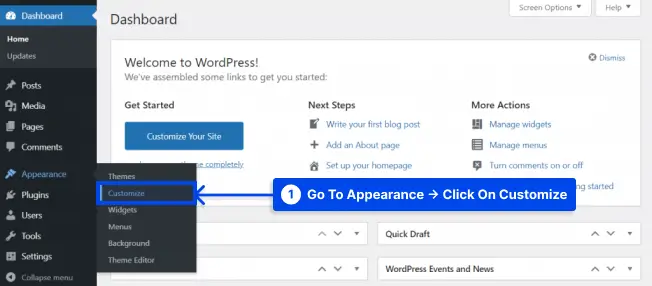
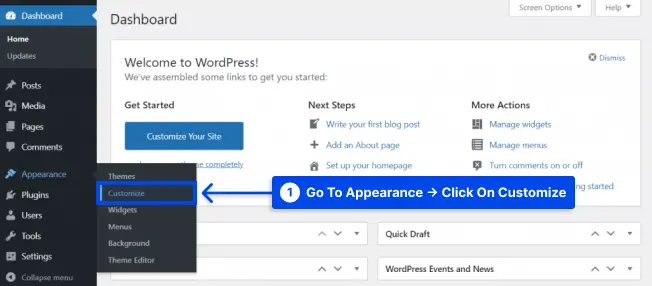
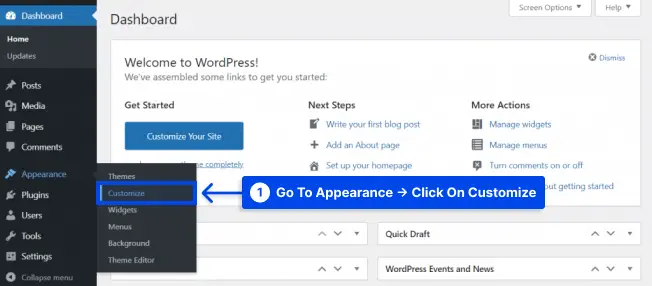
- Go to Appearance in your WordPress dashboard.
- Click on the Customize option.
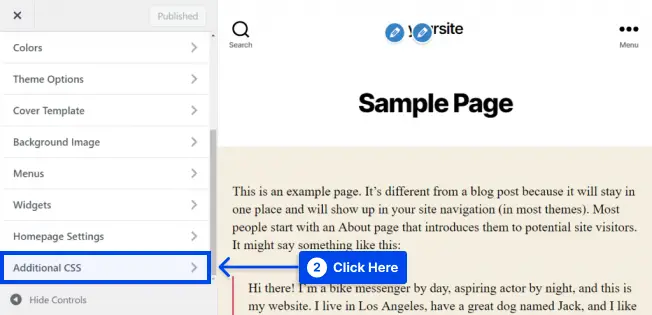
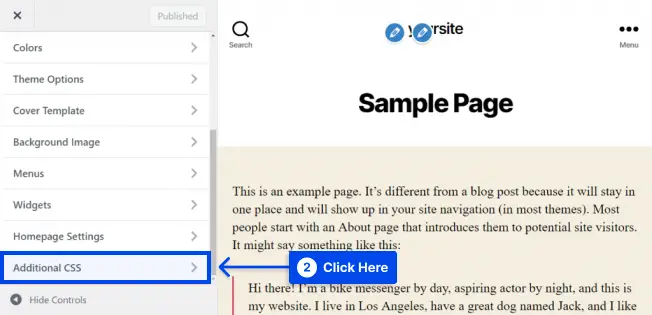
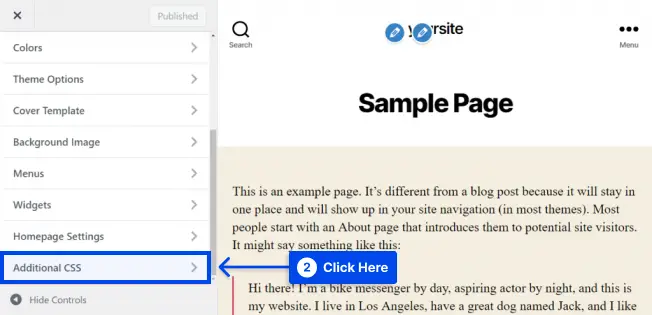
- Find and click on Additional CSS.
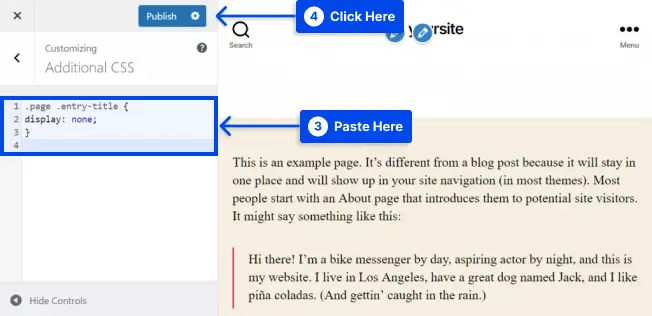
- Copy and paste the following code:
.page .entry-title {
display: none;
}
- Click on the Publish button.
If the above code does not work, your theme may employ a different CSS class for titles. If this is the case, you will have to make some modifications to the code.
Here are the steps you need to follow to locate the page and post title classes for your theme:
- Right-click on the page title and select the Inspect element in the website preview panel of the theme customizer.
This opens a new panel with the title or H1 CSS class name highlighted in the page source code. For example:
<h1 class="entry-title">Sample Page</h1>You might see the CSS class name post-title, page-title, or something completely different instead of entry-title.
- Replace the
.entry-titleelement with the CSS class assigned by your theme in the code snippet we used earlier.
It will look something like this when the code is updated:
.page .page-title {
display: none;
}
- Enter the updated code into the Additional CSS field and click on the Publish button. This code hides all the page’s titles.
Hide a Specific Page Title
In this method, you will discover how to hide the title of a particular page. Before you can do that, you must identify the ID of the particular page. Follow these steps to do this:
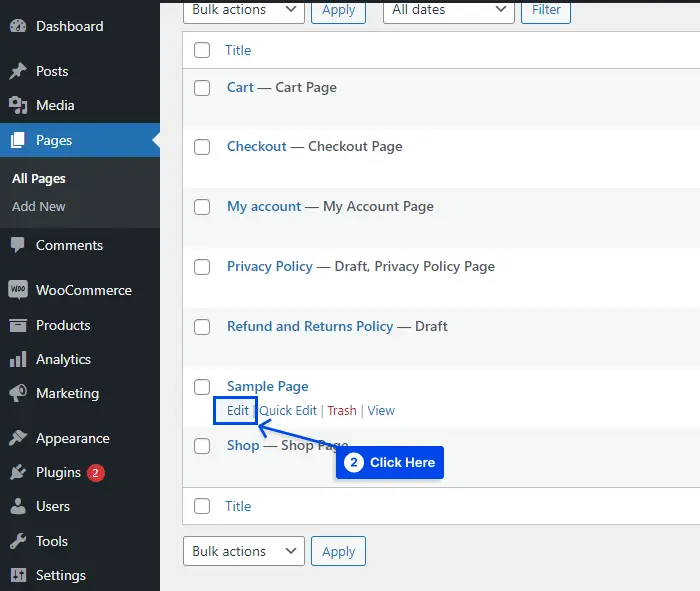
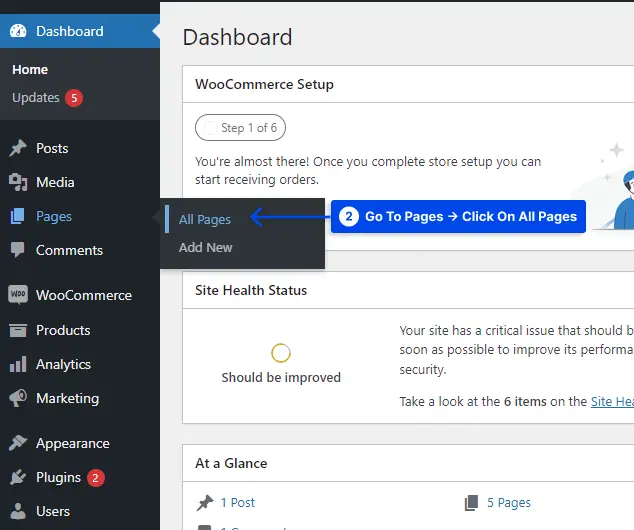
- Go to Pages in your WordPress dashboard.
- Click on the All Pages option.
- Hover over the page of your selection.
- Click on the Edit option.
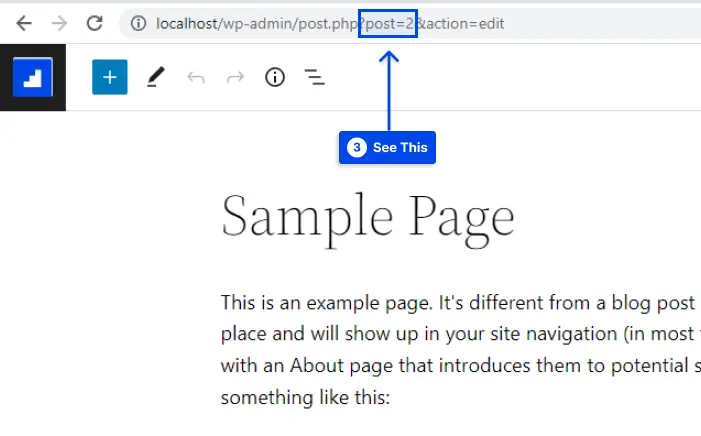
- See the page ID in the URL at the top of your browser.
Now, you should add the CSS code once you have the page ID. Follow these steps to do this:
- Go to Appearance in your WordPress dashboard.
- Click on the Customize option.
- Find and click on Additional CSS.
- Add this code:
.page-id-2 .entry-title{
display:none;
}
- Replace
.page-id-2with the ID of the page you’re trying to hide its title. - Click on the Publish button.
It should now be impossible for visitors to see that page’s title. If this didn’t have any effect, you might need to change the title’s CSS class, as it may differ depending on your theme. To do this, follow the steps in the previous section.
If there are still no changes, add !important to the code as follows:
.page-id-2 .entry-title{
display:none !important;
}
Hide Blog Post Titles
It is also possible to hide individual or all titles of WordPress pages as well as the titles of individual blog posts. There is no difference in the process, but you need to use a different code.
Follow these steps to hide every blog post title on your website:
- Go to Appearance in your WordPress dashboard.
- Click on the Customize option.
- Find and click on Additional CSS.
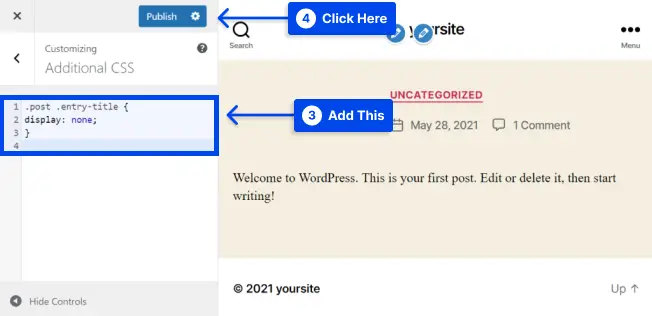
- Copy and paste this CSS code:
.post .entry-title {
display: none;
}
- Click on the Publish button.
You can hide the title of a single WordPress post instead of all of them. For example, if you wish to include a featured image in a particular article, you might want to hide that specific post’s title.
It is like hiding the title of a single page, which we discussed earlier. Follow these steps to do so:
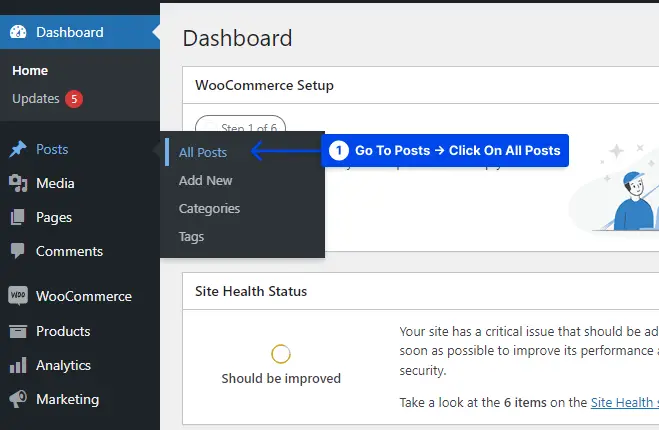
- Go to Posts in your WordPress dashboard.
- Click on the All Posts option.
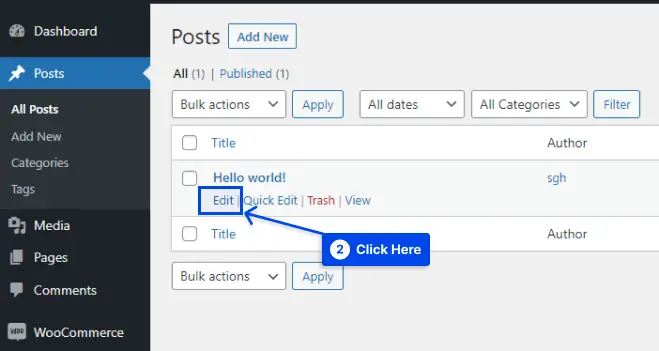
- Hover over the post of your selection.
- Click on the Edit option.
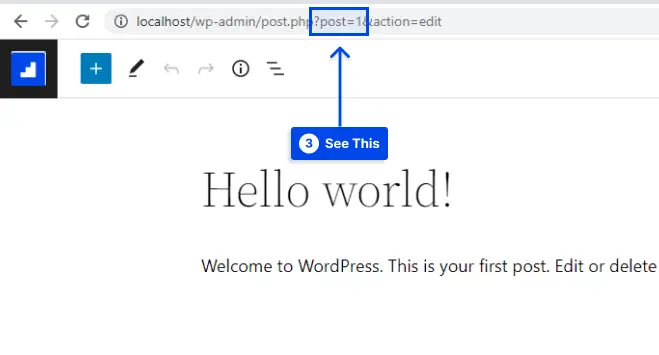
- See the post ID in the URL at the top of your browser.
- Go to Appearance in your WordPress dashboard.
- Click on the Customize option.
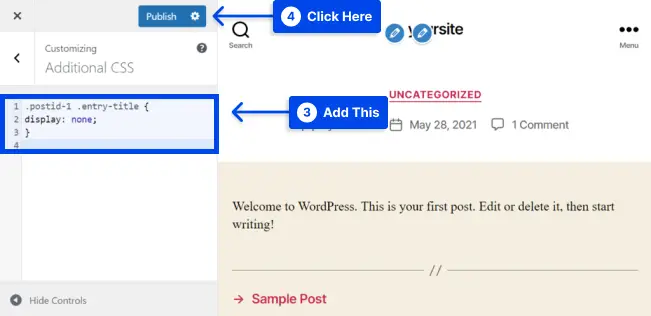
- Find and click on Additional CSS.
- Add the following code:
.postid-1 .entry-title {
display: none;
}
- Change
.postid-1to match the post ID that you’re working with. - Click on the Publish button.
Additionally, you may conceal the title of each page and post that appears on your website. Add this code to the Additional CSS field to do this:
.entry-title {
display: none;
}
Method 2: Hide Post Title Using Site Editor
This method can be used to remove the title from all posts or pages if you are using WordPress 5.9 or later and the theme you are using supports full site editing.
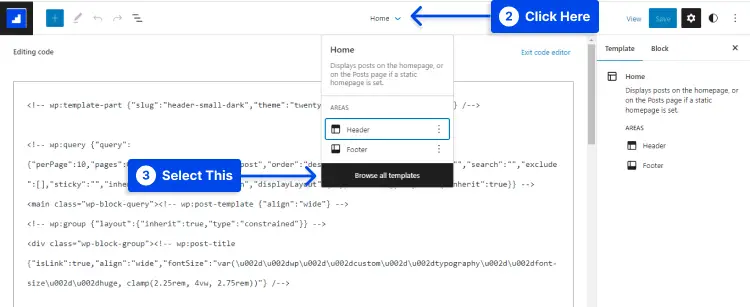
Follow these steps to hide the post title using the site editor:
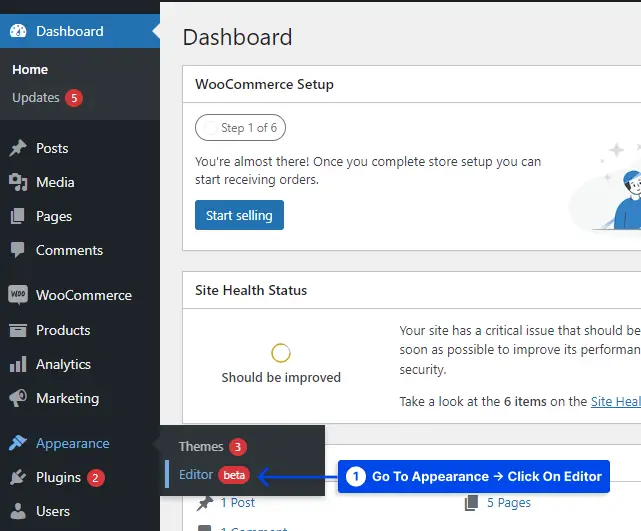
- Go to Appearance in your WordPress dashboard.
- Click on the Editor option.
Once this option has been selected, the full site editor will be displayed.
- Click on the dropdown at the top of the page to choose the template you want to edit.
- Click on the Browse all templates option.
- Click on the blog post title to hide the title.
- Click on the three dots options menu and select the Remove Post Title option.
- Click on the Save button after you’re done customizing the template.
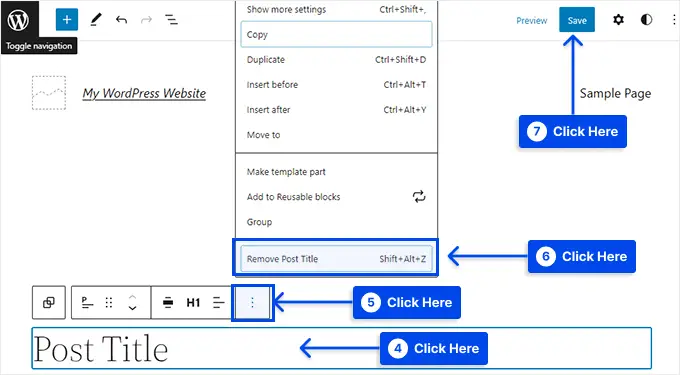

There you have it, all of your blog posts have been hidden from view.
Method 3: Hide Post and Page Title In Elementor Page Builder
If you’re using the Elementor page builder, follow these steps to hide post and page titles in Elementor Page Builder:
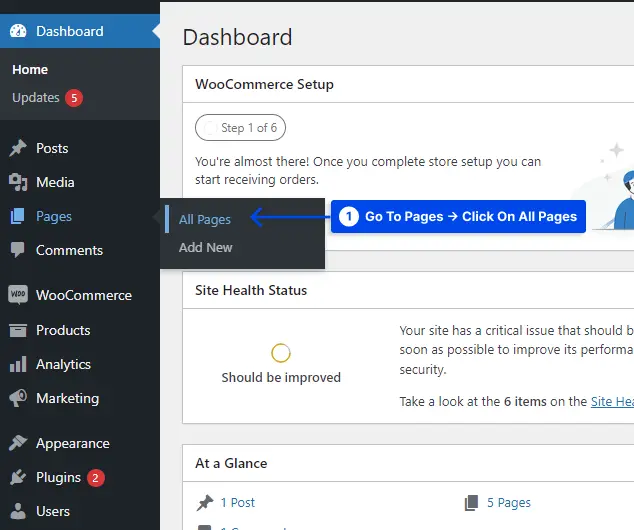
- Go to Pages in your WordPress dashboard.
- Click on the All Pages option.
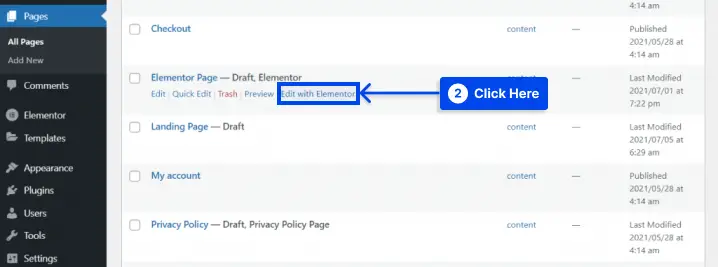
- Hover over any page whose title you want to hide.
- Click on the Edit with Elementor option.
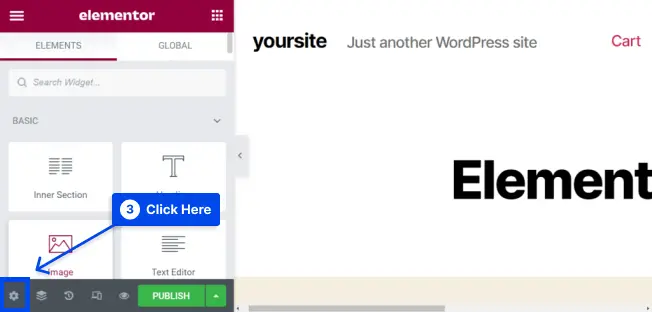
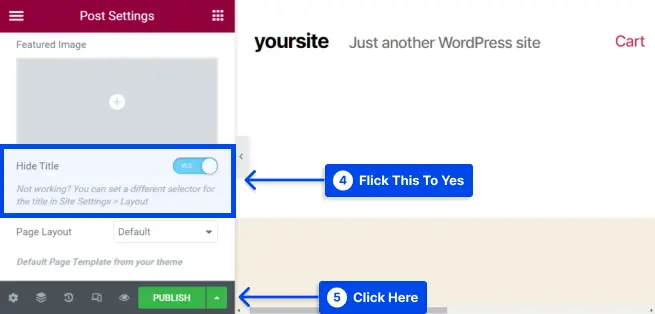
- Click on the Settings icon in the bottom left corner.
- Flick the Hide Title button to YES.
- Click on the Update or Publish button if you’re working on a new page.
Now that the page title has been hidden, it will not appear.
Method 4: Hide Specific WordPress Page Titles Using a Plugin
By using the Hide Page And Post Title plugin, it is easy to hide titles for selected posts and pages. This free plugin can assist you to hide the title of any page, post, or even custom post type
Follow these steps to hide specific WordPress page titles using a plugin:
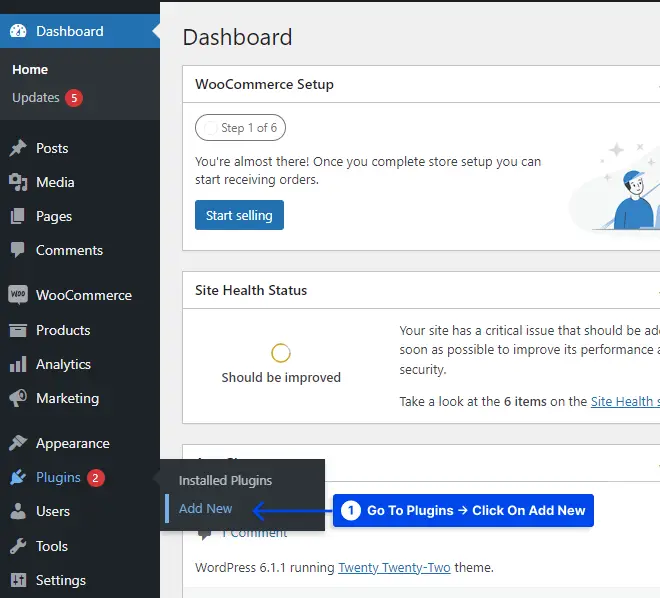
- Go to Plugins in your WordPress dashboard,
- Click on the Add New option.
- Install and activate the plugin.
- Go to Pages in your WordPress dashboard.
- Click on the All Pages option.
- Open the page, post, or custom post you want to edit.
- Scroll down to the bottom of the right sidebar.
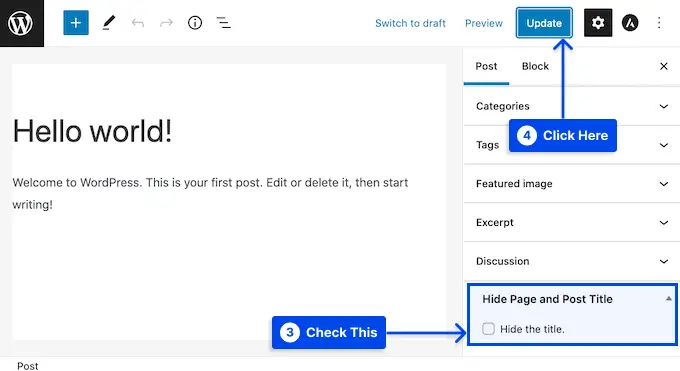
In this section, you will find a new Hide Page and Post Title box.
- Check the Hide the title checkbox to hide the title.
- Click on the Update or Publish button.
There you have it. If you visit the page, you will discover that the title has been removed. You may need to restore the title of this page or post at some point.
Follow these steps to do this:
- Open the page or post for editing.
- Uncheck the Hide the title checkbox.
- Click on the Update button at the top of the screen.
If you visit this page now, you should find that the title has been restored.
Conclusion
This article has explained why to hide the page titles and how to hide page and post titles in WordPress with four methods.
Greetings, and thank you for reading this article. If you have any questions or comments, please share them in the comments section.
Our Facebook and Twitter pages are regularly updated, so please follow them to stay up-to-date on the latest news.


