Would you like to know How to Screenshot on Chromebook? You should learn how to screenshot on Chromebook as soon as you have purchased one of these lightweight computers.
As soon as you become familiar with the screenshot feature in Chrome OS, you will use it constantly as it offers a variety of options for different scenarios for capturing screenshots.
This article aims to introduce some methods to teach you how to screenshot on Chromebook and where you can find your Chromebook screenshots.
How to take a screenshot on Chromebook?
There is no doubt that how to screenshot on a Chromebook can be learned by anyone, regardless of whether they have just purchased one of the best Chromebooks or haven’t used one for a while and forgot how it works.
This article introduces some methods to take a screenshot on Chromebook using shortcuts.
Take a Screenshot on a Chromebook with a Keyboard Shortcut
By using the keyboard shortcuts, taking full and partial screenshots on a Chromebook is very simple; you can also take a screenshot of a window with these shortcuts.
The first is the method you’d use if you want to capture whatever happens to be displayed on your screen at a given time and take a full screenshot on a Chromebook.
How to take a full screenshot on Chromebook?
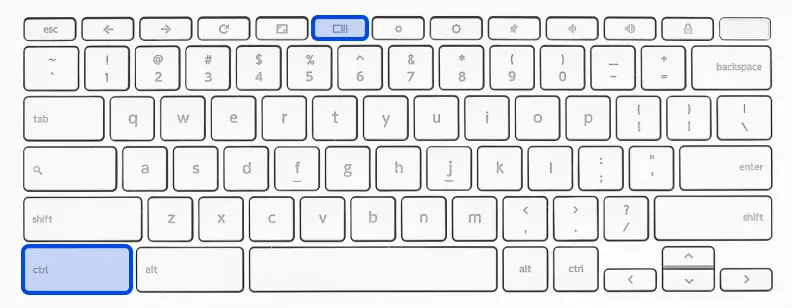
The process of taking a basic screenshot on a Chromebook is extremely straightforward. Follow these steps to take full screenshots on a Chromebook with a keyboard shortcut:
- Find the content you would like to screenshot.
Using a Chromebook, this can be pretty much anything you want. It can be web pages, applications, your desktop, or whatever you want.
- Hold Ctrl + Show Windows to screenshot
- Find your screenshot.
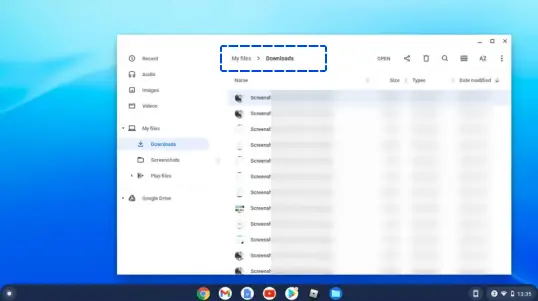
As a default, Chrome OS has saved it in the Downloads folder within My Files, which can be accessed through the Files application.
A copy of your screenshot has also been saved to your clipboard, which can be useful if you wish to paste it directly into Google Docs or Slides.
Finally, on some Chromebooks, you will also notice a window appearing in the bottom right corner of the screen once you take it. If you click this, you will be taken directly to Files.
How to take a partial screenshot on a Chromebook?
As easy as taking a full screenshot, you can also take a partial screenshot that focuses on only one portion of the Chromebook’s display.
Follow these steps to do this:
- Find the content you want to take a screenshot of.
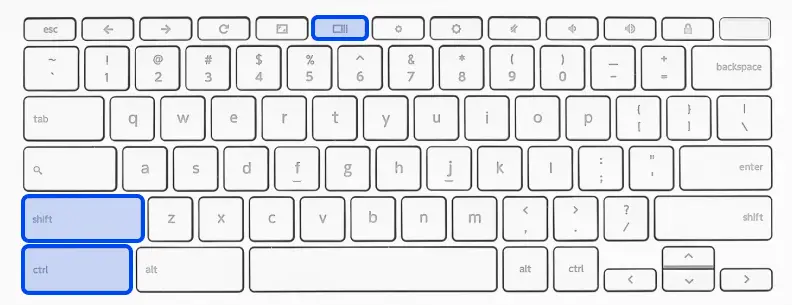
- Hold down the Ctrl and Shift keys and then press the Show Windows key.
- The user will receive a message instructing them to “Drag to select an area for capture.”
You will also notice that your cursor has changed into a crosshair and that the screen will have dimmed.
- By dragging the mouse or trackpad, you can select an area for capturing. You will be able to see the highlighted area you are capturing.
- To capture a screenshot, click the ‘Capture’ button in the middle of the screenshot. As before, your screenshot will be saved in the My Files/Downloads section.
How to take a screenshot of a window on a Chromebook?
Using the screenshot tool in Chrome OS allows you to capture only one specific window in a screenshot rather than capturing the entire screen.
Follow these steps to do that:
- Select the content you wish to screenshot
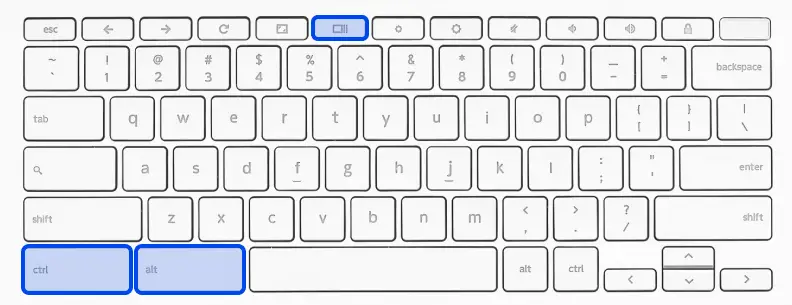
- Hold down the Ctrl and Alt keys and then press the Show Windows key.
- This will bring up the Chrome OS Screenshot toolbar at the bottom of the screen.
- Press the right-most of the three central icons on the toolbar. This is the ‘Window screenshot‘ option.
- Upon selecting this option, the cursor will change to a camera icon. Place the camera icon over the window you wish to capture and click.
In this case, a screenshot will only capture one window rather than your entire screen. As before, the screenshot will be stored in the My Files folder of your computer.
Where to Find Your Chromebook Screenshots?
Upon taking a screenshot, a copy of the screenshot is automatically copied to your clipboard. Screenshots also appear in Tote, a file storage application that was rolled out with Chrome OS 89. and provides easy access to important documents.
For access to recent downloads, screenshots, and pinned files, open the Tote from the Shelf. Moreover, screenshots are also stored in your “Downloads” folder for future reference.
To change where the screenshots go, press the Shift + Ctrl + Show windows, select Settings > Select folder, pick the folder you prefer, and future screenshots will be sent there.
Since Chromebooks do not have a large amount of hard drive space, one solution would be to back them up to Google Drive, where they can be accessed from different platforms.
Conclusion
A variety of methods for taking screenshots on Chromebook with keyboard shortcuts have been explained in this article.
We hope you have found this article helpful. Please do not hesitate to comment if you have any questions concerning it.
It would be appreciated if you shared this article on social media. You can also follow us on Facebook and Twitter.


