

 Learn WordPress
How do you fix the “Upload: Failed to Write File to Disk” error in WordPress? Your site may experience the “Upload: Failed to Write File to Disk” error, which can be frustrating because it prevents you from uploading any new files until you resolve it.
It is possible to resolve this WordPress error in a few simple steps so that you may once again upload files to your Media Library efficiently.
The problem can be resolved simply by adjusting a few settings via File Transfer Protocol (FTP) and contacting your hosting company.
This article explains why you may see the “Upload: Failed to Write File to Disk” error on your WordPress site. Next, we will discuss four effective methods to restore order to your workflow.
Why Did You Get the “Upload: Failed to Write File to Disk” Error?
It is possible for the Upload: Failed to Write File to Disk WordPress error to arise for various reasons. Incorrect folder permissions most commonly cause this error.
Furthermore, this error can also arise if your website exceeds the hosting service’s quota limit. So, WordPress is unable to write data to disk in this case.
Furthermore, you may experience this error in some rare cases as a result of WordPress’ temporary folder having insufficient capacity.
All three error cases are fixable, and we will demonstrate how to resolve each in the following section.
How to Fix the “Upload: Failed to Write File to Disk” Error in WordPress?
The following four methods will assist you in fixing this disk error in WordPress in some simple steps.
To proceed with this process, it is recommended that you perform a site backup. This way, the site can be restored to an earlier version if anything goes wrong.
Method 1: Check and Change the File Permissions
As we discussed earlier, file permission errors are likely responsible for the “Upload: Failed to write file to disk” error.
Your hosting provider can assist you in checking these permissions if you ask them to do so. The root directory of your website may also be accessed to accomplish the same task.
Follow these steps to do this:
- Connect to your site via a Secure File Transfer Protocol (SFTP) client such as FileZilla. Alternatively, you can access your site’s directory via your hosting account’s file manager.
- Open the folder labeled with your domain name.
- Locate the wp-content folder and right-click on it.
- Click on the File permissions option.

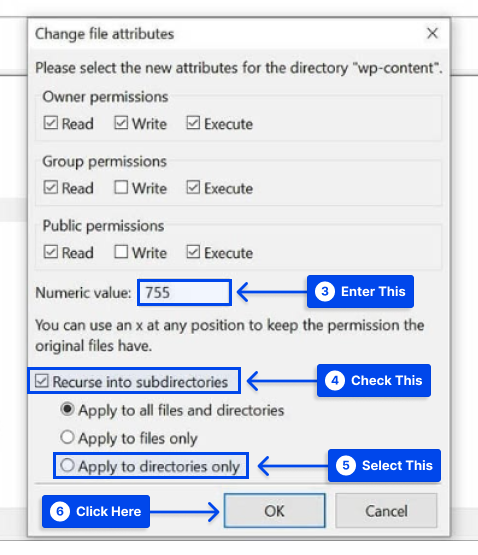
- Go to the Numeric value field and enter “755” or “750” in the corresponding box.
- Choose the Recurse into subdirectories and Apply to directories only options.
- Click on the OK button.
As a result of the above, all subdirectories within the wp-content folder have now been set to the correct permissions. It includes the uploads folder in which your uploaded media files are located.
You must also ensure that the permissions are set correctly for the files within those directories. Follow these steps to do this:
- Right-click on the wp-content folder again and select File permissions.
- Type in “644” in the Numeric value field.
- Choose the Recurse into subdirectories, select Apply to files only option, and click the OK button.
You may still encounter problems uploading files to your site despite checking your file permissions. Fortunately, you can take a few other methods to resolve the issue.
Method 2: Checking Quota Limit
In addition, your website may have exceeded the space limit of the hosting service if you receive the Upload: Failed to Write File to Disk WordPress error message.
Exceeding the website quota limit is more common than one might think, especially if your website is highly content-rich.
This would call for the deletion of some unused files on the server if that is the case.
Method 3: Checking Temporary Folder
If the error persists, you can verify that your WordPress site’s temporary folder has reached maximum capacity.
As a result of WordPress’ uploading process, your content is first stored in a temporary location on the server, then saved to the Uploads folder on the server.
Suppose the temporary folder needs more space. So, the content cannot be uploaded to the Uploads folder, leading to the Upload: Failed to Write File to Disk error message.
It may be necessary to contact your hosting provider if this is the case.
Method 4: Contact your Web Hosting Provider
Suppose you still experience this error after changing the file permissions. In that case, you may need to contact your web hosting provider to assist you with emptying the temporary file directory.
Consequently, if your temporary directory is full or incorrectly configured, the result will be that you will be unable to write the file to the disk, resulting in this error message.
If you cannot resolve this issue by contacting your web hosting provider, you may have to contact them.
Conclusion
This article has explained why you may see the “Upload: Failed to Write File to Disk” error on your WordPress site and discussed four effective methods to restore order to your workflow.
Please accept our sincere thanks for reading this article. You are welcome to ask questions or make comments in the comments section.
Following our Facebook and Twitter pages will provide updates on our most recent articles.