Page speed is a very important SEO factor. One key factor to achieve this is compressing your web pages. To do so you can simply enable GZIP on WordPress.
GZIP makes your WordPress pages load faster and reduces the data required for each page. In this article, we discuss how to enable GZIP compression in WordPress.
One key factor in achieving user satisfaction is fast loading speed. Since 2018 search engines calculate this factor for their website ranking system. Before we begin enabling GZIP, let us talk about some definitions.
First of all, what is GZIP? Why is this format important in WordPress? Finally, how can we use it on our website? Let us explain.
What is GZIP Compression in WordPress?
GZIP format is a simple application to compress files in WordPress. This makes your files load faster. The compression process is done on your server.
This type of compression allows you to compress your JavaScript, HTML, and Stylesheet files. Although GZIP won’t compress your images. Image compression is done by another method.
GZIP is designed by Jean-loup Gailly and Mark Adler.


Ilya Grigorik defines compression as the process of encoding information by fewer bytes.
When a browser visits a website, it checks if GZIP compression is enabled on the website or not.
If this type of compression is enabled on a website, the files are displayed with smaller data and if the website is not using the GZIP compression, the files are displayed with the original size and it may take a while for the entire website to load.
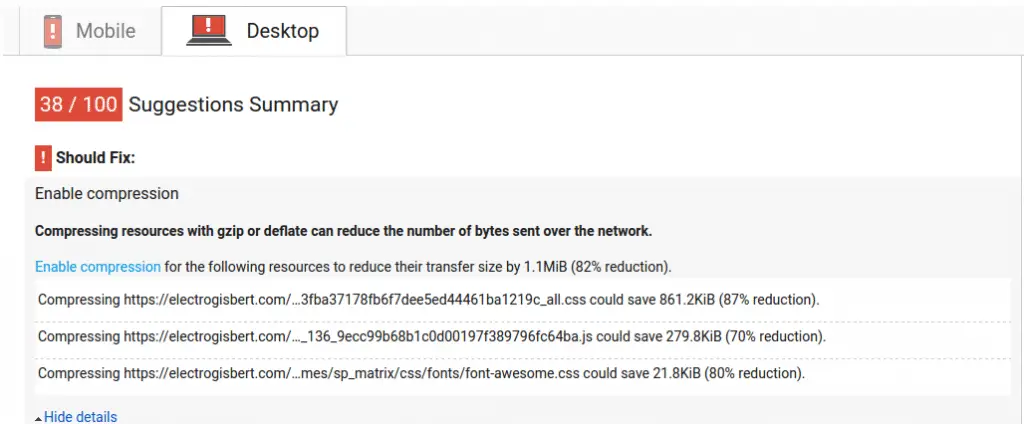
This is why you may see an error using Google Page Speed tools.
How to Enable GZIP Compression for WordPress?
As we mentioned, enabling GZIP compression in WordPress is very important. There are a few ways to enable GZIP. Follow the methods below to enable GZIP compression in WordPress.
1. Enable GZIP Compression via .htaccess for WordPress
One of the basic ways of enabling GZIP in WordPress is by adding it to your .htaccess file. It doesn’t matter if you access your .htaccess file through cPanel or FTP. The main goal here is to edit your .htaccess file and add GZIP to it.
Although, this method could be a bit risky. Because you are directly editing your WordPress core file. Therefore, if you make a mistake, your website may break.
So, we highly recommend getting a backup of your WordPress website before editing your .htaccess file.
Generally, the .htaccess file can be found in your website’s root directory. The best way to access this file is via an FTP client. Although, you can access it from your cPanel. But we recommend using an FTP client to access it.
Locate the .htaccess file and download it to your computer. To prevent any mistakes, you have to edit them on your computer. Then, upload the edited version to your server.
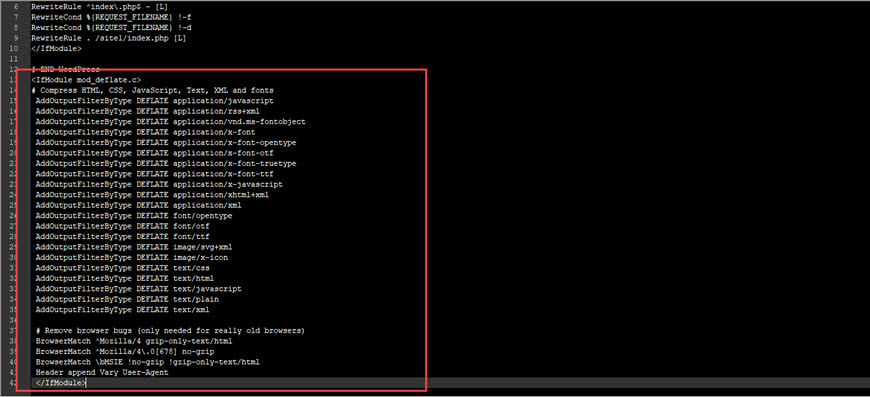

Copy and paste the code below between your beginning and ending WordPress tag.
Finally, save the file and upload it back to your server. Now all you need to do is check your website with GZIP online compression tool to make sure GZIP is enabled on your website or not.
# Compress HTML, CSS, JavaScript, Text, XML and fonts
 AddOutputFilterByType DEFLATE application/javascript
 AddOutputFilterByType DEFLATE application/rss+xml
 AddOutputFilterByType DEFLATE application/vnd.ms-fontobject
 AddOutputFilterByType DEFLATE application/x-font
 AddOutputFilterByType DEFLATE application/x-font-opentype
 AddOutputFilterByType DEFLATE application/x-font-otf
 AddOutputFilterByType DEFLATE application/x-font-truetype
 AddOutputFilterByType DEFLATE application/x-font-ttf
 AddOutputFilterByType DEFLATE application/x-javascript
 AddOutputFilterByType DEFLATE application/xhtml+xml
 AddOutputFilterByType DEFLATE application/xml
 AddOutputFilterByType DEFLATE font/opentype
 AddOutputFilterByType DEFLATE font/otf
 AddOutputFilterByType DEFLATE font/ttf
 AddOutputFilterByType DEFLATE image/svg+xml
 AddOutputFilterByType DEFLATE image/x-icon
 AddOutputFilterByType DEFLATE text/css
 AddOutputFilterByType DEFLATE text/html
 AddOutputFilterByType DEFLATE text/javascript
 AddOutputFilterByType DEFLATE text/plain
 AddOutputFilterByType DEFLATE text/xml

 # Remove browser bugs (only needed for really old browsers)
 BrowserMatch ^Mozilla/4 gzip-only-text/html
 BrowserMatch ^Mozilla/4\.0[678] no-gzip
 BrowserMatch \bMSIE !no-gzip !gzip-only-text/html
 Header append Vary User-Agent
2. Enable GZIP Compression on NGINX for WordPress
NGINX is an open-source web server. If you are using this webserver for your website, you just need to add the following command to your nginx.conf file.
gzip on;
gzip_disable "MSIE [1-6]\.(?!.*SV1)";
gzip_vary on;
gzip_types text/plain text/css text/javascript image/svg+xml image/x-icon application/javascript application/x-javascript;
3. Enable GZIP Compression on IIS for WordPress
IIS is short for Internet Information Server. IIS is a server based on Visual Basic used for your browser’s requests. If you use this web server, you have two ways to enable GZIP. Dynamic and Static.
Static: First, enter IIS. Then from the System and Maintenance section look for Administrative Tools. Then, from Features View click on Compression. On the opened page, you need to check Enable static content compression. Finally, in the Actions panel click on Apply to save your changes.
This method is done through the server interface. With Command-Line you can directly enable this feature. Simply run the code below:
appcmd set config /section:urlCompression /doStaticCompression:TrueDynamic: To enable GZIP in a dynamic IIS server follow the instruction below.
You just need to check the Enable dynamic content compression in the settings and save your changes. You can also enable GZIP in Command line by typing in the command below:
appcmd set config /section:urlCompression /doDynamicCompression:True4. Ask your hosting provider to Enable GZIP Compression for WordPress
Another method for enabling GZIP is by asking your hosting provider. If you are uncomfortable with making the changes mentioned above to your server, then you can ask your hosting provider to enable GZIP for you.
Although, by default, most hosting providers have enabled GZIP in their servers.
In addition, you can use a GZIP compression WordPress plugin to enable this service.
WordPress plugins that can enable GZIP for you are:
- W3 Total Cache
- WP Rocket
- WP Super Cache
Generally, using plugins means fewer errors caused by the human factor.
5. Enable GZIP Compression using ‘W3 Total Cache’ plugin for WordPress
W3 Total Cache plugin is one of the most popular plugins in the WordPress community. Although, if you don’t have enough knowledge about configuring this plugin we recommend using any other method mentioned in this article.
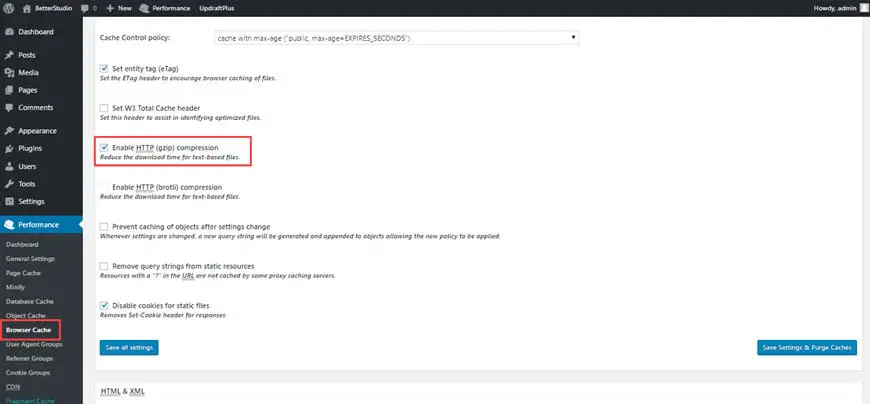

To enable GZIP in WordPress, go to the Browser Cache in the plugin’s settings. Here, you just need to check the HTTP compression to enable GZIP in WordPress.
6. Enable GZIP Compression using ‘WP Rocket’ plugin for WordPress
WP Rocket is another great GZIP compression WordPress plugin. With this plugin, you can increase your website’s speed with only a few clicks.
In WP Rocket right after installing and activating the plugin, GZIP rules are immediately added to your .htaccess file along with the mod_deflate module. In simple words, you don’t need to do anything, you just need to install and activate the plugin.
7. Enable GZIP Compression using ‘WP Super Cache’ plugin for WordPress
WP Super Cache is another GZIP compression WordPress plugin. This plugin is also one of the most popular cache plugins in WordPress. To enable this feature, go to your WordPress dashboard.
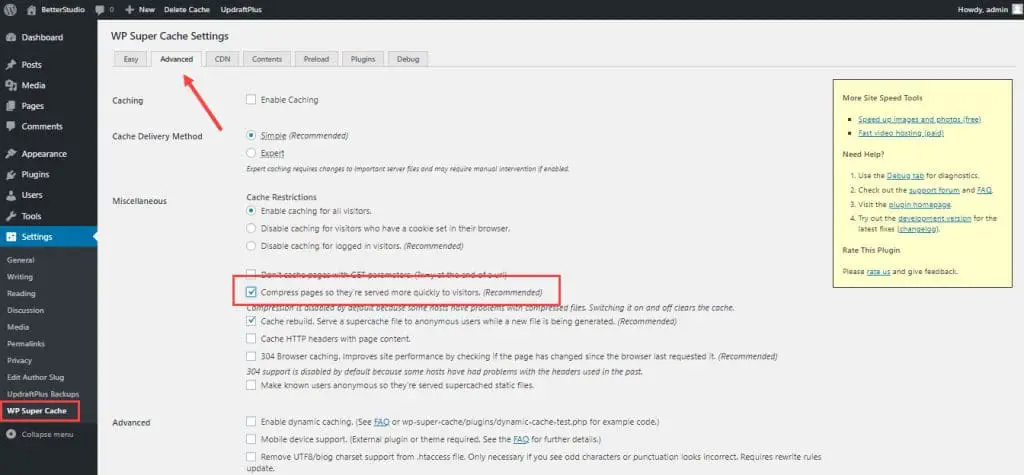

From your Tools menu look for WP Super Cache and click on it. Go to Advanced. Look for Compress pages so they’re served more quickly to visitors and enable it. Finally, save your changes.
How Does WordPress GZIP Compression Work?
How does this process work? How does a simple program can bring such amazing results? GZIP returns HTML, Javascript, and CSS files back to the most basic form (text-based).
When a user visits a website with their browser, they begin to download these files. Then, based on the codes in these files, your browser renders the website for you.
As a result, you can see and read what the codes say. But computers don’t need any changes to read these files. As long as your browser can analyze these codes, it can turn them into text blocks.
GZIP compression removes the formats and structures that are understandable to humans. As a result, the files are compressed. This is everything GZIP does to compress your WordPress files.
GZIP Warning in Google PageSpeed Insights
You may be familiar with Google PageSpeed Insight. This is a tool provided by Google to check your website’s speed. Google says compressing with GZIP reduces the bytes sent from the network.

GZIP Warning in GTmetrix
GTmetrix is an online analyzer. It analyzes your website’s loading speed and tests all the required factors for a fast website. GTmetrix also recommends using GZIP on your website. Because enabling GZIP decreases the size of your files.
How to check if GZIP compression is enabled on a WordPress website?
GZIP compression is popular in WordPress and it’s automatically enabled in most servers. It has been more than 17 years since most browsers started supporting GZIP. Therefore, you shouldn’t worry about your browser supporting GZIP. Browsers that support GZIP are:
- Internet Explorer version 5.5 and above – Since 2000
- Opera version 5 and above – Since 2000
- Firefox version 0.9.5 and above – Since 2001
- Google Chrome – Since 2008
- Safari – Since 2003
But how to check if GZIP is enabled or not?
Use GZIP compression test
The first method to check if GZIP is enabled or not is by using the Gzip compression test. This website analyzes your site in an instant and checks if GZIP is enabled or not. Simply head over to GZIP compression test website. Type in your website’s URL and click on Test.
When GZIP is enabled the website also shows the size that has been saved.
Use GZIP content-encoding
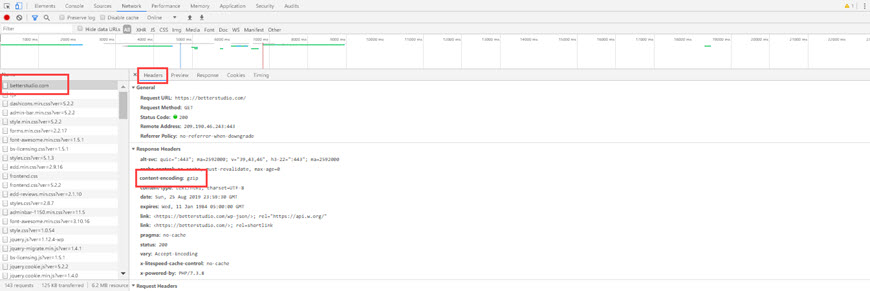

The second method to check GZIP is checking header with GZIP content-encoding. This is what your browser looks for when it sends a request to the website.
Click on the Network tab in the Chrome Developer Tools. You can find this information in the header of a website. Look at the picture below.
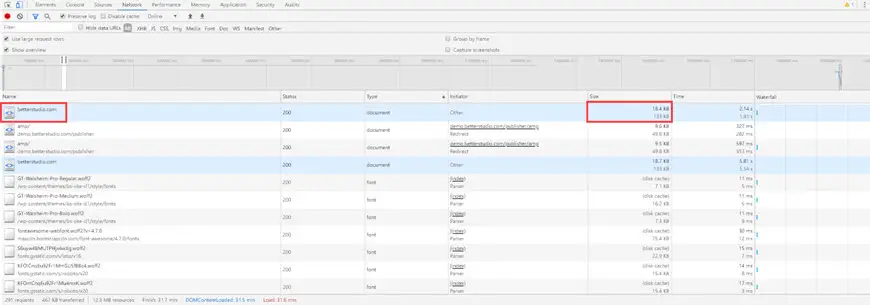

Also, by clicking on View Large Request you can view the actual file sizes and compressed sizes. As you can see in the picture, the actual size was 51.6 KB and the compressed size is 17.7 KB.
Conclusion
As you probably know, there are a lot of ways to increase your website’s performance and speed. But the simplest way is to enable GZIP in your WordPress.
Don’t let your website’s speed discourage your visitors. Before you see the downfall of your website, enable GZIP compression in WordPress. GZIP is compatible with CDN. By enabling CDN you can compress your images and increase the loading speed of your website.


