In WordPress you have the ability to crop, re-size, rotate and etc. your images. With this feature, you are less likely to use image-editing software like Photoshop.
The most important advantage of this is the fact that you don’t need to upload your edited images from your computer or any editing software and there are no limitations to upload an image. In this article, we tend to teach you the easiest and simplest way of editing WordPress images.
You may ask yourself, why we need to use WordPress editor when there are already many powerful image editing software like Photoshop? The answer is simple.
You may not have access to these programs all the time. Also, most bloggers are looking for a simpler way to edit and upload their images. Thus, WordPress developers have integrated a powerful editor for this popular CMS.
In this article, we would like to discuss how to edit WordPress images.
How to Edit WordPress Images?
If WordPress is using Gutenberg, we have explained how to add images to the Gutenberg editor.
Before you begin editing your image, first you need to upload the desired image. To do so, you can click on “Add Media” in your editor or you can use the “Media” gallery to select existing images or upload a new image. In “Media” when you click on an image, you will see some information about it; name, URL, caption and description are displayed.


You have two ways of opening the editor to begin editing your WordPress images. The first way, click on “Edit Image” at the bottom of your image. The editor page will popup. The second way, look for “Edit More Details” in the description menu. Once you click it you will be able to see “Edit Image” at the bottom of the image. Although, both ways will lead you to the same editor.
WordPress Image Editor
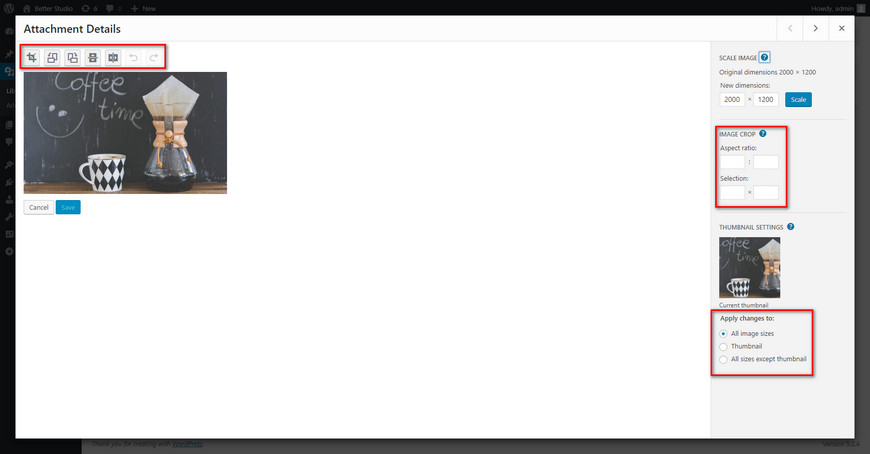
Using this editor is very simple. Once you have selected the image to edit, you see a toolbar at the top. On the right, you see a menu to edit the size of the image.
Cropping
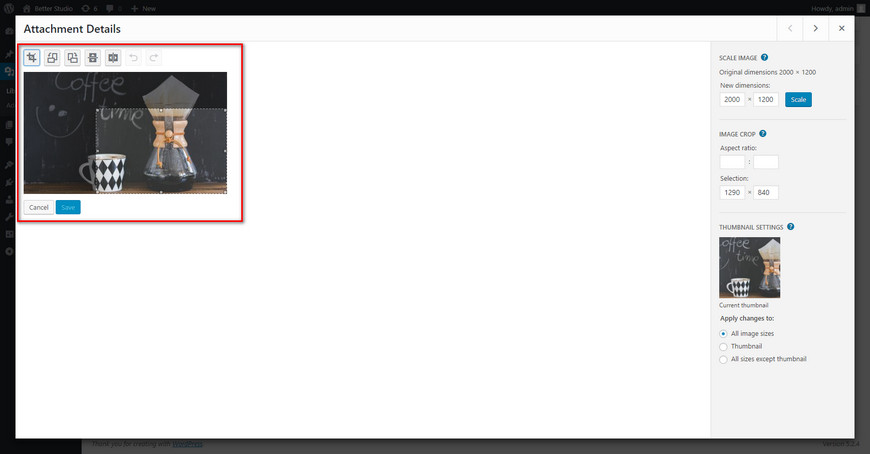
In the toolbar, the first option from right is “Crop”. This option allows you to crop your image. By clicking on it, a box will appear which you can drag it to crop your image.
Rotating
The other two options next to the crop are for rotating your image. You can rotate your image clockwise or anticlockwise. The third and fourth option from left is for flipping your image. You can flip your image horizontally and vertically.
The two remaining options are, undo and redo, which you can use to undo your changes or redo them.
There is also another column on the right-hand side of your image with few other options to edit your image.
Resizing
The first option you will see is “Scale Image”. As you probably can tell, by selecting this option you can manually scale your image. Keep in mind, you can only scale down your image.


The next option would be “Aspect Ratio”. If you’d like to crop your image to a specific ration you can do so by entering a value. For example, 1:1, 4:3, 16:9 etc.
Thumbnail settings are the next option. In this section, you choose whether you want your changes on the entire image or just thumbnail.
Once you are done with your changes make sure you click on “Save” to save your work.
Restore Image
If for any reason you are not happy with the changes you have done or you wish to edit the original image you can click on “Restore Image” by opening the edited image to undo all of your work.


