Google Analytics is a free tool that gives webmasters crucial information about their websites. Google analytics shows you data about your website’s traffic, user locations, and etc.
Thus, using it brings many great benefits. In this article, we discuss how you can add Google Analytics to WordPress.
Before we install Google analytics to WordPress, first, let us discuss Google analytics and why is it so popular. Then we talk about steps you need to take to add Google analytics to WordPress.
Why Google analytics is important to website owners?
Why Google analytics is important to webmasters and website owners? Let us answer this question with a few facts.
When you launch a website, your main goal is to increase your online presence. The more traffic your website has the more chance you have got to build a community.
On the other hand, you need a powerful tool to analyze your website visitors. Google Analytics is the tool you need.
Google Analytics gives you the necessary information about your website. This information can help you to reach your goal. But what kind of information can we expect from Google analytics?
Who visits your site?
Google Analytics tells you where your visitors come from and with which browser they opened your website. Other important information you can expect in this section are:
- Screen resolution
- JavaScript
- Browser language
- Flash
As you can probably tell, this information is very important to any webmaster and website owner.
For example, when you want to make some changes to your website, you can do so in a way to improve your audience’s experience on your website.
How users behave?
Google analytics shows you, which section of your website is being visited frequently and for how long do they stay in that particular section.
This information is used to calculate the bounce rate and conversion rate. Whenever a user visits your website and leaves without doing anything it adds up to your bounce rate.
When do users visit your website?
It’s very important to know the peak time of your website. So you can publish your new content when there are people visiting your website. Fortunately, you can schedule posts in WordPress.
How did users find your website?
Analytics shows you how your visitors find your website. This information can help you to focus on optimizing your website for different platforms to attract more traffic.
How do users interact with your website’s content?
How long do users stay on each page? How many users have actually clicked on your call-to-action? Or how many users have clicked on links on your website? Other than answering these questions, Google analytics can also run an A/B test which helps you to choose the perfect content for your audience.
How to sign-up for Google Analytics?
To use this service, first, you need to sign-up. Google Analytics is a free service and to use it, you only need to have a Google account. To sign-up, follow the steps below:
- First, head over to Google Analytics sign-up page.
- Log in with your Gmail account. You can also sign-up for a new account.
- After signing up or logging in you need to sign-up for Google analytics. After the second step, you face the page below:
- On the next page, make sure you select the website.
- Enter the required information. Name, website name, website URL, category and etc.
- Then click on Get Tracking ID.
- The next page is the terms and conditions. You need to click on “I Agree”.
- Copy the displayed tracking code. You need to paste it in your WordPress settings later.
Now you are registered with Google analytics. Keep the code you have copied; you need it later on.
Should I manually add Google Analytics to WordPress or use a plugin?
Now it’s time to install this service. Which way do you prefer? Manually adding Google analytics to your website or using a plugin?
Many people believe, the fewer plugins you install in your WordPress the fewer problems you will face. Although, they are not wrong.
However, plugins cannot affect your website’s performance and speed. If there is any problem with a plugin, it’s usually the source code.
Therefore, having plugins won’t destroy your website. In addition, plugins can help you perform your tasks faster and without any programming knowledge.
How to add Google Analytics to WordPress?
In this section, we discuss how to add Google Analytics to WordPress with or without a plugin.
The first way: Add Analytics to WordPress without plugin
The first way is to add Google analytics without any plugins. Before using this method, we highly recommend getting a backup of your WordPress and theme. Because we are going to make some changes to your website’s core and if you misplace a word, your website may break.
In this method, we are going to use the code Google Analytics has given you. It is the code you have copied in the signup phase. But, if you have lost the code, follow the steps below:
- Enter your Google Analytics account.
- Click on the website you desire.
- From the left-hand side menu, click on admin.
- In the property section, from tracking info click on tracking code.
- In the opened page, you can see the code in the website tracking section. Copy it.
Where do you use this code?
1. log in to the WordPress dashboard.
2. From tools click on appearance > editor.
3. From the right-hand side, menu click on header.php
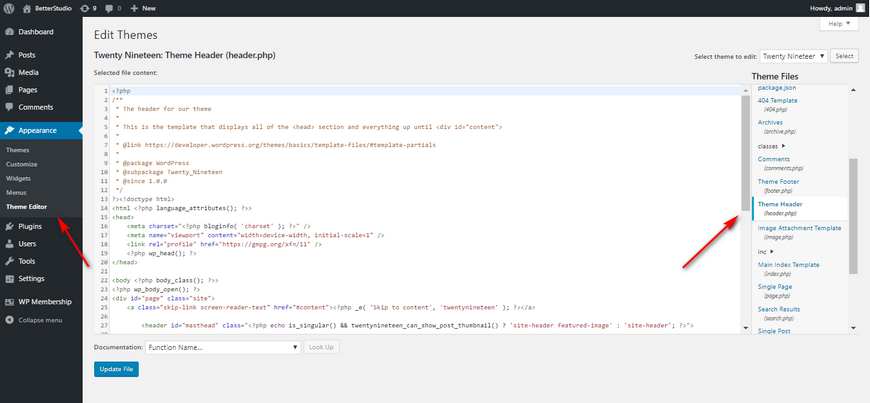

4. Now, paste the code you have copied before </header>.
5. Finally, click on the update to save your change.
This is everything you need to do to manually add Google analytics to WordPress.
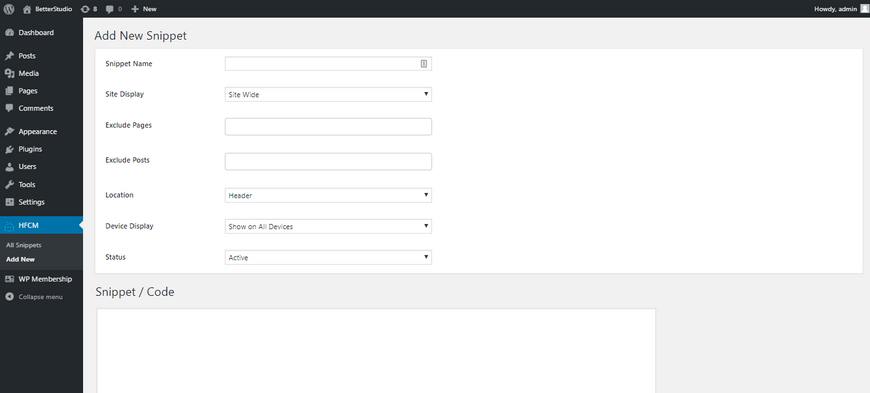
All of these steps are taken care of automatically by the Insert Header and Footer plugin as well. After installing the plugin, you need to paste your Google Analytics code into the header.

The second way: Manually adding Google analytics to the child theme
As you know, the child theme is a sub-theme that has all the main features. Generally, this theme is very useful. Because you can make your changes to it without having to touch your main theme.
For this method, you need to create a child theme. In the created theme, copy the header section from your main theme.
Now you just need to follow the previous step. Paste your analytics code right before </header>. Make sure you add <script> before and after your copied code. Otherwise, this code won’t be used at all.
The third way: Add Google Analytics to WordPress with Analytics Cat
Using Analytics Cat to add Google Analytics to WordPress is another popular method. By using this plugin, you can add Google analytics to your WordPress in a matter of a few minutes. This plugin is user-friendly and adds Analytics features to your WordPress admin panel.
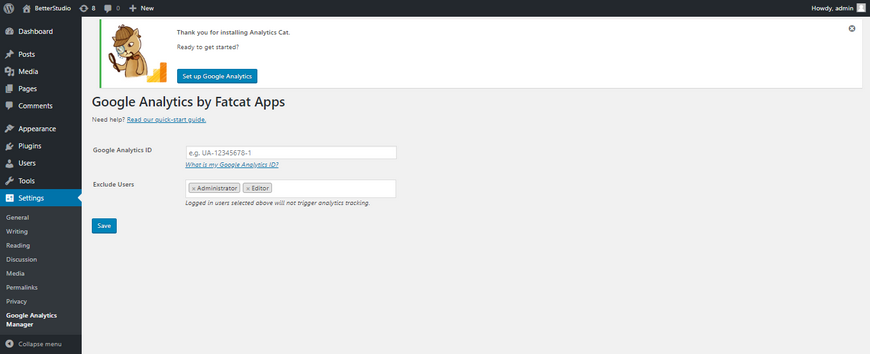
After activating the plugin, go to Settings > Google Analytics Manager and configure the plugin. On this page, the plugin asks you if you want to connect your website to it. You can skip this step.
On the next page, you need to enter your Google Analytics ID.
In the second box, you can type in the users you want to monitor. We recommend leaving exclude users section untouched and let the plugin use its default settings for it.
Finally, click on save.

The fourth way: Install analytics to WordPress with Google Analytics Dashboard for WP
Google analytics dashboard for WP is another plugin you can use to add analytics to your WordPress website. This plugin offers many features, such as:
- You can see your Google analytics information directly in your dashboard.
- It allows you to have access to the outbound link feature from Google analytics.
The first step is to actually download the plugin and then proceed to install and activate it.
You can download it from the official WordPress website or from your plugins section in your WordPress dashboard. You just need to type in the Google Analytics dashboard for WP in the search box.
After installing the plugin, from tools click on Google analytics. On the opened page click on authorize the plugin.
On the next page, click on get access code. You will receive a code that you need to use in the plugin.
Next, you need to login to the Google account that is registered with Google analytics. Then click on allow on the next page.
You will be redirected to a new page where you can see your access code. Make sure to copy it. The picture below is an example of the access code:
Now you need to paste the code in the access code section of your plugin and click on save access code.
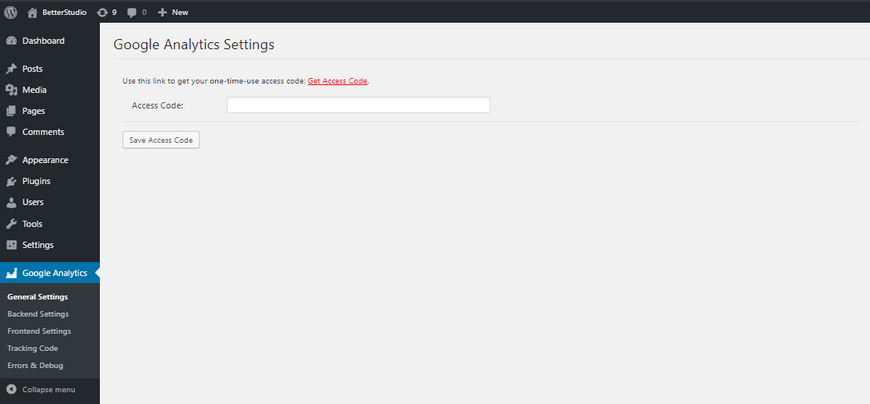

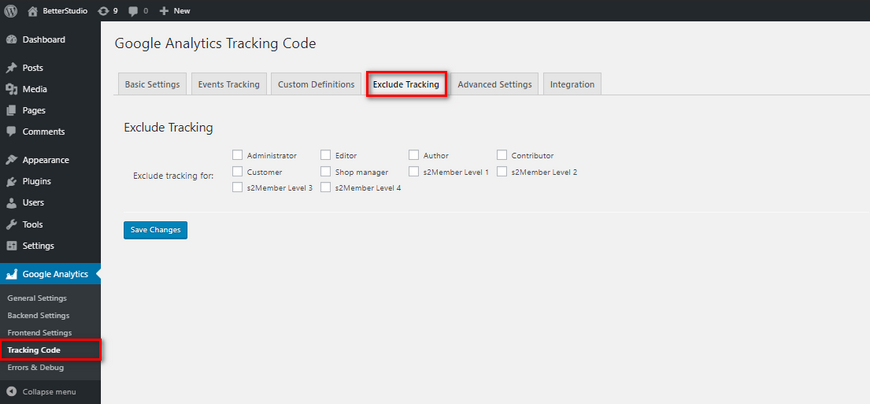
You have successfully installed Google Analytics on your WordPress website. In the next step, if you need to change the tracking settings, simply go to settings Tracking Code > Exclude Tracking.

The fifth way: Install Analytics in WordPress with Google Tag Manager
Another great tool that Google has to offer is called Tag Manager.
With Tag Manager, you can easily manage your tags and snippets. Also, you can edit your tags without using the directory.
After downloading Tag Manager for WordPress, install and activate it on your website. After activating, you need to sign-up to use the plugin.
After signing up, you need to copy the container ID from the dashboard and paste it into Google tag manager ID in your WordPress.
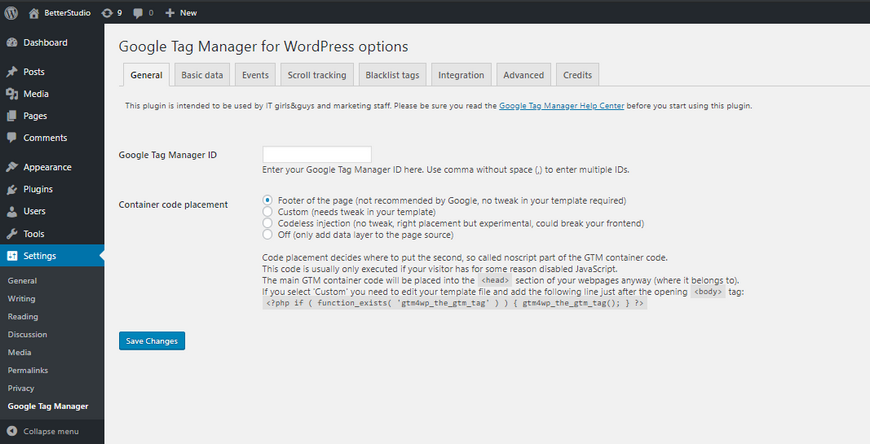

Finally, click on save to save your changes.
The sixth way: Add Analytics to WordPress with MonsterInsights
MonsterInsights is one of the most popular plugins to install and add Google Analytics to WordPress.
Using this plugin is the easiest and fastest way of adding Google Analytics to WordPress. MonsterInsights is very user-friendly and even beginners can use it. It is available in both free and premium versions. Here we are working with the free version.
First, you need to download and install the plugin on your website. After installing and activating the plugin, you can see a new option in your tools menu. Click on it to configure the plugin.
Next, the plugin asks for your website’s category.
Next, click on connect MonsterInsights.
Next step, you need to connect to the Google account you have registered with Google analytics, and allow the plugin to use your account.
In the next step, you need to choose a profile you want to use for tracking and click on complete authentication. Now you have successfully added Google Analytics to WordPress.
In the next step, the plugin asks you if you want to use the default settings or rather make some changes to it. You can make your desired changes. Also, if you have an affiliate link you can use it. Finally, click on save and continue.
The plugin then asks you, if you wish to upgrade to the premium version to have access to the settings below? You can save the page without any changes.
In the next step, MonsterInsights recommends installing the WPForms plugin.
You are done. You have successfully configured and installed the plugin on your WordPress website.
Click on Finish Setup & Exit Wizard to finalize your installation process. Once you are done, you can view your settings in your WordPress dashboard under the Insight and Report tab.
The seventh way: Host analytics on your server
The last way to add Google Analytics to WordPress is to locally host Google analytics. Keep in mind, this is not recommended nor supported by Google.
One of the main reasons many people prefer to use this method is the fact that you use less cache compared to other ways. Therefore, you can use your cache space for other important plugins and whatnot.
To use this method, you can use the free plugin designed specifically for this way. You should install Complete Analytics Optimization Suite to locally host Analytics.
However, you need to have Google analytics JavaScript file on your server. One key feature of this plugin is the fact that you can easily identify and track your visitors IP.
You only need to download, install and activate the plugin on your website. After activating, type in the required information and use wp_cron() command to keep it updated.
Test Google Analytics on WordPress
After adding Google analytics to WordPress (it doesn’t matter which method you have chosen to do so) you need to test it to make sure it is working correctly. There are many ways to test it. But the simplest way is using Real-Time analytics.
Go to your Google Analytics admin page. Click on reporting on top of the page. You will then be redirected to the tracking page.
From the left-hand side, click on Real-Time. From the opened menu click on overview. To test if it’s working or not, look at your live visitors. Keep in mind, as the website owner, your data won’t be displayed here.
To do this test, from another browser open your website. View one or two pages. If you have successfully configured Google analytics, you can see yourself going through pages.
If you are still unable to see this number, click on re-authenticate with your Google account and retry the test.
Conclusion
As you can probably tell, Google Analytics is very useful to help your website grow. It helps you to have a better understanding of your audience and their needs.
When you have enough information about your audience you use better strategies to increase your website’s traffic. Which ultimately, ends up with a happier audience.


