Would you like to know how to install fonts on Android? You may not like the default font with your Android phone, but that is no reason not to use it. Especially on Android, you can easily change it and install another font you prefer.
You will find in this article a description of all the available methods for installing new fonts on your Android mobile device.
How to install fonts on Android?
To install .ttf fonts on android, you should check with your phone to determine whether it has a native method of performing this task. In the case of Samsung phones, you can download and install fonts from the Samsung Theme Store and then install fonts on Samsung.
This is faster and easier than the method below. Please check that first and come back here if you do not like or want to use any of the fonts provided.
How to Download & Install Custom Fonts On Android Without Root?
There are two main methods to download and install custom fonts on Android without root:
Method 1: Using iFont
Before adding custom fonts on your Android device without root, you will first need to download iFont to download fonts on Android.
Once you get this on your Android device, follow the following steps:
- Open the app.
- Find and tap the font you want to install under Find.
- Click “Download” on the front page.
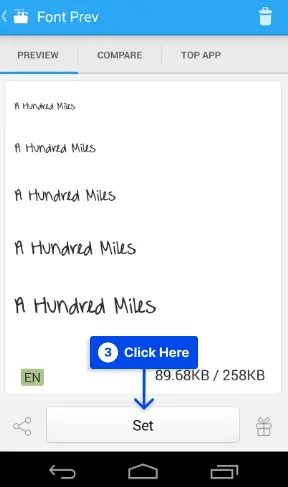
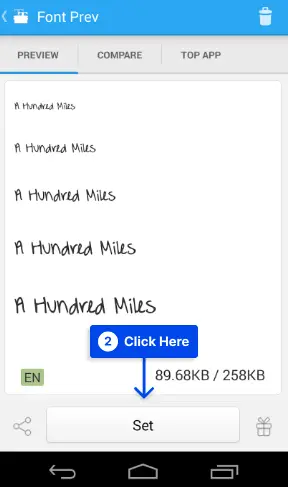
- Tap “Set” and follow the on-screen instructions to install the font.
- Open Settings on your Android.
- Use the search bar to search for “ Unknown Sources”.
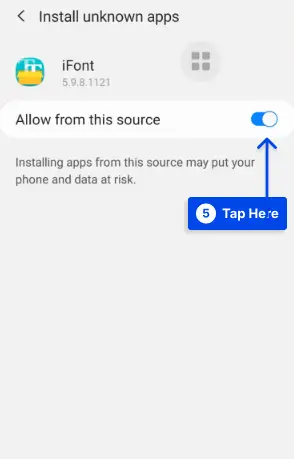
- Tap on “Install unknown apps” and locate “iFont”.
- Press the toggle button to “Allow from this source”.
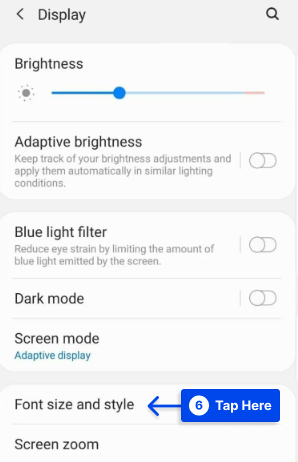
- Go to Font size and style under Display section to apply your new font.
Method 2: Using a Launcher
With the aid of a third-party launcher, you can change the fonts on your Android phone and install new fonts.
You should be aware that this method does not modify all of your phone’s font settings. Instead, only the launcher’s font settings are altered.
In this particular demonstration, you can use GO Launcher; however, almost all launchers, such as Nova Launcher and Microsoft Launcher, allowing you to customize the fonts to suit your preferences.
Follow the below steps to change your Android phone’s fonts and install new ones by a launcher:
- Go to the launcher’s settings on your Android device
- To access GO Settings, hold anywhere on the home screen
- Click “Font” and choose “Select Font”.
- Select a font or scan the device to add a font that is already installed
- Click the chosen font to save changes.
It should now appear in your launcher that you have a different font.
How to Install Custom Fonts and Typefaces on a Rooted Android Device?
Using a rooted device, you can install any .TTF file as a font on your Android device and use that font throughout the device’s functionality.
Therefore, you are not restricted to the features of a single application. Thankfully, you can still install these fonts using the iFont application. Follow these steps to do this:
- Open iFont.
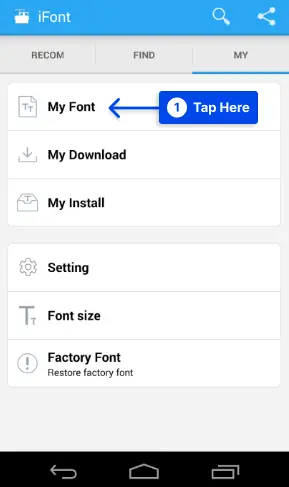
- Locate the “MY” window and tap on “My Font”.
- Once you have located any downloaded TTF file, tap the “Set” button.
When you have downloaded a font that you like, you may use the method described above on your rooted Android device, and you should be able to access it.
Where are fonts stored on Android?
The system fonts are located in Android’s directory /System/Fonts. The first thing you must do before beginning to play around with system files is to find the Roboto .tff file. Be careful, as all changes are permanent.
Conclusion
Changing the font on Android is relatively straightforward. However, the level of customization and variety you have depends on the original Android skin and whether you have a rooted device or not.
If you have any other questions concerning blogging, please do not hesitate to leave them in the comments section.
We would appreciate it if you shared this article on social media. You can also follow us on Facebook and Twitter.


