Would you like to know how to fix the “SSL Handshake Failed” & “Cloudflare 525” errors? When a Secure Sockets Layer (SSL) certificate is installed on your WordPress site, it is possible to ensure secure communication between users and the site using HTTPS.
Several things can go wrong while verifying an SSL certificate and establishing a connection between your website’s server and a visitor’s browser.
There is no need to worry if you have encountered an “SSL Handshake Failed” error message and are unsure of what it means.
This is a common error that does not provide much information. However, while it can be frustrating, it is possible to resolve the error by following a simple process.
This article will explain the SSL Handshake, the SSL Handshake Steps, the SSL Handshake Failed error, and what causes it. It will then provide you with seven methods for rectifying the error.
What is SSL Handshake?
During an SSL handshake, devices on a network, such as a browser and a server, exchange encrypted algorithms, keys, and other information about their connection before exchanging data.
When a browser and server perform a handshake, they might request to see each other’s SSL certificates to verify them.
To establish a secure connection, an SSL handshake must be established first, which is why it is crucial to know what an SSL handshake is and what to do in the event it fails.
An SSL handshake occurs when the client and server set up the encryption algorithms and secret keys they will use for secure communication and exchanging and validating their digital certificates.
Clients and servers that operate over a network may communicate securely with the help of SSL and TLS protocols. The TLS protocol has replaced SSL, but SSL is a more common term.
SSL Handshake Steps
In an SSL handshake, the exact steps depend on which version of SSL the client and server are using, but in general, the following steps should be followed:
- Hello from the client: The “client hello” message contains information regarding cryptography, including the SSL version through which the client communicates with its server. It also details the encryption algorithms the client supports, known as “cipher suites.”
- Hello is the server’s response: A “server hello” message contains important information, such as the selected encryption suite and digital certificate. It might also include a request for the client’s certificate.
- The client verifies the server’s certificate: Additionally, it sends several bytes, including one that allows both the client and server to compute a secret key that will be used to encrypt subsequent messages and the “finished” messages. A server sending a certificate request to a client will also send an encrypted byte string along with its private key and digital certificate.
- The server verifies the client’s certificate: Client authentication must be performed for this step to occur.
- “I am finished,” the client states: In this “finished” message, the client indicates that part of the handshake has been completed.
- The server says, “I’m finished, too”: By sending the “finished” message, the server signifies that it has completed its part of the handshake.
With the same secret key shared in step three, the server and client can exchange encrypted messages for the remainder of the session. Symmetric encryption is known as this.
If everything goes smoothly, the above steps will be carried out. However, what if it does not? In the following sections, we will explain what an “SSL Handshake Failed” error message is and how to resolve it.
What is SSL Handshake Failed?
An SSL Handshake Failed error message occurs when a secure connection cannot be established between a client and server.
This error might occur for these reasons:
- The client is using an incorrect date or time.
- The configuration of a client browser causes the error.
- A third party on the client side is intercepting the connection.
- SSL version is not the same on the client and server.
- The client and server are using different cipher suites.
- There is an invalid certificate on either the client or the server.
The SSL Handshake Failed error message appears differently depending on your client application or the server you are attempting to connect to.
On the other hand, if you are using Cloudflare, an SSL Handshake Failed error will appear as the Cloudflare 525 error.
Having identified some causes of the SSL Handshake Failed error, we will discuss some methods for resolving it in the next section.
How to Fix SSL Handshake Failed?
Several potential causes may contribute to the “SSL Handshake Failed” error message. Therefore, it is impossible to provide a simple solution to the problem.
As a result, you can use various methods to explore and resolve potential issues one step at a time. Seven methods can be used to fix the SSL Handshake Failed error:
Method 1: Update Your System Date and Time
The first issue we will address is one of the most unlikely causes. Still, it is straightforward to correct if it is a problem with your computer’s clock.
An incorrect date and time may interfere with the SSL handshake if your system uses the wrong date and time.
If the system clock is set to be different from the actual time, such as if it is too far into the future, it may interfere with verifying the SSL certificate.
It is possible that the clock on your computer was set incorrectly, either due to human error or a malfunction in your settings.
Suppose you are experiencing issues with your system time. In that case, it is a good idea to ensure it is accurate and update it if necessary.
Follow these steps to do this:
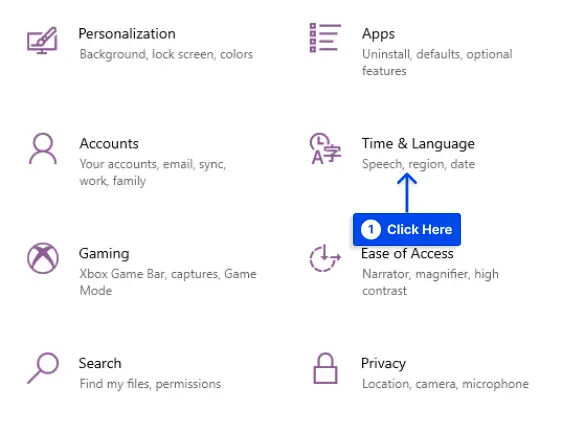
- Go to Time & Language in your Windows Settings.
- Go to Date & time, click Sync now, and turn on Set time automatically.
If your clock displays the correct information, it can be safely assumed that this is not the source of the “SSL Handshake Failed” error message.
Method 2: Check to See If Your SSL Certificate Is Valid
SSL certificates feature expiration dates to ensure that their validation information remains current. These certificates generally have a validity period of six months to two years.
The browser will detect an SSL certificate that has been revoked or expired, and the SSL handshake will be unable to be completed as a result.
When the SSL certificate on your website has been installed for more than a year, it is probably time to reissue it.
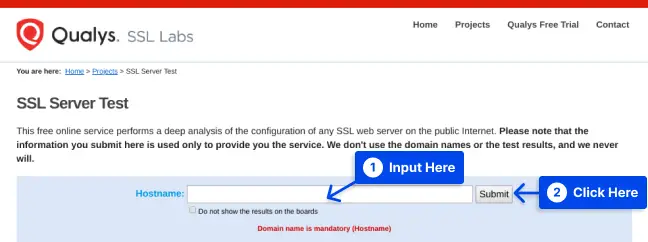
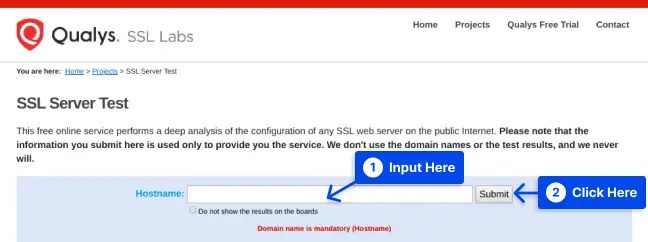
An SSL certificate checker tool such as Qualys can view your SSL certificate status.
Follow these steps to use this tool:
- Input your domain name into the Hostname field.
- Click on the Submit button.
You will receive some results after the checker has analyzed the SSL configuration of your site. Using the results page, you can determine whether the certificate is still valid and whether it has been revoked for any reason.
You must update your SSL certificate to resolve the handshake error and to ensure the security of your website and WooCommerce store.
Method 3: Configure Your Browser for the Latest SSL/TLS Protocol Support
There is the possibility that the “SSL handshake failed” error is the result of a misconfiguration of the browser. Try switching to another browser if there appears to be a problem with one particular browser.
In any case, this can serve as a starting point for narrowing down the scope of the problem. Additionally, you can try disabling all plugins and resetting your browser to the default settings.
A protocol mismatch is another possible problem related to the browser. There is no mutual support protocol for a server that can only support TLS 1.2 and a browser that can only support TLS 1.0. There will be an inevitable failure in the SSL handshake due to this.
To ensure that your browser supports the latest SSL/TLS protocol, you should configure it. Follow these steps to do this:
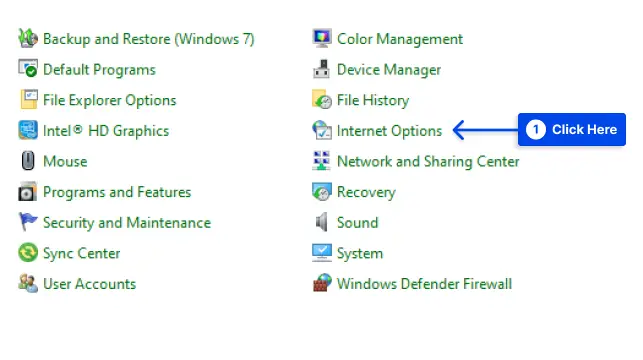
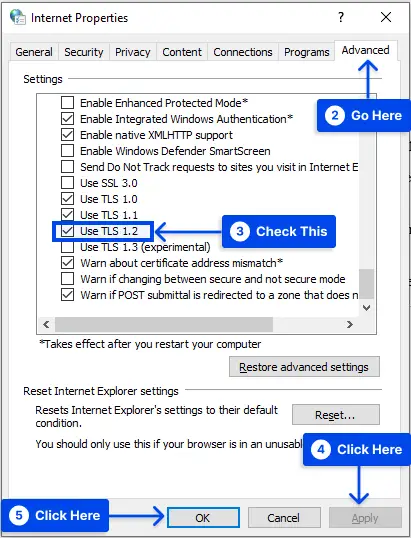
- Click on Internet Options in Control Panel to open Internet Properties.
- Go to the Advanced tab.
- Check the box next to Use TLS 1.2.
Note: Generally, it is not recommended to check the boxes next to Use SSL 2.0 and Use SSL 3.0.
- Click on the Apply button and then click the OK button to save changes.

- Check to see if the error has been resolved.
Method 4: Deactivate recently installed plugins or extensions
There is a high possibility that browser extensions and plugins may contain malicious code since unknown developers typically develop them.
Therefore, if you have recently installed one of those and are experiencing the SSL handshake error, you should uninstall it and clear your cache and cookies as a first step.
Once that has been accomplished, reconnect to the same website and verify that you can establish a secure connection.
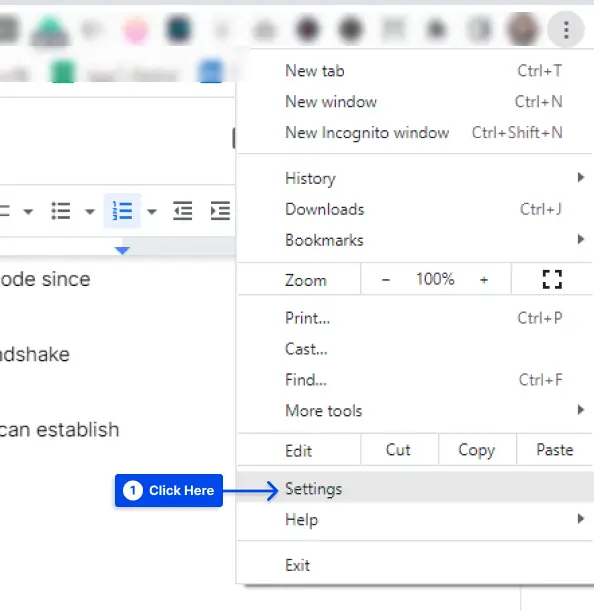
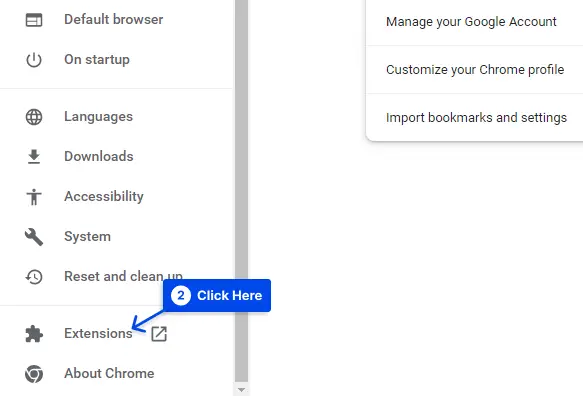
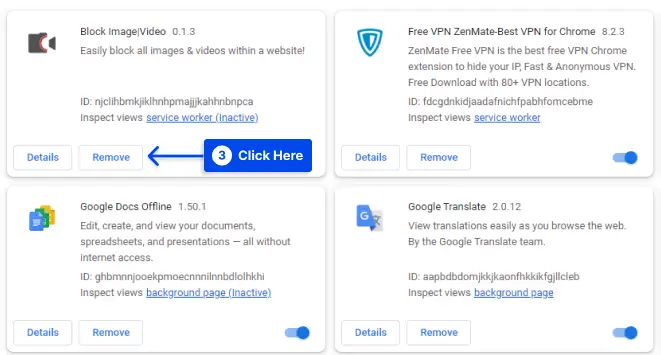
Follow these steps to uninstall the extension in Chrome:
- Click on the menu icon in the top-right corner of the browser.
- Click on Settings.
- Click on the Extensions option.
- Select the extension you recently installed and click on Remove.
Method 5: Protocol Mismatch
SSL handshake issues can often be attributed to a mismatch in protocol between the client and server.
For a handshake to be successful, the web server and the browser must support the exact version of the SSL/TLS protocol.
There are times when an SSL handshake error occurs when a server runs on a protocol version that is much higher than the one of the client.
In the case of a server that uses TLS 1.3 but a browser that uses TLS 1.1, the SSL handshake is likely to fail since servers do not support older versions of TLS.
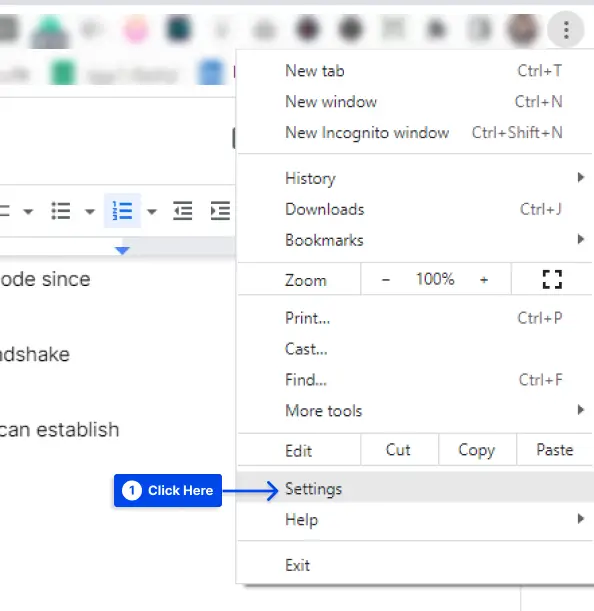
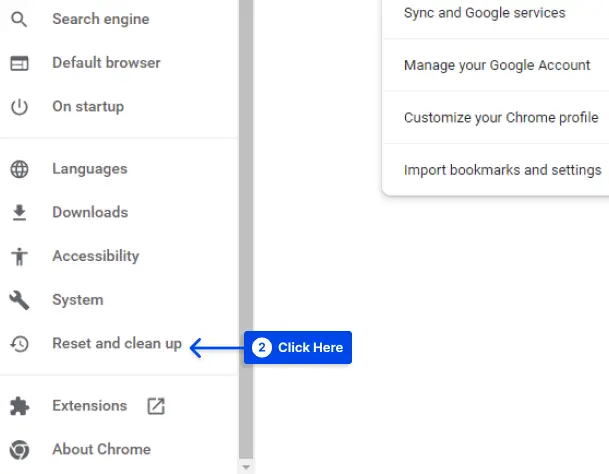
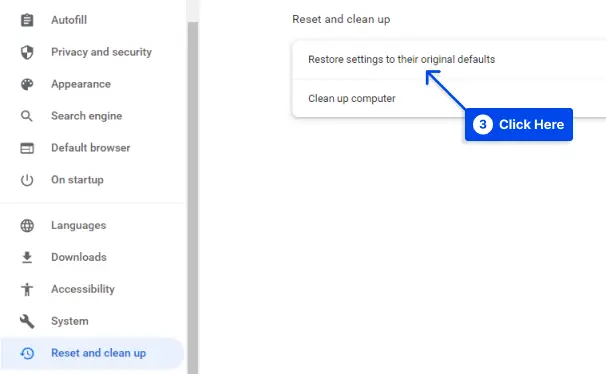
To fix this, you should reset your browser to its default settings and use it without any extensions. Follow these steps to do this on your Chrome browser:
- Click on the menu icon in the top-right corner of the browser.
- Click on Settings.
- Click on the Reset and clean up option.
- Click on the Restore settings to their original defaults option.
Method 6: Pause Cloudflare to Test Your SSL Certificate
If you are using Cloudflare, the “SSL handshake failed” error can be caused by a problem with the connection between it and your website. Temporarily disabling it is the most convenient way to test this.
Fortunately, Cloudflare provides a “pausing” feature that can be used at any time to disable the service temporarily.
It is recommended that you clear your browser’s cache once you have done this to regain access to your website.
You should contact Cloudflare to determine the cause of the SSL handshake error and if it has been resolved.
As you wait for a response, make sure the CDN is disabled so that other users may also access your website.
Alternatively, if the SSL error persists, the problem is probably due to a configuration error on your server.
Method 7: Make Sure the Cipher Suites Match
If you still have not identified the cause of the SSL handshake failure, it may be related to a mismatch between the cipher suites.
As a brief explanation, cipher suites are sets of algorithms for securing SSL and TLS network connections, including those for encrypting key exchange data, bulk encryption, and message authentication.
In cases where the server’s cipher suites are incompatible with those used by Cloudflare, this can lead to an “SSL Handshake Failed” message.
Once again, Qualys’ SSL Server Test is a valuable tool for determining whether there is a mismatch between the cipher suites.
Follow these steps to use this tool:
- Input your domain name into the Hostname field.
- Click on the Submit button.
Following that, you will be presented with a summary analysis page. Under the Cipher Suites section, you can find cipher information.
Using this page, you can determine which ciphers and protocols are supported by the server. You should pay particular attention to those with a “weak” status. This section also contains a detailed description of the algorithms that make up the cipher suites.
To resolve this issue, you can use Qualys SSL/TLS Capabilities of Your Browser tool to compare the results with your browser’s support.
Conclusion
This article has explained what the SSL Handshake is, what the SSL Handshake Steps are, what the SSL Handshake Failed error is, and what causes it. It will then provide you with seven methods for rectifying the error.
Please accept our sincere thanks for taking the time to read this article. You are welcome to submit questions and comments in the comments section.
You will be able to receive notifications of our most recent articles if you follow our Facebook and Twitter pages.


