Would you like to know how to fix The Link You Followed Has Expired error? WordPress may have an error message stating, “The Link You Followed Has Expired”.
This is one of the most common WordPress issues you may encounter if you use the WordPress platform.
This error may appear in various situations, including: “the link you followed has expired” in WordPress localhost MAMP, “the link you followed has expired” in WordPress localhost XAMP, “the link you followed has expired” in Divi, and “the link you followed has expired” in WooCommerce.
The issue frequently occurs when the file you are trying to upload exceeds WordPress’ default limits for uploading and executing files, such as “the link you followed has expired” when uploading a theme.
The best method to resolve this issue is to increase the default upload limits. We will show you various ways to fix the “the link you followed has expired” error in this article.
What Causes ‘The Link You Followed Has Expired’ Error?
The “The link you followed has expired” error often occurs when uploading a WordPress theme or plugin to your website from the WordPress admin area.
By default, WordPress hosting companies limit the size of files that can be uploaded via the WordPress administration panel.
You will receive this error message if you attempt to upload a theme file that exceeds the standard size limit. Further, this error has a fundamental problem as it does not have a description.
Little information about what is wrong is provided in the error notice, so beginners usually have difficulty solving the problem.
This error occurs due to WordPress’ default limits for uploading and executing files. In the next section, we introduce the best methods to increase the limits to solve this error.
How To Fix ‘The Link You Followed Has Expired’ Error?
Your website must have a larger upload limit and a faster execution rate to fix the “the link you followed has expired” error.
It is necessary to edit a core WordPress file and copy a few lines of code to accomplish this. Several methods can be used to accomplish this. You will be guided through the process.
Take note that you do not have to use all of these methods, after attempting a method that did not prove successful, reverse the changes that have been made and try another method.
Before making any changes to the WordPress core files, it is also crucial to back up your website and make a copy of the files.
Method 1. Increasing Limits In functions.php File
While this method is more straightforward, it has some disadvantages as well. The important one is if you change the theme of your website, the site will return to its previous limits.
If you intend to change your theme, you may wish to consider one of the other methods described in the following sections.
However, this method can be used by simply adding the following code to the functions.php file of your WordPress theme.
@ini_set( 'upload_max_size' , '120M' );
@ini_set( 'post_max_size', '120M');
@ini_set( 'max_execution_time', '300' );
The upload_max_size and post_max_size values can be set to a size greater than the file you are uploading.
It may also be necessary to increase the max_execution_time to the amount of time you believe the file will take to upload. If you are unsure, you can double this value.
Method 2: Fix by Increasing Limits in .htaccess File
Alternatively, you can use the .htaccess method instead of adding code to your theme’s functions file.
In order to implement this method, you will need to edit the .htaccess file via an FTP client or through the File Manager app in your cPanel account.
The procedure for using this method is as simple as connecting to your website through FTP and editing the .htaccess file.
Follow these steps to do this:
- Connect to your website through FTP.
- Find the .htaccess file.
- Right-click on it.
- Select the View/Edit option.
- Add the following code at the bottom of your .htaccess file:
php_value upload_max_filesize 128M
php_value post_max_size 128M
php_value max_execution_time 300
php_value max_input_time 300
- Save your changes.
- Upload the file to your website.
Method 3. Fix By Increasing Limits in php.ini File
WordPress and PHP use the php.ini file to configure their configuration. Follow these steps to fix the error by increasing limits in the php.ini file. Follow these steps to do this:
- Connect to your WordPress website using an FTP client.
- Search for the php.ini file in the root directory.
In most cases, users are hosted on a shared hosting account; therefore, they are unlikely to find it in the root directory of their site.
In that case, to properly configure your website, you must create a blank php.ini file using a plain text editor, like Notepad, and upload it to your server.
- Add the following code inside the php.ini file:
upload_max_filesize = 128M
post_max_size = 128M
max_execution_time = 300
- Save your changes and upload the file to your website.
Now you can visit your website and upload the theme or plugin. You should now be able to upload the file without experiencing an error.
If the error persists, try increasing the file size limit to accommodate the file you wish to upload.
Method 4: Update the PHP Version
An outdated PHP version may cause the “Link you followed has expired” error to appear on your site.
In this case, the WordPress software will not be compatible with your PHP version, and you will have difficulty maintaining the functionality of your website.
Several hosting providers offer cPanel hosting services that enable users to update their PHP versions.
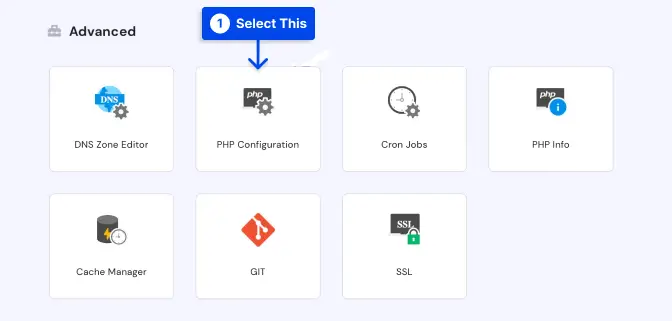
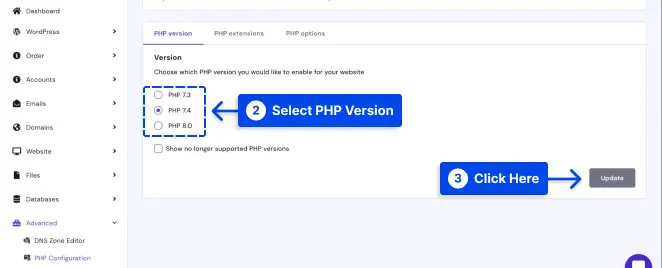
Follow these steps to do this:
- Log in to your cPanel.
- Click PHP Configuration under the Advanced settings.
- Choose the PHP version you want from the list under the PHP version tab.
- Click on the Update button to apply it server-wide.
Method 5: Contact Your Hosting Provider
Consider contacting your host provider if none of the above-listed methods work. Their support team will be able to assist you in resolving the issue.
Conclusion
You were shown numerous methods to resolve this article’s “The link you followed has expired” error. The most effective method is to increase the default upload limits.
We hope this article has been helpful to you. If you have any questions or comments, please use the comment section.
Please, follow us on Facebook and Twitter to stay up-to-date with the latest articles.


