In this article, we tend to introduce the Yoast SEO plugin along with its many features.
If you have no experience working with SEO and you want to launch a successful website with WordPress, then this plugin is a must. Although, some of its features may be confusing for some. In this article, we will teach you how to use this amazing plugin.
Why Use Yoast SEO?
Yoast SEO is the first choice for many WordPress websites. Although, there are many other powerful plugins like “all in one SEO pack”. But what made Yoast SEO become popular? And why is this plugin the best choice for your website?
- This plugin offers free and premium versions. But the free version gives you all the necessary features.
- Yoast SEO is designed based on the latest Google algorithms.
- Yoast SEO manages your URLs
- Due to the active support and developer’s team, this plugin is constantly updated. Therefore, you will rarely find any bugs or errors.
- Managing titles, meta descriptions, and keywords in your posts.
- It updates your feed
- Optimizes your website for social media platforms
- It’s very user-friendly, anyone can use it
- Optimizes your content
- It creates a powerful sitemap for you to use in Google search console
How to Install and Activate Yoast SEO?
Now that you are familiar with its advantages, we will now explain how to install Yoast SEO. To install it, head over to your WordPress dashboard, click on “Plugins” and select “Add new”. You now can install this plugin with two methods:
- You can download the Yoast SEO plugin from the official WordPress website (wordpress.org). From the plugins, click on “Add new” and upload the .zip file and click install or activate.


- In the second method, you can look for the Yoast SEO plugin in the store and click on install and activate.


How to Setup Yoast SEO?
Now that you have installed and activated Yoast SEO, it’s time to configure it. Head over to your WordPress dashboard and click on the plugin. You will then get redirected to Yoast SEO settings page.


Dashboard
In this section, you will see any new notifications you may have. Also, you will be able to see if there is any problem with your plugin.
General Settings


Click on “Open the configuration wizard”.


By clicking on “configure Yoast SEO” you will be able to configure it step by step. In the next step, you have to choose whether your website is ready to be indexed or not. If you are still making your website, select “B” and click on next.


In the third step, you have to select your website’s type.


In the fourth step, you have to select whether you are a person or a company.


In the fifth step, you have to put your social media platform URLs.


The sixth step is your search engine visibility.


In the seventh step, you have to declare whether you have one author or more.


In the eighth step, you have configured your Google search console. If you have your code simply enter it and click authorize if you do not, click on “get Google authorization code”.


In the ninth step, you have to select your title separator and enter your website’s name.


The tenth step is your newsletter configuration. Enter your name and email address.


Step eleventh is recommended content for you to have a look.


Step twelveth, you are done and Yoast SEO is now configured for your website. Click close to go back to your dashboard.


How to Use Yoast SEO Features?
In the features tab, you can see all the features Yoast SEO offers. You can turn on/off each of them. It’s recommended to turn on your SEO analysis, readability analysis, cornerstone content, rate, admin bar menu and text link counter to maxi maize the full potential for this amazing plugin.


How to Use Webmaster Tools on Yoast SEO?
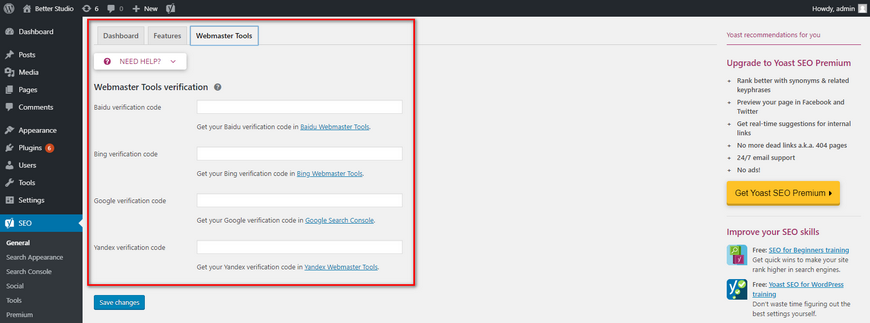
In this section, you can verify Google, Bing, Baidu, and Yandex to use their webmaster tools in Yoast SEO.


How to Use Yoast to Improve Website’s SEO?
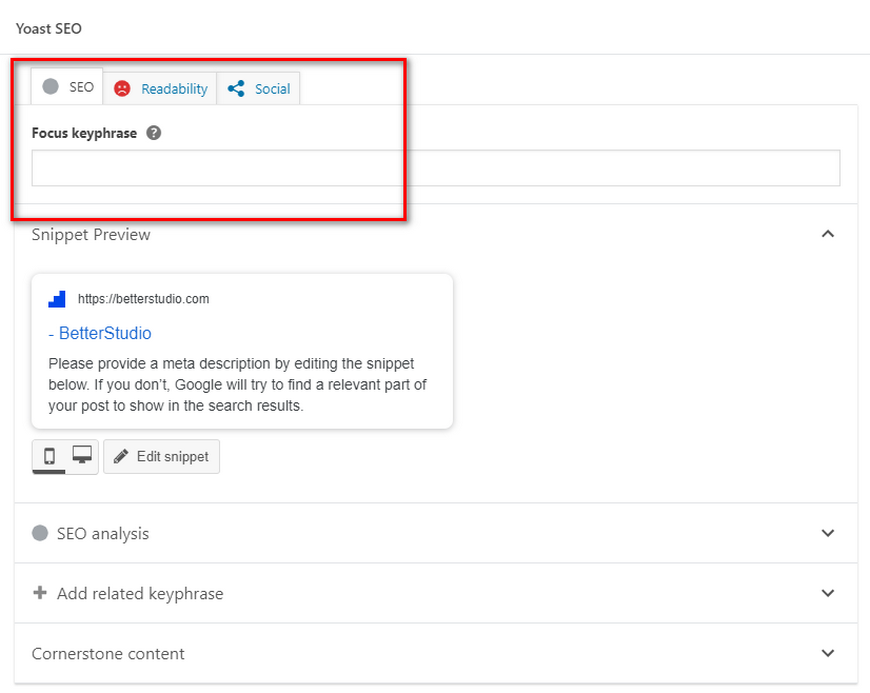
After activating the Yoast plugin, a new box gets added to the editor which looks like the following:


As you can see, this box has three main tabs, SEO, Readability, and Social. Add related keyphrase is a premium feature which we will talk about later. To maximize the Yoast SEO plugin it is recommended to do what the plugin is telling us to get the green light for SEO and Readability.
When you use Yoast for content, it’s best to follow its directions and improve the content to prepare it to match Google standards. At first, the lights will be red and yellow and if you follow the guides they will turn green.
Getting the Green Light
To follow SEO standards, first, you must enter the keyword used in the text. When you click on SEO analysis a window opens up with a few options.
In the snippet section, you can preview how the URL would look like in search engines. By clicking on edit snippet you get three options:
- SEO title. This title will be displayed in the search engines. If you leave this untouched, the plugin will use the default structure. Most websites use the title page first followed by a separator then add the site title.
- You can leave this field blank or change it and match it with your keyword.
- In the meta description tab, write a short brief of your content. It shouldn’t be more than 150 characters and should contain at least one keyword. The meta description will be displayed in search engines. Thus, it’s important to make it as appealing as possible to attract visitors.
Once you are done with this section, go to SEO analysis. In this section, you can see problems, improvements, and good results. You have to solve the problems.
Improve Readability with Yoast SEO
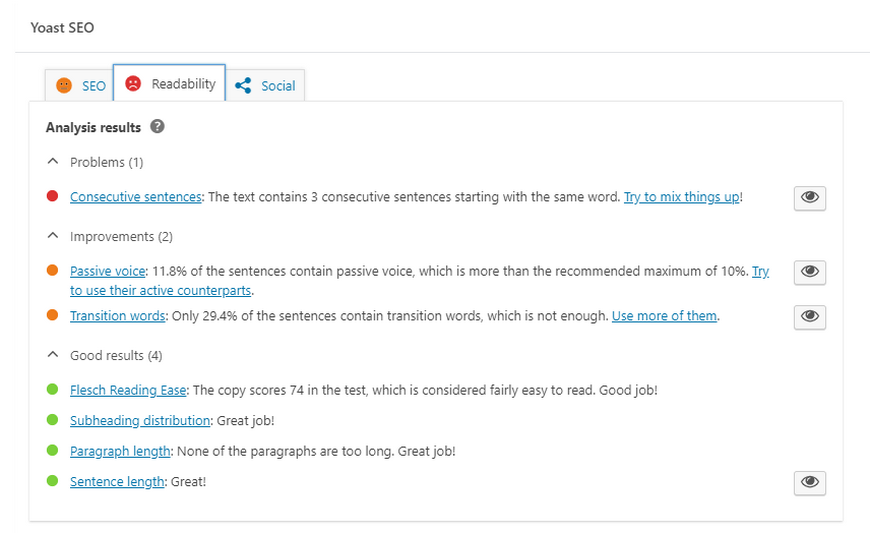
To get the green light in the readability tab, you must consider a few key points. However, most people don’t take notice of readability. Nevertheless, we recommend that you have a look at it.


Keep in mind, the readability increases the user experience and directly affects the SEO. The following pointers help you get a better score for this tab:
- Don’t use long paragraphs. Separating paragraphs help improve the readability.
- Use a lot of subheadings. Each subheading should be no less than 300 words.
- Try not to use long sentences, each sentence shouldn’t be more than 20 words.
What are the Premium Features of Yoast SEO?
If you are looking for more features and willing to pay a fee, we recommend upgrading to the premium version. Some key features of the premium version are:
- In the premium version, you can redirect URLs. You may have two different URLs for the same content indexed in Google and Yoast fixes this issue.
- The premium version allows you to choose more than one keyword for each content.
- It checks inbound links and recommends relative links.
- The premium version allows you to preview the content in social media.


