As you know WordPress CMS by default uses PHP to send emails to its users. These emails can contain any information like password restoration info or a welcome message.
But this is not the best way to send and receive emails and most hosting providers don’t configure it properly. So, you may face many issues in the long run. By using PHP your emails may end up in the spam folder instead of inbox.
Have you gotten any errors while sending or receiving emails? One way to fix this issue or any related issue is by using email applications like Mailgun and Sendgrid.
However, these services don’t come for free. In this article, we teach you how to install and use an SMTP server to send emails.
What is SMTP?
SMTP is short for Simple Mail Transfer Protocol. This protocol can replace any other application to send emails. You can use SMTP to send emails to your audience without any issues. Some of the key features of SMTP are:
- Emails sent by SMTP go through the same DNS
- SMTP doesn’t need verification
- You don’t need to pay any fee to use SMTP
- SMTP guarantees your email security
- SMTP emails are unlikely to be sent to the spam folder
Installing SMTP using a plugin
Unfortunately, WordPress doesn’t have any tools to use SMTP. Therefore, you need to install a plugin to add SMTP to your WordPress website. Here we have introduced the 5 best SMTP plugins for WordPress.
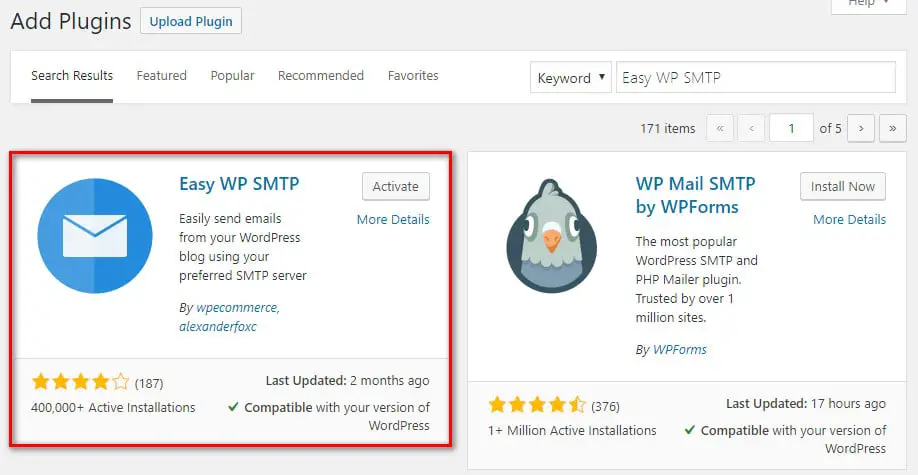
Easy WP SMTP is a free plugin with many features offered to those who are seeking to use SMTP in WordPress. To install this plugin, follow these steps:


1. Before anything, you need to install the plugin. To do so, head over to your WordPress dashboard and from plugins, click on add new and search for “Easy WP SMTP”. Finally, install and activate it.
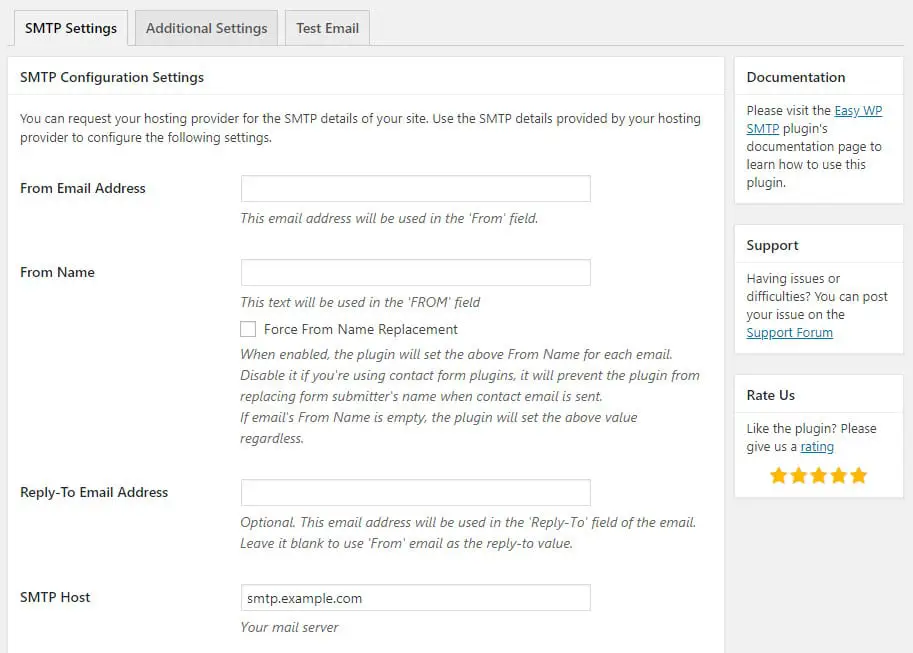
2. From tools go to Easy WP SMTP settings.
3. In the general tab, enter your SMTP information:
- Email Address: Enter the email address you are using for your WordPress login. Most hosting providers don’t allow you to use third-party email addresses. Therefore, we recommend using the same email address you used to install your WordPress website.
- Name: You can choose a simple name. Like Administrator.


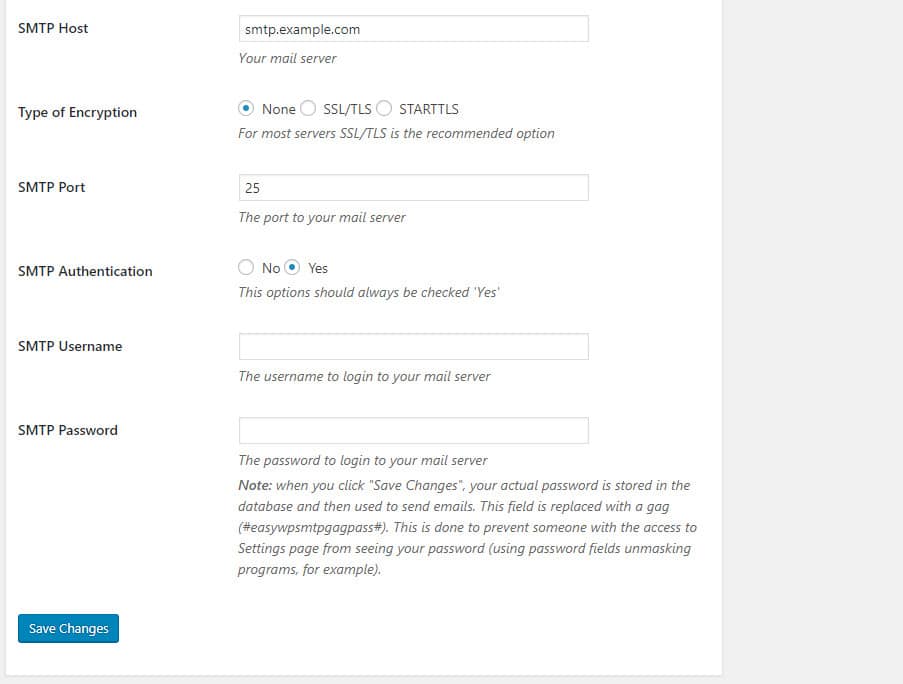
- SMTP Host: Enter your email server.
- Type of Encryption: SSL.
- SMTP Port: This is used for the outbox. Ports are usually 465 or 587.
- SMTP Authentication: Yes.


- SMTP Username: It’s the same name you use to enter your email.
- SMTP Password: It’s the same password you use to enter your email.
4. Easy WP SMTP comes with a test server. With the help of this feature, you can test the process of sending an email. Fill in “to”, “Subject” and “Message” and click on send to test the whole process.
5. If you have configured it correctly, a green message will appear on top of your screen.
By following these 5 steps you can easily install and configure SMTP on your website and after that, your emails are sent via an SMTP server instead of PHP.
Installing SMTP with API and WP_MAIL
Instead of using different email management plugins you can use the WordPress API to customize your codes. To use SMTP and your API to send your emails, follow the steps below:
Enter the code below to your wp-config.php file:
define( 'SMTP_HOST', 'server.hosting.com' );  // Hosting server name.
define( 'SMTP_AUTH', true );
define( 'SMTP_PORT', '465' );
define( 'SMTP_SECURE', 'ssl' );
define( 'SMTP_USERNAME', 'user@example.com' );  // Username for SMTP authentication
define( 'SMTP_PASSWORD', 'password' );          // Password for SMTP authentication
define( 'SMTP_FROM',     'user@example.com' );  // SMTP From address
define( 'SMTP_FROMNAME', 'Name' );         // SMTP From name
Replace the data such as server.hosting.com with your personal information and save the changes.
Copy the code below to your plugin code:
add_action( 'phpmailer_init', 'send_smtp_email' );
function send_smtp_email( $phpmailer ) {
    $phpmailer->isSMTP();
    $phpmailer->Host       = SMTP_HOST;
    $phpmailer->SMTPAuth   = SMTP_AUTH;
    $phpmailer->Port       = SMTP_PORT;
    $phpmailer->SMTPSecure = SMTP_SECURE;
    $phpmailer->Username   = SMTP_USERNAME;
    $phpmailer->Password   = SMTP_PASSWORD;
    $phpmailer->From       = SMTP_FROM;
    $phpmailer->FromName   = SMTP_FROMNAME;
}
To send email, use wp_mail() function. For example:
wp_mail("recipient@example.com", "Subject", "Message");SMTP tests
Now that you have configured SMTP, you need to test it to make sure it is working perfectly fine.
From your plugins settings click on “Email test” tab. Enter an email address to test. This email can be from any email provider service. However, you need to have access to it. Finally, click on send.
Now SMTP tries to send an email with your configured settings. If email is sent correctly you will see a message.


