Just like many other open-source platforms, WordPress has its own advantages and disadvantages. WordPress is the most popular CMS in the world. Most websites you visit nowadays are created by WordPress.
One of the most commonly occurred errors WordPress users get is PHP memory error. In this article, we tend to talk about this error and how to increase your WordPress memory limit.
The more time goes by the more themes, plugins, and content you have on your website. The amount of data on your website requires a lot of space without any limitations.
In some cases, you don’t have this space or you forget to increase it. WordPress PHP memory limit error occurs when you run out of memory space. Below we discuss ways to increase PHP memory limit. We tend to introduce every possible way in this article.
What is WordPress Memory Exhausted Error?
Before anything, we need to understand this error. What is WordPress Memory Exhausted error? When does it occur and why? Let us answer these questions one by one.
As you know, WordPress is programmed by PHP. In addition, every website needs to have a host to run. Webservers work exactly like computers, they need memory to run multiple commands at the same time. Therefore, Administrators dedicate memory to each program. PHP is one of these programs. Thus, we have a memory for PHP in WordPress.
When your WordPress website requires more PHP memory to run your commands, you get the error below:
Fatal error: Allowed memory size of 33554432 bytes exhausted (tried to allocate 2348617 bytes) in /home4/xxx/public_html/wp-includes/plugins.php on line xxx
On the other hand, when WordPress faces low PHP memory error, it tries to fix itself. By default, WordPress tries to increase the PHP memory limit once it needs more memory space. This number is usually 64M which is not enough.
How to Check Your Current PHP Memory Limit
It is still too early to talk about ways of fixing this error. Before we discuss solutions, we need to look at other options. How can we check the WordPress PHP memory limit? When you face this error it is obvious how many memory spaces you originally had and how many you need to continue running your PHP commands. There are two main ways to check the WordPress PHP memory limit. First, you can use Site Health Tools. Second, you add a PHP file to your web server.
Use Site Health Tools
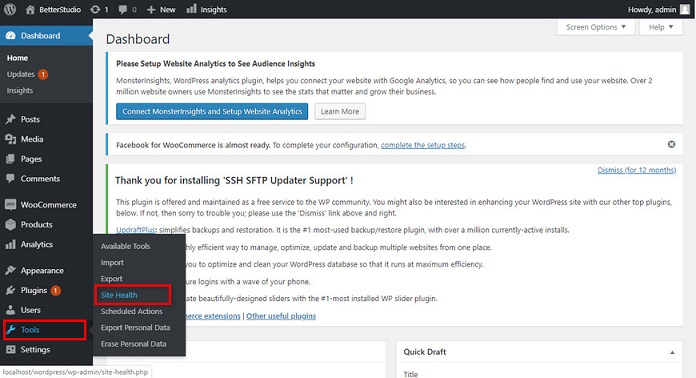
This method requires you to have at least WordPress version 5.2. WordPress developers added Site Health Tools on versions 5.2 and above. This built-in tool offers many features to the user. One of these features is checking the PHP memory limit.


To access this tool, head over to your WordPress dashboard. From Tools click on Settings and look for Site Health Tools. After going to the page, at the bottom you can see the PHP memory limit.
Add a PHP file to your web server
In this method, you need to create a .php file in your web server. Then you need to add the code below to it:
<? php(); phpinfo?>
It doesn’t matter where you put the code in the file.
Then you need to open the page in your browser and look for memory_limit. The amount you see here is the amount allocated to your PHP memory in WordPress.
By using the methods mentioned above, you can easily check the PHP memory limit.
Increase PHP Memory Limit in WordPress
Unlike other errors occurred in WordPress, this error is easily fixed. Because you know exactly what happened and what you need to do.
For example, for HTTP error in WordPress, you don’t have any point A and point B, you need to try every possible solution to find the source of the error. But PHP memory error in WordPress is easily fixed.
Let us begin introducing ways of fixing this error:
1. Increase PHP Memory Limit with wp-config.php
The first way to increase the PHP memory limit is from the wp-config.php file. This file includes commands your website uses. By default, your PHP memory is set to 32M. Without a doubt, this number is way too low to run a successful website. To increase this number, first, you need to have access to the wp-config.php file. You can find it in your root directory. With an FTP account or cPanel, you can access your File Manager (root directory).
It doesn’t matter which way you follow, you just need to have access to your file and be able to edit it.
If you are going to use cPanel, go to File Manager. Then, in your root look for wp-config.php file. Open the file in an editor.
You need to copy and paste the code below right after the “That’s all, stop editing! Happy blogging” sentence:
define(‘WP_MEMORY_LIMIT’, ‘256M’);
This code increases your PHP memory limit to 256 megabytes. You can increase this number to any amount you desire. However, we recommend not to go above 512 megabytes.
Don’t forget to save your changes after adding the code above to your file. We recommend downloading the wp-config.php file on your computer and re-upload it once you are done.
This method is one solution to your PHP memory limit error.
2. Increase PHP Memory Limit with php.ini
Another way to increase the PHP memory limit in WordPress is by using the php.ini file. You have two main ways to access this file. We mentioned them both below.
First, using your hosting panel. You need to log in to your hosting panel and enter File Manager. Look for the wp-admin folder. Open the folder and look for php.ini file. If you find the file in the said folder, download it on your computer. Open php.ini file. Look for memory_limit. Then, increase the number in front of it. By doing so, you increase your PHP memory limit.


If you can’t find php.ini in the wp-admin folder. You need to create it yourself. In your computer, create a file. Copy and paste the code below to it:
Memory_limit 512M
Keep in mind, you can change the number to any amount you require.
Now save the file with php.ini name and upload it to your wp-admin folder.
Second, connect to your host with SSH. In this method, you are going to be using SSH instead of cPanel to connect to your web hosting. Php.ini file can be found in “usr/local/lib/php.ini/”.
To open this file, you need to run this code, vi /usr/local/lib/php.ini and then press enter to run it. Once you have entered the code, php.ini file will be opened for you, edit it.
Look for memory_limit in the file. Click on : from your keyboard to go back to the command. After typing in /memory_limit you will be redirected to the memory limit section.
Now, click on “insert” on your keyboard and type in the required memory limit. After typing in the required number click on “Esc” on your keyboard to exit the insert mode. Click on : on your keyboard to go back to the command section. Then type in X and then click on “Enter” on your keyboard.
By doing so, you save all the of the changes you have made. Finally, type in service httpd restart to restart the system and run your changes.
3. Increase PHP Memory Limit with .htaccess
Other than the ways mentioned above, you can also increase your PHP memory limit from your .htaccess file. As you can probably tell, you need to make some changes to your .htaccess file.
You can look for this file in your root directory. Again, it doesn’t matter how you access your host. Whether it’s from cPanel or FTP, you just need to access .htaccess file.
Keep in mind, .htaccess file is a dotfile. Meaning, by default, some hosting providers hide this file.


If you want to access this file from FTP, you need to configure your FileZilla to show hidden files. To do so, click on the Server tab, then check Force Showing Hidden Files.
The best option is to download the file on your computer. Then edit it and upload it back to your host. Therefore, the first step is to download the file.
Open .htaccess file and look for php_value memory_limit 512M, if you couldn’t find it in the file, you can add it to the .htaccess file.
As you can probably tell, the memory limit is set to 512 megabytes here. You can change this number to any amount you require. Make sure you save your changes to the .htaccess file.
Upload the file back to your host. Once the file is uploaded, refresh your Root directory. Then refresh your site and see if the error is fixed or not.
4. Increase PHP Memory Limit in cPanel
Another way to increase the PHP memory limit is from cPanel. You have two main ways of changing your PHP memory in this method.
The first way, you need to login to your cPanel and go to the Software section. Click on Select PHP Version. Then click on Switch to PHP Options. Finally, click on memory_limit to increase the PHP memory limit.
The second way, from your cPanel, go to the Software section. Then, click on MultiPHP INI Editor. From the opened page, scroll down and locate memory_limit. Here you can easily change the PHP memory limit.
5. Increase PHP Memory Limit in Plesk
First, let us introduce Plesk. What is Plesk? Plesk is a hosting control panel. Plesk is used both by Windows and Linux.
Through the graphical interface in Plesk, you can control your server’s activities. Creating a new website, reseller, email accounts and DNS entries are only some of the features offered by Plesk.
To use Plesk to increase the PHP memory limit of your website, first, you need to log in. Like cPanel, when you purchase a WordPress hosting, you get a username and password. With the given username and password, log in to your Plesk hosting panel.


After logging into Plesk, to increase your PHP memory limit, follow the path below:
Plesk > Domains > example.com > PHP Settings > memory_limit
Then change your memory_limit. As you can see, this method only works if you want to increase the PHP memory limit of a specific website. But if you want to increase your server’s PHP memory limit, you need to follow the path below:
Plesk > Tools & Settings > PHP Settings > PHP handler > php.ini
Now in the php.ini file, look for memory_limit. Change the amount in front of it to your desired amount. Don’t forget these Settings only work for domains with the default PHP memory limit.
6. Increase PHP Memory Limit in GoDaddy
GoDaddy is one of the most popular hosting providers. In this provider, the default PHP memory limit is set to 64 Megabytes. If you want to increase this amount, follow the steps below:


- First, go to GoDaddy login page and enter your hosting panel.
- Select File Manager.
- From the Root directory, create php5.ini file (if the file already exists on your server then edit it and add memory_limit = 256M to it)
- Add memory_limit = 256M to your php5.ini file.
- Save your changes.
- When you open your PHP file, your changes may have not yet been activated.
- Your actual work begins now. In your hosting panel, from Stats & Monitors click on System Processes.
- Locate End All and click on it.
- Now open PHP info file in your browser and check your PHP memory limit.
7. Increase PHP Memory Limit in WHM
WHM is short for Web Host Manager. With the help of this powerful software, you can access your Back-end, cPanel. To change and increase your PHP memory limit, first, you need to enter your WHM login. Once you are logged in, from the left-hand side menu, click on the PHP Configuration Editor.
From the opened menu, locate memory_limit. You only need to change the amount in front of memory_limit and save your changes.
After making the changes, your php.ini file is automatically opened. You can check your memory_limit and make sure your changes are saved.
8. Increase PHP Memory Limit in XAMP
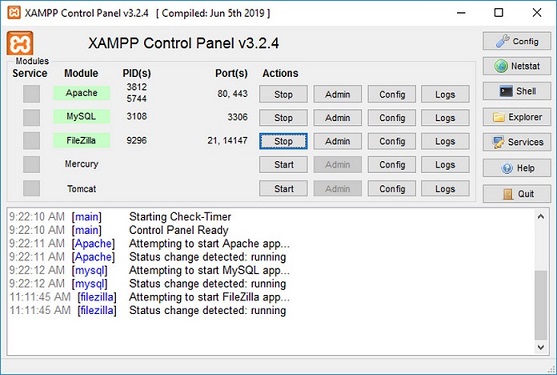
One of the easiest ways to increase the PHP memory limit is in XAMPP. As you know, XAMPP is a web hosting simulator. It simulates the server environment on your computer and you can manage your website and server locally.


To change the PHP memory limit in XAMPP first go to C:\xampp\apache\bin\php.ini. Open PHP.ini file and locate memory_limit. You just need to change the amount in front of memory_limit to increase your PHP memory limit in XAMPP.
Make sure you save your changes.
9. Contact Your Host
If for any reasons you couldn’t follow the steps mentioned above to increase your PHP memory limit, you need to contact your hosting provider. In some hosting providers and shared hosting services, you cannot create nor you have access to php.ini file.
Therefore, users cannot increase their PHP memory limit on their own. Thus, the only way to increase your PHP memory limit is to contact your hosting provider. In some hosting providers, you cannot increase your PHP memory limit.
In this case, you need to change your hosting provider and make sure you can change your PHP memory limit and many other features in the new hosting provider.
After contacting the hosting provider supports team, they explain how you can increase your PHP memory limit, or they will do it for you.
WP_MEMORY_LIMIT is not Increasing
In this article, we tried to cover every possible way to increase the PHP memory limit. But as we mentioned before, these ways may not work for you. Even if you follow the steps above, they may not work for you. Don’t be surprised.
As mentioned above, sometimes these changes won’t work because the hosting provider you have purchased doesn’t allow you nor will they change your PHP memory limit. Therefore, users are forced to change their hosting provider.
If this article was helpful to you, leave your comments down below. Also, if you know any other way that we didn’t mention in this article, do let us know.


