Would you like to know how to screen record on iPhone? Whether you are trying to demonstrate a bug to a customer service representative or you are demonstrating an iPhone task for your coworkers, it is always beneficial to be able to screen record your iPhone quickly and easily.
Fortunately, Apple has made it easy to take native screen recordings on any modern iPhone with iOS 14, released in 2020. Read on to learn how to access and use the built-in tool.
How to Screen Record on an iPhone?
To screen record on an iPhone, you need any iPhone running iOS 14.0 or later. You can do this work in less than 1 minute. Follow these steps:
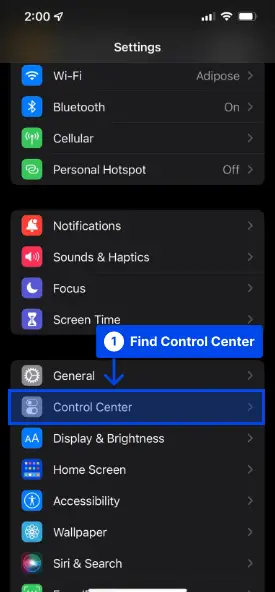
- Open your Settings app and find “Control Center“
With iOS 14 in 2020, Apple added a quick and easy way to record your screen. However, enabling this feature will be required. You can do this by opening the Settings app and finding the Control Center.
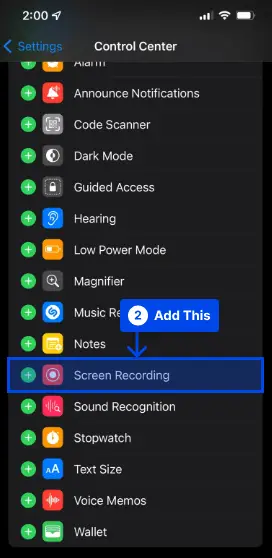
- Add the Screen Recording button to your Control Center
When you are in the Control Center section, you will see a couple of toggles, an “Included Controls” section, which contains all of the options that have already been added to your Control Center, and a section named “More Controls“.
You may need to scroll down a bit depending on the number of controls you have activated. Click the green + icon to the left of Screen Recording in the More Controls section.
By doing this, it will be added to the Included Controls section and will be accessible from the Control Center.
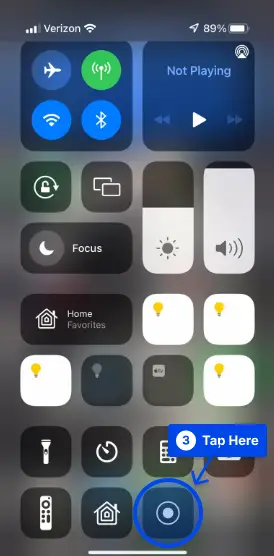
- Open your Control Center
Your next step will be to open Control Center. The Control Center can be accessed from the home screen or from most iPhone apps.
If your iPhone does not have a physical Home Button, you can access it by swiping down from the top right corner of your screen.
On iPhones that have a physical Home Button, you can reach it by swiping up from the bottom of the screen.
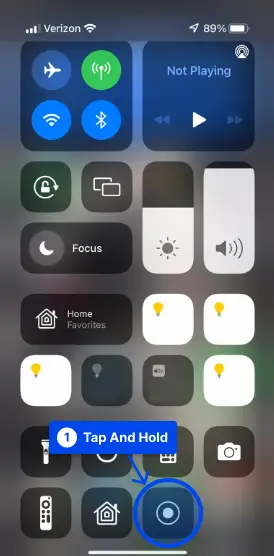
Open the program and scroll through your options until you locate the button that resembles a solid circle within a hollow circle.
- Begin screen recording
Tap the Screen Recording button when you are ready to begin recording. This will start a three-second countdown, at the end of which the recording will begin.
Before the video capture actually begins, you may use this countdown time to close the Control Center and return to the true subject of your Screen Recording.
During recording, the Screen Recording button in Control Center will turn white and the icon within it will turn red to indicate that recording is taking place. Your display will also feature a red indicator surrounding the clock on the top left.
- End your recording
When you are ready to end your recording, there are two methods to do so. The first method involves tapping the red clock in the top left corner of your screen.
You will be prompted with a dialogue box when you have finished recording. You will need to tap “Stop” to end the recording.
Additionally, you can tap the Screen Recording button in your Control Center if you are within a full-screen app that hides the clock.
This second method will result in the recording ending immediately without the need for confirmation.
You will receive a notification that the recording you just made has been saved to your Photos library in both cases. Your iPhone’s Photos application allows you to playback, share and edit videos just as you would.
How to Screen Record with Audio on an iPhone?
Aside from recording your screen, the iPhone’s screen recording feature allows you to record yourself talking simultaneously.
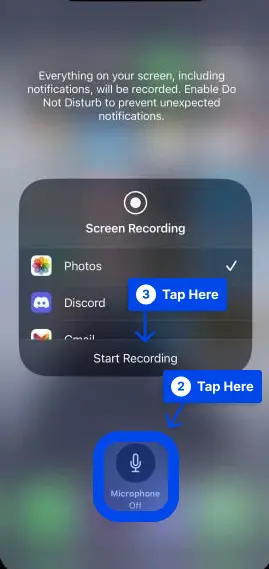
To turn your microphone on while recording the screen, follow these additional steps before pressing “Record” to screen recording.
- Tap and hold the Record button.
- Upon activation of the pop-up screen, select the Microphone icon at the bottom and then click Start Recording. You will see the countdown begin.
- Tap twice to exit the screen and close the Control Center.
- The microphone will now be activated whenever you begin recording.
When you do not wish to use your microphone, you can turn it off by returning to this screen and pressing and holding the microphone icon.
How to Open and Edit Your Screen Recording?
Screen recordings are stored in the Camera Roll of your iPhone’s Photos app. You can view and edit them there. You may then edit the video using the iPhone’s editing tools and add filters, trim the beginning or end, and save it as a new clip.
- Open the Camera Roll album in the Photos app and tap the video.
- Tap Edit in the top right-hand corner of the screen.
- On the bottom of the screen is a visual timeline showing the video’s progress. You can trim the video by tapping and dragging the arrow beside the Play button to the right. By tapping and dragging the left arrow, you can trim the end to the desired length.
- The new version of the video can be viewed by pressing the Play button. You should adjust the arrows until you are satisfied with the result.
- Apply filters using the same buttons that you would use in the Photos app to edit a photo.
- Once you have completed editing the video, tap Done → Save as New Clip.
Conclusion
In this article, we explained the methods of screen recording on an iPhone with and without audio and how to open and edit your screen recordings.
We suggest you our related article about taking screenshots on Mac if you are an Apple lover.
Thank you for reading this article. If you have any questions regarding it, please do not hesitate to comment.
The sharing of this article on social media would be greatly appreciated. Please follow us on Facebook and Twitter as well.


