Not sending emails (or sending broken emails) are two of the most commonly occurred issues in WooCommerce. For example, one of your customers may not receive their purchase notification email. Which then could lead to an ultimate panic that you’ve taken his/her money and ran off.
This issue also occurs when a website admin doesn’t receive WooCommerce or any notification emails after a customer makes a purchase. This usually happens when your plugins aren’t configured correctly or they are not compatible with HHVM or PHP 7.
In this article, we would like to discuss WooCommerce emails not sending, and finally, we will introduce methods to fix it this issue once and for all.
Check WooCommerce Email Settings
The very first step you need to take is to check your WooCommerce email settings. Scroll down until you find email sender options. Simply follow the steps below.
Email Sender Options in WooCommerce
To check Email sender options, first, head over to your WordPress dashboard, hover over WooCommerce, and click on Settings.
Now, click on Emails Tab. Scroll down until you see Email Sender Options and make sure you have the correct information in “From” name and “From” address fields.
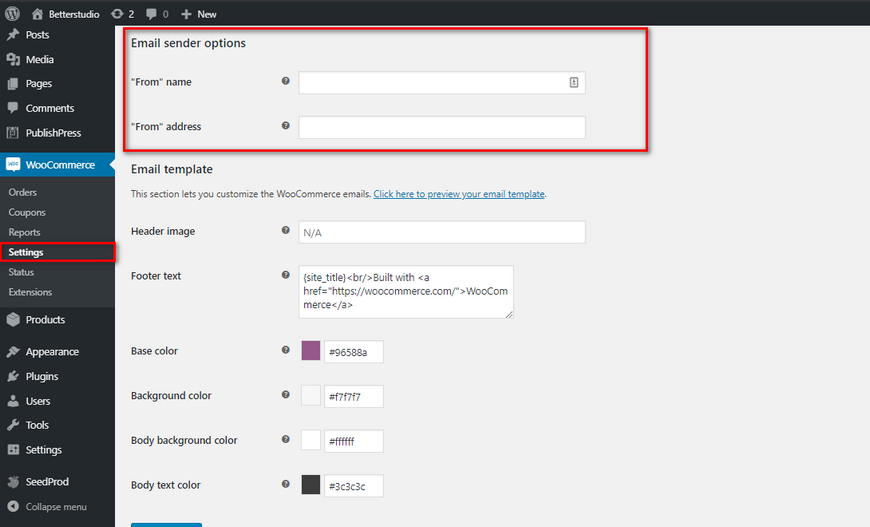

“From” name is the name you want your audience to see in their email inbox. Make sure you are not using any special characters. You are only allowed to use the alphabet. If currently, you are using yourname@BusinessName as your “From” name, then this is the problem.
In the “From” address section, make sure you are using the correct email address. If you need to make any changes in both of these settings, do so and finally click on Save Changes.
Test Your Webmail Server
With the Check Email plugin, you can simply run a test to check your WordPress webmail server. By doing so, you can tell if your current configurations are correct or not.
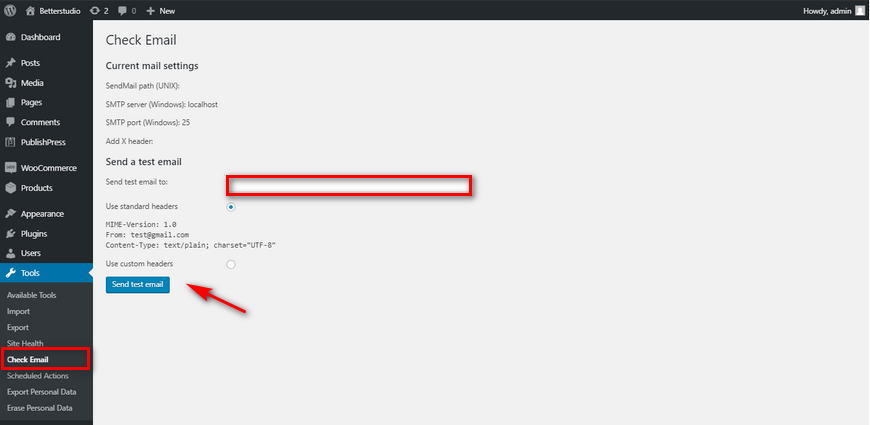
After installing the plugin, from the Tools menu, click on Check Email.
Enter an email address and click on Send test email. By doing so you test your WordPress webmail server.
A message will be displayed showing the email has been sent. Now, open the email address you used for the test and make sure you have received an email from your server.

The subject would be “Test email from https://yourdomain.com”. Also, check spam and junk files.
If you have received an email, it means that your webmail server is working perfectly fine. Therefore, there is no issue with your plugin’s configuration.
You can then contact the plugin developers team and tell them about the issue. Make sure you tell them that you have done the test above.
Check the WooCommerce Email Log?
If your website’s webmail server is working perfectly fine, then the issue could be on the receiver’s end. Meaning they are using a service that considers your emails as spam.
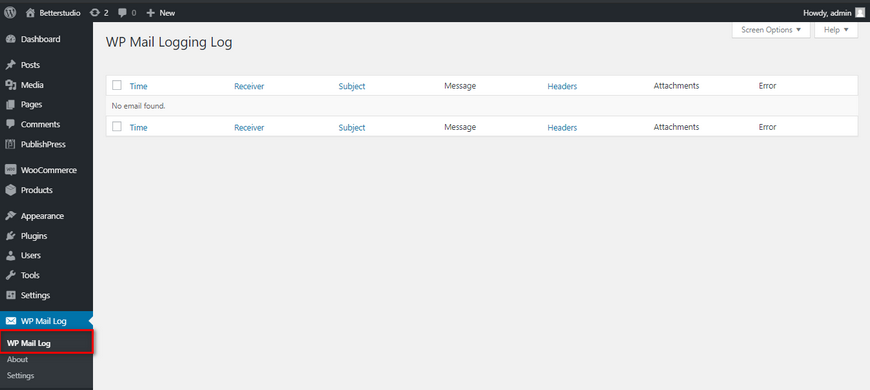
By installing the WP Mail Logging plugin, you can view all the sent emails. After downloading and activating the plugin, send a test email.
From your WordPress dashboard, go to the WP Mail Log plugin.
From the plugin’s page, you can check if your email has been sent or not. Also, if any problem occurs during the process, you can see the log to resolve any occurred issues.

If your email has been sent but not received, follow the steps below:
- From your WordPress dashboard, hover over WooCommerce and click on Settings
- Then go to Emails Tab.
- Make sure “From” Address is the correct email. If you are using @gmail.com, if your server isn’t connected to Gmail servers, your emails will be sent to the spam folder of your recipient.
- By using an SMTP server, you can fix this issue.
Use a Different Email Service to Receive Emails
Sometimes the notification problem is specific to you. Meaning, your website users can receive their email notifications but you can’t receive anything.
Some WooCommerce users strongly believe this problem occurs when you and your website’s user use the same email service.
For example, the sender’s email is example@yourdomain.com and the recipient’s email is person@yourdomain.com. They’re both using yourdomain.com. Using a different email service could fix this issue.
From your WordPress dashboard, go to WooCommerce and click on Settings.
Then, click on Emails Tab and find the notification that’s broken. Choose a new email address and click on Save Changes.
Check If Your Emails Are Not Sent to the Spam Folder
Your emails may be sent to the spam folder rather than the inbox of your recipient. It is probably because your web hosting’s IP address has been blacklisted. This could be the reason why your emails have landed in the spam folder of your recipients.
To fix this issue, you can contact your hosting provider, tell them about the issue, and ask them to help you. If your hosting provider can’t help you and you are happy with the other services that they provide and for any reason don’t want to change your hosting provider, then, you have to use an SMTP plugin. We will explain what SMTP is and how can you install it on WordPress down below.
What is SMTP and How to Install it on WordPress?
SMTP stands for Simple Mail Transfer Protocol and most websites on the internet use this protocol to send and receive their emails. An SMTP server is a computer running SMTP and acts like the postman delivering your daily mail. Once you sent out emails, they are picked up by the server and the server delivers the emails to their recipients.
SMTP servers are way more secure than your regular webmail. As you probably know, Gmail is the most secure emailing platform on the internet, and having SMTP on your website, is exactly like having Gmail connected to WordPress and using it to send and receive emails.
Nowadays, due to security reasons, most hosting providers restrict access to PHP mail function of a WordPress website, that is why you are resolving this issue by adding SMTP to your website. Let us introduce one of the greatest SMTP services that you can use to add SMTP to WordPress without knowing any programming knowledge.
Without further ado, let’s begin.
Install Sendinblue SMTP in WordPress
Sendinblue is a powerful SMS and email marketing service for businesses that are running their website on WordPress and other platforms. This plugin comes with a lot of features that allow you to create a gorgeous looking email marketing campaigns and newsletters.
Furthermore, it comes with a tool that enables you to send emails to a targeted audience based on how they act on your WordPress website. Sendinblue comes with an easy to use email template builder that supports the drag and drop feature.
With the free version of this plugin, you can send 300 emails per day. Thus, the free version is only useful for small businesses. However, if you would like to send more than 300 emails per day, we recommend upgrading to the premium version.
In another article, we have explained in detail how to install and configure the Sendinblue plugin in WordPress. However, we will briefly explain it.
Simply, download, install, and activate the plugin from the WordPress dashboard. Go to Plugins > Add New > search for Sendinblue in the search box. Proceed to install and then activate the plugin.
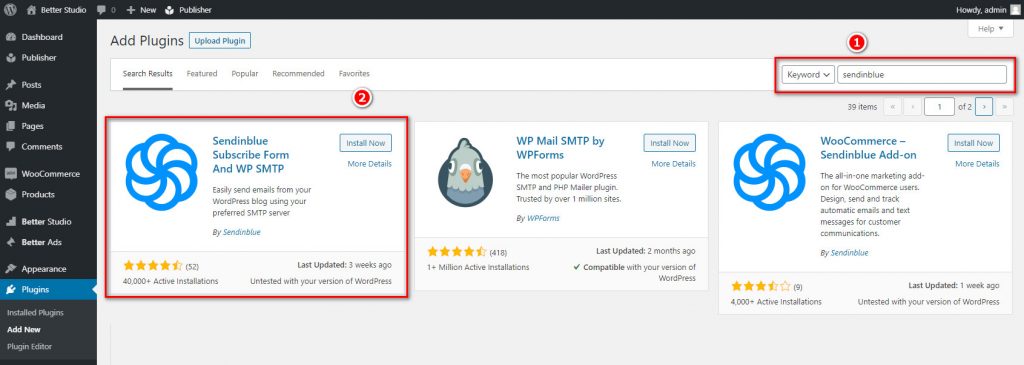

But you will need to create an account on their website and activate it in order to use the plugin. Once you have activated your account, go to your API tab and copy your plugin’s API and paste it in the plugin to activate the plugin as well.


Once the plugin is activated it will look like this.
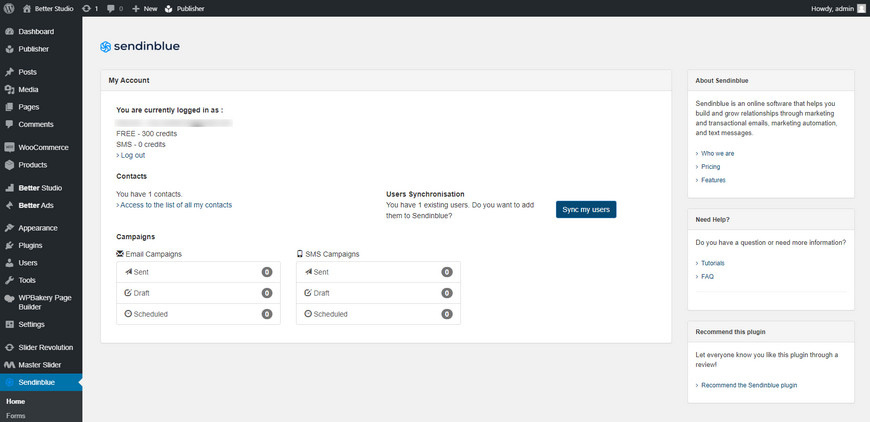

That’s all you need to do to use SMTP on WordPress. If you are looking for more SMTP plugins, have a look at our previous article where we introduce 5 best SMTP plugins for WordPress.
Conclusion
In this article, we discussed why WooCommerce emails are not sending and provided strong solutions for it. We’ve introduced the best SMTP plugins that you can install on your WordPress website to start sending out WooCommerce emails once again and interact with your customers.


