Expires Headers are certain lines of code that tell your browser how long it should keep the cached files from your site. You can add Expires Headers by adding a code such as ExpiresByType image/jpg “access plus 1 month” to your site. You can find other forms of it below.
One of the most common errors we face when speed testing our websites on GTmetrix is ‘add Expires headers’.
As you can probably tell by the name of this error, you must increase the time your files (such as images, HTML, CSS, and JavaScript) stay on your website’s cache. Caching has a direct impact on site speed and site speed is a major SEO factor.
When a user enters your website they will automatically download some files. Each of these files has an expiration date and they stay for a certain amount of time in your cache.
When the time is too low you will face ‘your server is not using expires header for your images.’ Here is how to add expires headers to .htaccess file.
What are Expires Headers?
When a user visits a website, the browser will automatically load files and save them in the memory. So, when the user decides to check other web pages of the same website, there is no need to reload all the files.
Expires headers give the command to your browser to download and store these files.
The reason behind this is to reduce the send and receive between your computer and the server (website) and use the data stored in your cache.


This is why when you enter a new website, it takes a bit longer to load compared to 2nd and 3rd time loading the website. A web page contains different files such as HTML, CSS, JavaScripts, Graphics, Images, PDF and other files and often the number of these files goes up to 25.
Whenever a new user enters your website, all of these files are requested from your server.
Each request takes time. But when files are stored in the memory the number of requests will decrease automatically. Your website will load faster and the user’s bandwidth won’t be wasted.
But the question is, how long should the data stay in the browser’s cache? In order to prevent users from re-downloading shared files between pages, an expiration date should be defined for them.
The defined date tells browsers which file to request from the server and which file to request from the cache.
How to Add Expires Headers to .htaccess?
To add Expires Headers to your site, you need to edit the .htaccess file.
Simply download the .htaccess file from the root of your host (it may be hidden) and add the code below:
## EXPIRES CACHING ##
<IfModule mod_expires.c>
ExpiresActive On
ExpiresByType image/jpg "access plus 1 month"
ExpiresByType image/jpeg "access plus 1 month"
ExpiresByType image/gif "access plus 1 month"
ExpiresByType image/png "access plus 1 month"
ExpiresByType text/css "access plus 1 month"
ExpiresByType application/pdf "access plus 1 month"
ExpiresByType text/x-javascript "access plus 1 month"
ExpiresByType application/x-shockwave-flash "access plus 1 month"
ExpiresByType image/x-icon "access plus 1 year"
ExpiresDefault "access plus 2 days"
</IfModule>
## EXPIRES CACHING ##
First, we activate the “expirations” file. Then we add a different line for every file. Now go back to the code and change the date however it fits your website.
As a default, we have set this time for your files to be stored on the browser’s cache to 1 month, 1 year and 2 days.
After a month, if the user visits your website again, their browser will request these files. After making your changes to .htaccess file make sure you save it and upload it back to your website’s root.
Note: If the .htaccess file is hidden, you may have to use FTP to enable the “Show Hidden files” option.
How to Add Expires Headers to WordPress?
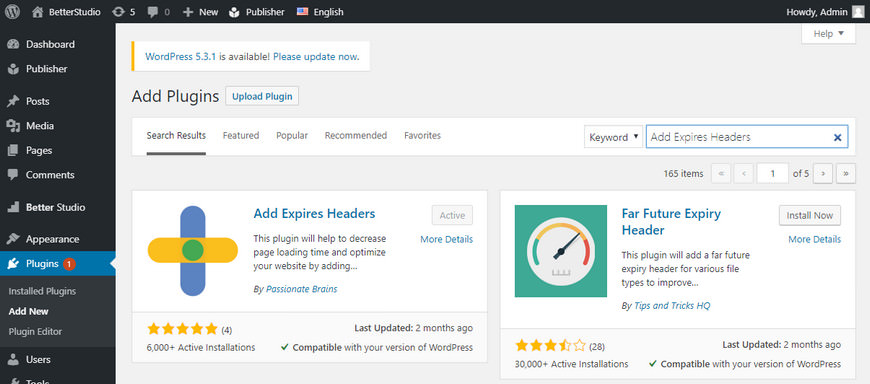
Adding lines to the .htaccess file can cause some troubles. An easy way to handle this task is to use the Add Expires Headers plugin.


To add Expires Headers to WordPress take these steps:
- Open WordPress dashboard
- Go to Plugins > Add New
- Search for ‘Add Expires Headers‘
- Click on Install now and then Activate
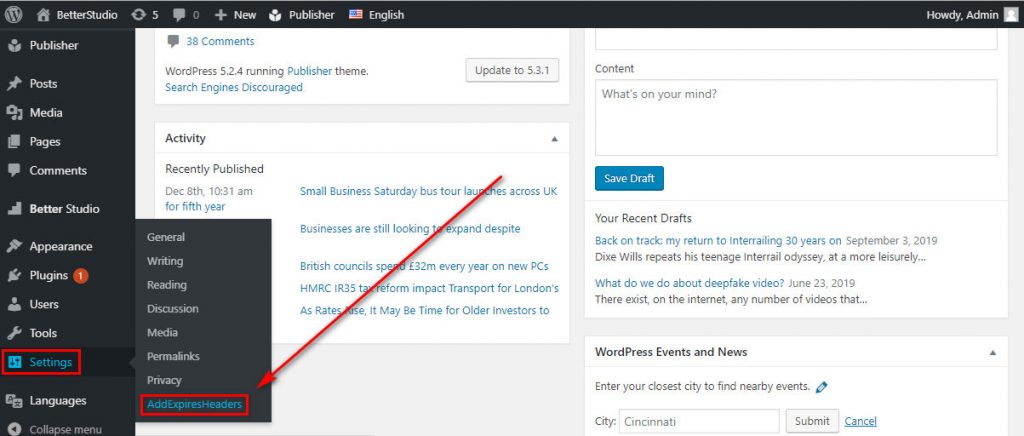
- Go to Settings > AddExpiresHeaders
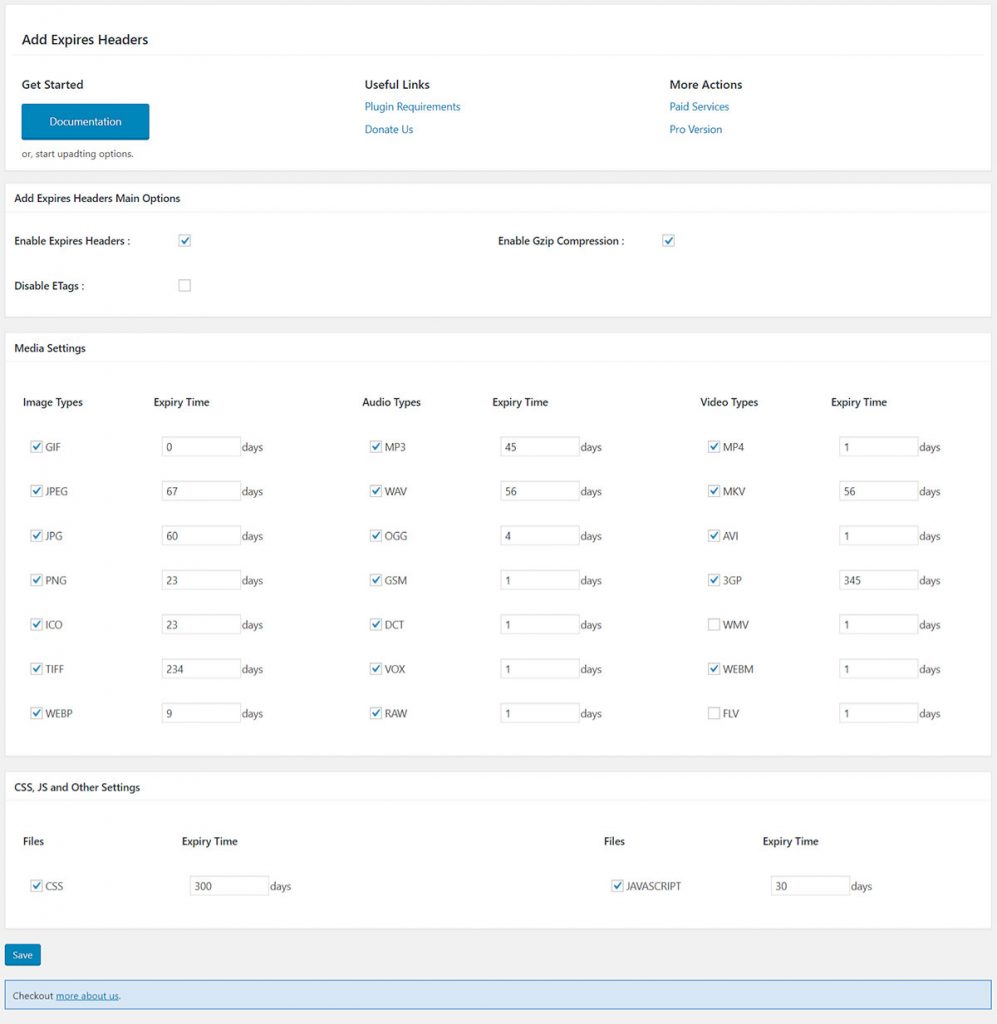
- Choose the Types and Expiry Times the way you wish
- Click on Save


You can choose the file types and how long you want them to be cached. Below you can see an example of how this section can be configured. (Click to see it larger.)
Caching plugins such as W3 Total Cache also add expires headers to .htaccess file, although they have a much broader function.
How long the caching time of a file should be?
The duration of the cache can be set in years, months, weeks, days, hours, and even seconds.
Your expiration date shouldn’t be unrealistic. The expiration date of each file should be set based on the amount of time it’s being used/requested. If you plan to store your files in your browser’s cache for more than a year, we recommend you to optimize your browser.
The expiration date of images can be set to one year since they are not easily changed and they take the most time to load.
HTML, CSS, and JavaScript need regular updates so we recommend to set their expiration date to a month.
What files are saved in the cache?
First, you need to identify which files you frequently update and which one you do not. Here is a list of said files:
- Jpg, jpeg, gif, and png
- Favicon/ico
- Javascript
- CSS
- Shockwave-flash


Now you must select the files you wish to update on a regular basis. Most images will remain the same on websites, favicon may also remain the same, javascript and CSS may face some changes.
Now it’s time to add expires headers to .htaccess file to avoid getting “add expires headers” error.


One Comment Leave a Reply
Thanks, it worked well on My Site